Blog posts about Education, CyberSecurity, Digital Citizenship, Privacy, InternetSafety, curation, PKM, PLN, blogging, Global Collaboration, Coaching, Collaboration, eSkills, eLeadership, Coding, MakerED, MakerSpace, Social Media, How to learn, learning to learn
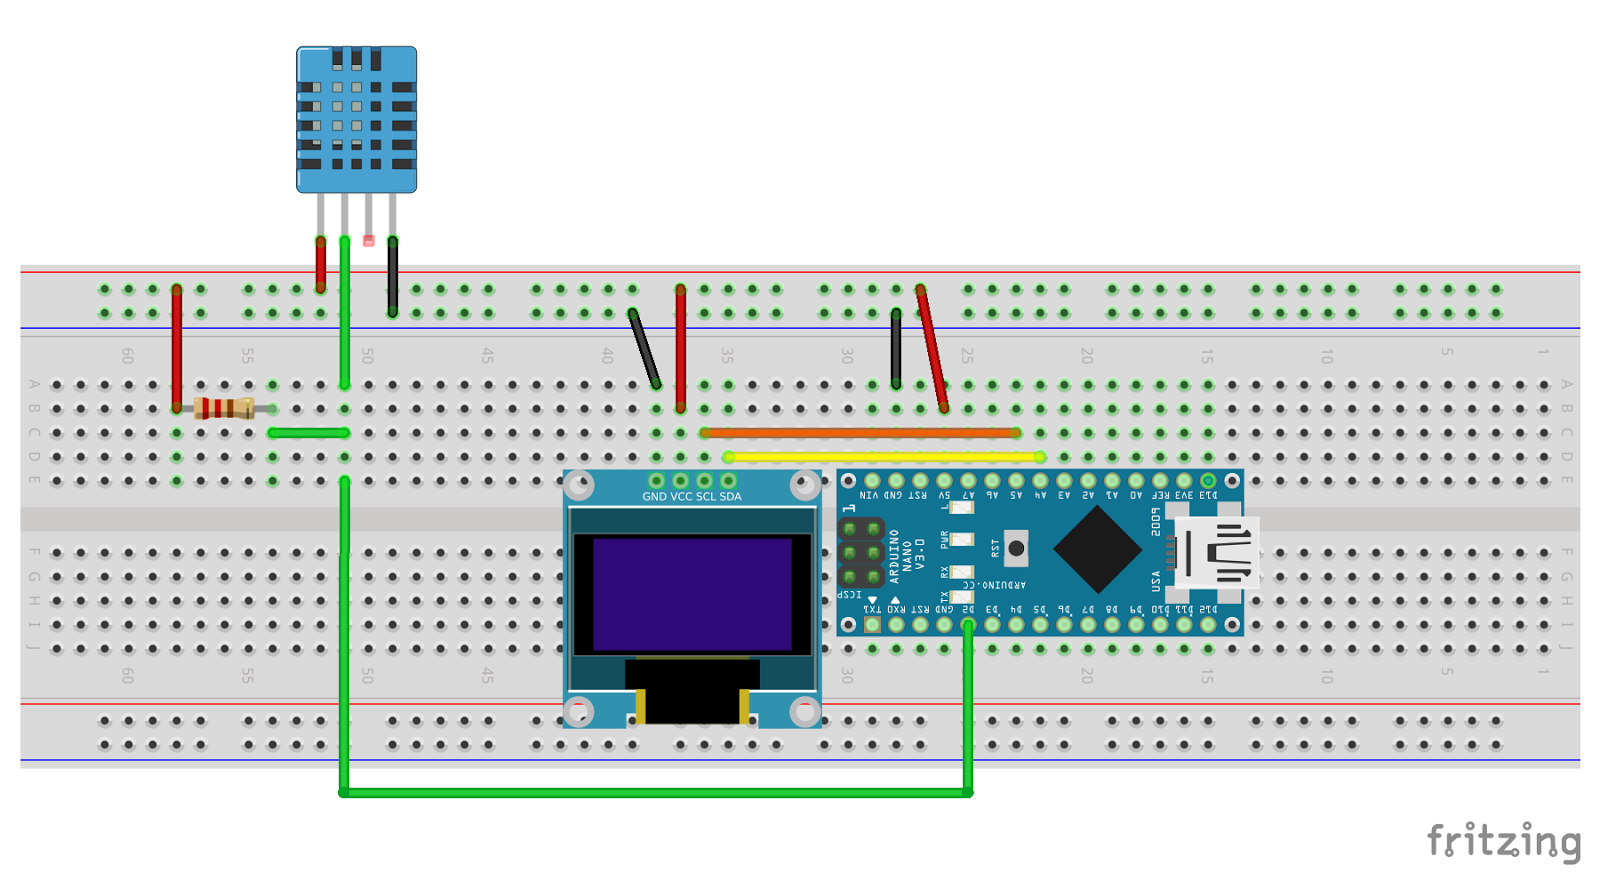
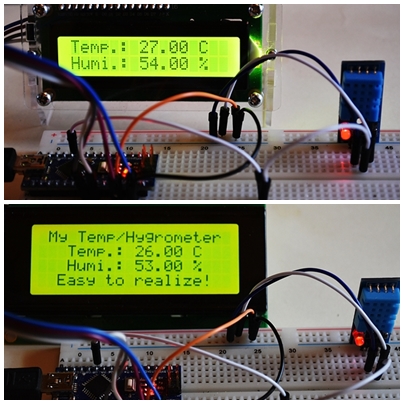
In this tutorial WE will use the BREAKOUT of the GROVE Pressure-Module BME280 together with a NORMAL I2C LCD1602 display, ONLY 4 wires to connect. At that moment I didn’t yet receive my ordered GROVE LCD1602 display, so the suspense was great to find out… I was curious to find out if that would ALSO work and it did with a few changes of code.
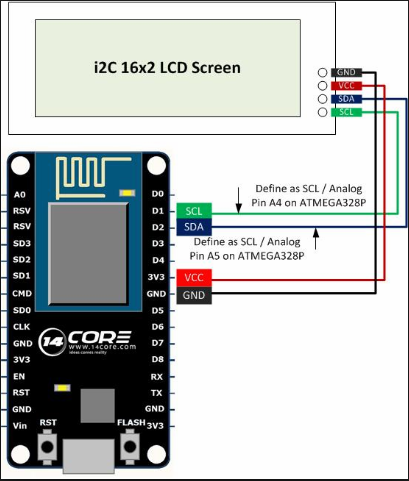
Check out the wiring below, please:
.
.
I2C LCD1602 SEEEDUINO MAINBOARD
+ 5V <======================> + 5V
GND <======================> GND
SDA <======================> SDA
SCL <======================> SCL
The Code
.
Click image, please, to enlarge.
.
Find here below, please, the Code for download in “.odt Format”:
Have fun learning with PracTICE and stay tuned for next adventures of learning 😉
.
L’auteur Gust MEES est Formateur andragogique / pédagogique TIC, membre du “Comité Conseil” de “Luxembourg Safer Internet” (LuSI), appelé maintenant BEESECURE, partenaire officiel (consultant) du Ministère de l’éducation au Luxembourg du projet ”MySecureIT“, partenaire officiel du Ministère du Commerce au Luxembourg du projet ”CASES” (Cyberworld Awareness andSecurityEnhancementStructure).
The author Gust MEES is ICT Course Instructor, ”Member of the Advisory Board” from “Luxembourg Safer Internet” (LuSI), BEESECURE, Official Partner (Consultant) from the Ministry of Education in Luxembourg, project “MySecureIT“, Official Partner from the Ministry of Commerce in Luxembourg, project “CASES” (Cyberworld Awareness and Security Enhancement Structure).
.
..
Keywords necessary for me to create this blog post: Arduino UNO R3, Arduino NANO, Grove, Grove Beginner Kit for ARDUINO, Coding, Maker, MakerED, Maker Spaces, LCD1602, BME280, Pressure, Altitude Monitor, I2C, SEEEDSTUDIO,
In this tutorial WE will use the BREAKOUT of the GROVE Pressure-Module BME280 together with a GROVE LCD1602 display. As the GROVE LCD1602 display is not included in the Grove Beginner Kit for Arduino, WE will need to buy it! Here below the address:
Connections of the GROVE BME280 and the GROVE LCD1602 on I2C BUS
.
Well, as you can see in above photo there is NO cabling!! You just need to connect the connectors from the BME280 and the LCD1602 to the I2C BUS. Less than a minute work and you are ready to upload the code, which you will find in below link:
Have fun learning with PracTICE and stay tuned for next adventures of learning 😉
.
L’auteur Gust MEES est Formateur andragogique / pédagogique TIC, membre du “Comité Conseil” de “Luxembourg Safer Internet” (LuSI), appelé maintenant BEESECURE, partenaire officiel (consultant) du Ministère de l’éducation au Luxembourg du projet ”MySecureIT“, partenaire officiel du Ministère du Commerce au Luxembourg du projet ”CASES” (Cyberworld Awareness andSecurityEnhancementStructure).
The author Gust MEES is ICT Course Instructor, ”Member of the Advisory Board” from “Luxembourg Safer Internet” (LuSI), BEESECURE, Official Partner (Consultant) from the Ministry of Education in Luxembourg, project “MySecureIT“, Official Partner from the Ministry of Commerce in Luxembourg, project “CASES” (Cyberworld Awareness and Security Enhancement Structure).
.
.
.
Keywords necessary for me to create this blog post: Arduino UNO R3, Arduino NANO, Grove, Grove Beginner Kit for ARDUINO, Coding, Maker, MakerED, Maker Spaces, LCD1602, BME280, Pressure, Altitude Monitor, I2C, SEEDSTUDIO,
As MOST of YOU know, I am an autodidact, a self-directed learner. I learn BETTER by doing it on my own, by searching my own articles, relevant to the topic which needs to get learned. Pursuing ALSO my learning by choosing the books which I decide to buy for my Professional Development! This time YOU will see a lot of “I’s” in my blog post here, different from usual, where I mostly use the WE. WHY!? Because it’s ME who is owning MY learning and I decide WHAT is BEST for me, that is working perfectly, I learn MUCH quicker! 😉
Another reason WHY I learn on my own is the BAD quality of courses around where adults are getting treated as pupils (Pedagogy) and NOT as mature persons (Andragogy)!! Aged 62 years (2017), I DON’T want to get treated as a 12 years old in courses, I won’t feel comfortable at all!! It’s about time that EDUcators, TEACHers, Instructors get training about ANDRAGOGY!
WHAT is Andragogy?
Text from Wikipedia: Andragogy refers to methods and principles used in adult education.[1][2] The word comes from the Greek ἀνδρ- andr-, meaning “man”, and ἀγωγός agogos, meaning “leader of”; it literally means “leader of man”, whereas “pedagogy” literally means “leading children”.[3]
FIRST of all, DON’T fear about learning new stuff, even if it feels strange and NOT understandable up from the beginning!There might be strange words in the learning texts which YOU don’t know YET; but by reading different texts you will understand these words and later understanding ALSO the whole! I learnt that way, it takes time on the beginning, BUT later you will learn very quickly! It’s like an exponential curve…
MUST follow names in EDUcation and also from successful people:
Howard GARDNER
Sir Ken ROBINSON
Jack MA
Daniel GOLEMAN
John HATTIE
Owning the LEARNing
Personally I am convinced and PracTICE with students, learners showed me ALSO, that when owning its learning boosts learning and even accelerates it!! The learners are more motivated to learn as they are engaged in the learning process! I did THIS MOSTLY through Curation! Learn more below please:
L’auteur Gust MEES est Formateur andragogique / pédagogique TIC, membre du “Comité Conseil” de “Luxembourg Safer Internet” (LuSI), appelé maintenant BEESECURE, partenaire officiel (consultant) du Ministère de l’éducation au Luxembourg du projet ”MySecureIT“, partenaire officiel du Ministère du Commerce au Luxembourg du projet ”CASES” (Cyberworld Awareness andSecurityEnhancementStructure)..
The author Gust MEES is ICT Course Instructor, ”Member of the Advisory Board” from “Luxembourg Safer Internet” (LuSI), BEESECURE, Official Partner (Consultant) from the Ministry of Education in Luxembourg, project “MySecureIT“, Official Partner from the Ministry of Commerce in Luxembourg, project “CASES” (Cyberworld Awareness and Security Enhancement Structure).
.
.
.
Keywords necessary for me to create this blog post: Blogging, blogs, Infographics, Text links in my article, I, ME, MY, owning MY learning, making OWN choices for learning, Curation, PKM, Knowledge Management, LEARNing2LEARN, Autodidact, Engagement, Andragogy, Heutagogy…
WHAT gifts to buy for the kids for Xmas and Holidays?
Every year the same question, isn’t it!? WHY not thinking about to buy gifts from where and with that the kids will learn? It might be good to have a look on WHAT are the skills required for the future from youth, students, learners and upon that making your choice! Actually (2020) the trends are in the maker scene and coding scene! Engineers, coding people and ICT specialists are needed, the workforce, industry is searching!!
WHAT is the Coding Scene?
Coding is THE 21st Century skill. Coding enhances creativity, teaches young people to cooperate, to work together across physical and geographical boundaries and to communicate in a universal language. Technology is part of our life, and coding brings it closer to you!
Well, I started myself years ago as a NEWBIE in Coding and so I tried out different stuff, whereby I became a fan of ARDUINO. Here below my gift selection for Christmas (Xmas) which I recommend:
While reading my above tutorials, you will find ALSO more examples in my blog about “Coding with Arduino, etc.); stay tuned for next tutorials with LEARNingByDoing with FUN and PracTICE 😉
.
.
L’auteur Gust MEES est Formateur andragogique / pédagogique TIC, membre du “Comité Conseil” de “Luxembourg Safer Internet” (LuSI), appelé maintenant BEESECURE, partenaire officiel (consultant) du Ministère de l’éducation au Luxembourg du projet ”MySecureIT“, partenaire officiel du Ministère du Commerce au Luxembourg du projet ”CASES” (Cyberworld Awareness andSecurityEnhancementStructure)..
The author Gust MEES is ICT Course Instructor, ”Member of the Advisory Board” from “Luxembourg Safer Internet” (LuSI), BEESECURE, Official Partner (Consultant) from the Ministry of Education in Luxembourg, project “MySecureIT“, Official Partner from the Ministry of Commerce in Luxembourg, project “CASES” (Cyberworld Awareness and Security Enhancement Structure).
.
.
Keywords necessary for me to create this blog post: Arduino UNO R3, Arduino NANO, Grove, Grove Beginner Kit for ARDUINO, Coding, Maker, MakerED, Maker Spaces, OLED, DHT11, Temperature and Humidity Monitor, I2C, SEEDSTUDIO, Robots, Robot car,
Once cut out you have made the BREAKOUT and in this case the two modules “OLED Display 0.96 inch” and “Temperature/Humidity” modules are ready to get connected to the main module. NOW we have to connect them through the delivered connection cables. Here below a picture:
.
.
As you can see, the OLED-Module is connected to the I2C connector, while the “Temperature/Humidity-Module” is connected to the “D3” connector. See PIC below, please:
.
.
SO WHY the “D3” connector for the “Temperature/Humidity-Module”?! Well, let us have a look on the code:
.
.
As you can see in this shown part of the code, there is marked ===> “#define DHTPIN 3“, SO it should GET connected to the “D3-connector” on the main board! If you use “D4” or whatever connector, SO you should change the code from “3” to “4” and so on!!! Give it a try and play around with it for understanding 😉
.
Temperature/Humidity on OLED Display | THE Code
Well, the two connections with the provided cables with connectors took ONLY a few seconds, ISN’T it? 😉 Let’s GO now to upload the code. Open your “Arduino IDE“, click on “NEW“, erase the few lines marked in there, make a “Copy&Paste” from the mentioned Code below and paste it in the “Arduino IDE (NEW)” and upload it, here below the code:
As you can see there is a “special” indication on the display, THE “Heat Index“, WHAT is it?! I encourage you to read my following tutorial which explains:
Have fun learning with PracTICE and stay tuned for next adventures of learning 😉
.
.
L’auteur Gust MEES est Formateur andragogique / pédagogique TIC, membre du “Comité Conseil” de “Luxembourg Safer Internet” (LuSI), appelé maintenant BEESECURE, partenaire officiel (consultant) du Ministère de l’éducation au Luxembourg du projet ”MySecureIT“, partenaire officiel du Ministère du Commerce au Luxembourg du projet ”CASES” (Cyberworld Awareness andSecurityEnhancementStructure)..
The author Gust MEES is ICT Course Instructor, ”Member of the Advisory Board” from “Luxembourg Safer Internet” (LuSI), BEESECURE, Official Partner (Consultant) from the Ministry of Education in Luxembourg, project “MySecureIT“, Official Partner from the Ministry of Commerce in Luxembourg, project “CASES” (Cyberworld Awareness and Security Enhancement Structure).
.
.
.
Keywords necessary for me to create this blog post: Arduino UNO R3, Arduino NANO, Grove, Grove Beginner Kit for ARDUINO, Coding, Maker, MakerED, Maker Spaces, OLED, DHT11, Temperature and Humidity Monitor, I2C, SEEDSTUDIO,
SEEEDSTUDIO asked me through LinkedIn to make a cooperation with them for reviewing a NEW Arduino, the “Grove Beginner Kit for Arduino” product which I accepted. Today I received the stuff which in the next days I will play around a bit and create Blog posts (Tutorials) about it, stay tuned…
FIRST impressions:
I ordered it on 28-07-2020 on the site of SEEDSTUDIO and it arrived on 03-08-2020 @02H58 PM, delivered by DHL. Actually very quick from China to Luxembourg!!
Unpacking my order:
Nice cardboard with lots of TIPS printed on it. The box is sealed with 3 circular glued plastic which I had cut through with scissors, BAD IDEA, as I damaged the cardboard while NOT knowing that the box was meant as a whole playstation as itself (see photos, please)… Here the company could improve please, thanks! My constructive critics! 😉
.
Click image, please, to enlarge.
Click image, please, to enlarge.
..
.
.
.
As long as that glued plastic problem ISN’T resolved, use a sharp cutter to cut off the glued circular plastic as I couldn’t remove it by hand!
.
Reading the online Manual
Well, NOTHING to say against it, it is well done!! Please check it here below:
There are professional STEP-BY-STEP instructions so you can’t make mistakes!!
.
Getting started
ALL you have to do is to connect the USB-Cable to the PC, Laptop, which is in the right sight of the box (see step 2 in the PIC below please) to start. [Start Text from WiKi] Grove Beginner Kit for Arduino is one of the best Arduino Beginner Kit for beginners. It includes one Arduino compatible Board and 10 additional Arduino sensors and all in one-piece of PCB design. All the modules have been connected to the Seeeduino through the PCB stamp holes so no Grove cables are needed to connect. Of course, you can also take the modules out and use Grove cables to connect the modules. You can build any Arduino project you like with this Grove Beginner Kit For Arduino. [End Text from WiKi]
.
Click image, please, to enlarge.
.
Plug and Play Unboxing Demo
The Grove Beginner Kit has a plug and plays unboxing demo, where you first plug in the power to the board, you get the chance to experience all the sensors in one go! Use the button and rotary potentiometer to experience each sensor demo!
Scroll -> Rotating Rotary Potentiometer
Select -> Short Press Button
Exit Current Demo -> Long Press Button
Buzzer and LED module are used for key prompt.
.
Some examples
Please check the pictures below:
.
Temperature/Humidity GROVE
Click image, please, to enlarge.
3
Air Pressure/GROVE
Click image, please, to enlarge.
Air Pressure/GROVE
Click image, please, to enlarge.
.
My review
Well, I can recommend this product for beginners by 100%!! Up from the beginning beginners can find out HOW things work with just plugging the USB cable to the PC, Laptop, computer. It’s a GREAT way to bring Coding to STEAM students, Maker’s, MakerED and Maker Spaces!
I didn’t yet using the Breakout possibilities, I DON’T overwhelm you with TOO MUCH information, that will GET discussed in next tutorials, BUT looks promising as NO need to plug single cables, ALL done by ONLY one connector!!!
.
Please check the videos below to understand how the GROVE System works.
Let the learners first trying the working examples in the box to discover the possibilities! Later you can make the Breakout and then they can reproduce the Coding examples such as mentioned in the online manual.
.
L’auteur Gust MEES est Formateur andragogique / pédagogique TIC, membre du “Comité Conseil” de “Luxembourg Safer Internet” (LuSI), appelé maintenant BEESECURE, partenaire officiel (consultant) du Ministère de l’éducation au Luxembourg du projet ”MySecureIT“, partenaire officiel du Ministère du Commerce au Luxembourg du projet ”CASES” (Cyberworld Awareness andSecurityEnhancementStructure)..
The author Gust MEES is ICT Course Instructor, ”Member of the Advisory Board” from “Luxembourg Safer Internet” (LuSI), BEESECURE, Official Partner (Consultant) from the Ministry of Education in Luxembourg, project “MySecureIT“, Official Partner from the Ministry of Commerce in Luxembourg, project “CASES” (Cyberworld Awareness and Security Enhancement Structure).
Social Distancing Monitor with Alarm, Arduino NANO and I2C LCD2004 Display
In previous tutorial we were using an LCD1602 display, this time we will use an LCD2004 display which gives us the opportunity to display on four (4) lines. That enables us to display more accurate text.
The wiring is exactly the same as already mentioned in previous tutorial, there is ONLY to make a few changes in the code, please check:
L’auteur Gust MEES est Formateur andragogique / pédagogique TIC, membre du “Comité Conseil” de “Luxembourg Safer Internet” (LuSI), appelé maintenant BEESECURE, partenaire officiel (consultant) du Ministère de l’éducation au Luxembourg du projet ”MySecureIT“, partenaire officiel du Ministère du Commerce au Luxembourg du projet ”CASES” (Cyberworld Awareness andSecurityEnhancementStructure). L’auteur était aussi gagnant d’un concours en électronique en 1979 ( Pays germaniques ) et voyait son projet publié dans le magazine électronique “ELO”.
The author Gust MEES is ICT Course Instructor, ”Member of the Advisory Board” from “Luxembourg Safer Internet” (LuSI), BEESECURE, Official Partner (Consultant) from the Ministry of Education in Luxembourg, project “MySecureIT“, Official Partner from the Ministry of Commerce in Luxembourg, project “CASES” (Cyberworld Awareness and Security Enhancement Structure).
The author was also a winner of an electronics contest (Germanic countries) in 1979 and got his project published in the “Electronics Magazine ELO”.
Social Distancing Monitor, Arduino NANO and I2C OLED Display
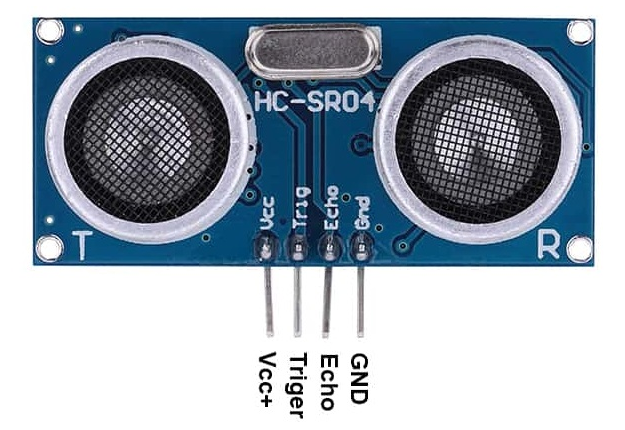
In times of the Coronavirus-Crisis (Covid_19), it might be GOOD to respect the 2 meters distance to avoid getting infected!!! But not everybody can estimate distances, nor are ALL persons respecting the 2 meters rule!!! So came the idea to build an easy to realize gadget, which measures the distance when the 2 meters are not respected.
First of all, like usual, I was searching the internet to find out if there isn’t already such a project around. And YES, there is one; I found a tutorial with an Arduino UNO with provided code as well. Please check below:
In a previous tutorial WE were already using a “Social Distancing Monitor with Alarm, Arduino NANO and I2C LCD1602 Display“, check below please for revision:
L’auteur Gust MEES est Formateur andragogique / pédagogique TIC, membre du “Comité Conseil” de “Luxembourg Safer Internet” (LuSI), appelé maintenant BEESECURE, partenaire officiel (consultant) du Ministère de l’éducation au Luxembourg du projet ”MySecureIT“, partenaire officiel du Ministère du Commerce au Luxembourg du projet ”CASES” (Cyberworld Awareness andSecurityEnhancementStructure)..
The author Gust MEES is ICT Course Instructor, ”Member of the Advisory Board” from “Luxembourg Safer Internet” (LuSI), BEESECURE, Official Partner (Consultant) from the Ministry of Education in Luxembourg, project “MySecureIT“, Official Partner from the Ministry of Commerce in Luxembourg, project “CASES” (Cyberworld Awareness and Security Enhancement Structure).
Social Distancing Monitor with Alarm, Arduino NANO and I2C LCD1602 Display
In times of the Coronavirus-Crisis (Covid_19), it might be GOOD to respect the 2 meters distance to avoid getting infected!!! But not everybody can estimate distances, nor are ALL persons respecting the 2 meters rule!!! So came the idea to build an easy to realize gadget, which measures the distance and gives an alarm when the 2 meters are not respected.
First of all, like usual, I was searching the internet to find out if there isn’t already such a project around. And YES, there is one; I found a tutorial with an Arduino MEGA and a LCD1602 ISP with provided code as well. Please check below:
This tutorial gave me the idea to start. Instead an Arduino MEGA, I used an Arduino NANO; and instead of an LCD1602 ISP, I used an LCD1602 I2C.
Thus meaning: it needs a bit to adjust the code in the sketch in the above mentioned tutorial and it’s LESS cabling, wiring needed to connect the I2C LCD1602 display.
WE played around already with I2C LCD1602 in my tutorial below, please check:
All you need now is to put everything into a case. I was choosing a cardboard (recycling) 😉
.
Social Distancing Monitor
Click image, please, to enlarge.
Social Distancing Monitor
Click image, please, to enlarge.
Social Distancing Monitor
Click image, please, to enlarge.
.
.
Stay tuned for next blog post(s) 😉
.
.
L’auteur Gust MEES est Formateur andragogique / pédagogique TIC, membre du “Comité Conseil” de “Luxembourg Safer Internet” (LuSI), appelé maintenant BEESECURE, partenaire officiel (consultant) du Ministère de l’éducation au Luxembourg du projet ”MySecureIT“, partenaire officiel du Ministère du Commerce au Luxembourg du projet ”CASES” (Cyberworld Awareness andSecurityEnhancementStructure). L’auteur était aussi gagnant d’un concours en électronique en 1979 ( Pays germaniques ) et voyait son projet publié dans le magazine électronique “ELO”.
The author Gust MEES is ICT Course Instructor, ”Member of the Advisory Board” from “Luxembourg Safer Internet” (LuSI), BEESECURE, Official Partner (Consultant) from the Ministry of Education in Luxembourg, project “MySecureIT“, Official Partner from the Ministry of Commerce in Luxembourg, project “CASES” (Cyberworld Awareness and Security Enhancement Structure).
The author was also a winner of an electronics contest (Germanic countries) in 1979 and got his project published in the “Electronics Magazine ELO”.
I recently met some young female teachers, educators in a Restaurant and as I am a very social person I started in to a discussion: I love to talk to find out what persons are around me and IF from EDUcation, guess, I can’t STOP to talk about Modern-EDUcation, Modern Pedagogy and for sure about Modern-Learning (THE MOST important for ME!).
Whiles the discussion was going on, THEY asked me my age and my function. THEY were surprised to know that first that I am retired (nearly 65 years old) and about my knowledge ABOUT Modern-EDUcation, Modern Pedagogy and for sure about Modern-Learning!! THEY asked me how that could be possible that I have MORE knowledge about it as THEM as THEY got the latest knowledge from Universities, according to THEIR diplomas… THEY heard (they were informed…) about the new, BUT WHEN I told them THAT I was using it ALREADY in 2002-2003 as an innovation in my country Luxembourg, they were perplex!!!
Well, looks like Universities are NOT YET UP-To-Date then?! I explained THEM that I am an “Autodidact” and a Life-Long-LEARNing person and that I made my “Professional Development” MOSTLY on my own!! SO, I could LEARN on my own pace with my personal LEARNing-Concept, check below please for more:
I told THEM ALSO, that soon THEY will GET used to Coding, programming as THIS is part of the National Strategy of #DigitalLuxembourg and #Digital4EDUcation, there THEY were skeptic about it, BUT today (06 February 2020) the Ministry released it:
When I was asking IF THEY were present on Social-Media Twitter, YES I have an account BUT… Well, THEY didn’t see the interest really in it and I gave THEM my Twitter account to follow to find out about the How-To one could do it ===> @Knolinfos. Please check ALSO my Blog post below:
Well, enough talked; BTW a week later I had some more followers from Luxembourg (NOT using a VPN…)… WHAT is a VPN actually? Please check below my Curation:
A certain moment we came up ALSO to talk about civilized behavior, OMG THEY told me!!! I was telling my experiences with a Bus-STOP 30 cm in front of the entrance of the house and one told me that she knows very well such an experience because of her grand father!!! Please check below my video about it to understand WHAT actually is going on:
.
Concerning the behavior, I will create later another blog, stay tuned 😉
.
.
L’auteur Gust MEES est Formateur andragogique / pédagogique TIC, membre du “Comité Conseil” de “Luxembourg Safer Internet” (LuSI), appelé maintenant BEESECURE, partenaire officiel (consultant) du Ministère de l’éducation au Luxembourg du projet ”MySecureIT“, partenaire officiel du Ministère du Commerce au Luxembourg du projet ”CASES” (Cyberworld Awareness andSecurityEnhancementStructure).
The author Gust MEES is ICT Course Instructor, ”Member of the Advisory Board” from “Luxembourg Safer Internet” (LuSI), BEESECURE, Official Partner (Consultant) from the Ministry of Education in Luxembourg, project “MySecureIT“, Official Partner from the Ministry of Commerce in Luxembourg, project “CASES” (Cyberworld Awareness and Security Enhancement Structure).
. . Stay tuned for next blog post(s) 😉
.
.
Keywords necessary for me to create this blog post: Autodidact, Knowledge, Professional Development, Life-Long-Learning, Curation, Blogs, PKM, PLN, Professional Knowledge Management, Personal [Professional] Learning Network, retired, behavior,
Valentine’s Day is around: GET creative with an LED Matrix and an Arduino!
[Start Text Wikipedia] Valentine’s Day, also called Saint Valentine’s Day or the Feast of Saint Valentine,[2] is celebrated annually on February 14. Originating as a Western Christian feast day honoring one or two early saints named Valentinus, Valentine’s Day is recognized as a significant cultural, religious, and commercial celebration of romance and romantic love in many regions around the world. [End Text Wikipedia]
A tradition worldwide around is to give flowers to his loved one, so WHY NOT ALSO a small electronic device which shows a heart on a LED Matrix?!! It is NOT expensive and gives a certain “special” feeling to your loved one 😉 And ALSO, I give you the “ready code” to start it straight on. You don’t need to create the “Heart Character” before, BUT I will give you ALSO the link to the tutorial who explains very well the How-To!
Please check below the tutorials with the wiring and the code:
All you need now is to bring it into a box for a nicer presentation and to give it as a gift to your love!
Secret tip: Use as well a LCD with scrolling text, where you can program then a special personal text message for your love. Please check my tutorial below:
Keywords necessary for me to create this blog post: Arduino UNO R3, Arduino NANO, LCD 1602, I2C Bus, coding, learning to learn, learning by doing, LED Matrix, Valentine’s Day, Character Generator for LED Matrix,
.
L’auteur Gust MEES est Formateur andragogique / pédagogique TIC, membre du “Comité Conseil” de “Luxembourg Safer Internet” (LuSI), appelé maintenant BEESECURE, partenaire officiel (consultant) du Ministère de l’éducation au Luxembourg du projet ”MySecureIT“, partenaire officiel du Ministère du Commerce au Luxembourg du projet ”CASES” (Cyberworld Awareness andSecurityEnhancementStructure). L’auteur était aussi gagnant d’un concours en électronique en 1979 ( Pays germaniques ) et voyait son projet publié dans le magazine électronique “ELO”.
The author Gust MEES is ICT Course Instructor, ”Member of the Advisory Board” from “Luxembourg Safer Internet” (LuSI), BEESECURE, Official Partner (Consultant) from the Ministry of Education in Luxembourg, project “MySecureIT“, Official Partner from the Ministry of Commerce in Luxembourg, project “CASES” (Cyberworld Awareness and Security Enhancement Structure).
The author was also a winner of an electronics contest (Germanic countries) in 1979 and got his project published in the “Electronics Magazine ELO”.
Through the Maker-Movement and IoT (Internet of Things) there is already a LOT happening and different Networks are collecting Data through Sensorsand make them available for everybody to have access and study them! Such sensors are e.g.:
Air Quality
Meteo
Street traffic
Radiation
People (counter) traffic
Water Quality
Wind velocity
Radar for excess of car speed
Inundation prevention
Observations on:
Nature (birds, etc.)
Archaeology discovering
…
Those, above mentioned applications can even be assembled together and so being a precious source for communes and Governments! Mostly such projects are done with an ARDUINO and/or Raspberry PI based micro controller and a mini computer: The main difference between them is Arduino is microcontroller board while Raspberry PI is a mini computer.
Thus meaning: that fits perfect for the Maker-Movement and could GET integrated easily into STEM projects!
Well, after following for a long time different possibilities on the How-To to get globally access to such IMPORTANT Big-Data for everyone, I found out THAT “The Things Network” is a perfect way! Please find below the address and the projects:
Key words necessary for me to create this blog post: CitiZEN-Science, STEM, MakerED, Maker-Spaces, PracTICE, LEARNing-By-Doing, TTN, The Things Network, Arduino, Raspberry PI, LoraWAN, SigFox (Low Power consumption…)
.
L’auteur Gust MEES est Formateur andragogique / pédagogique TIC, membre du “Comité Conseil” de “Luxembourg Safer Internet” (LuSI), appelé maintenant BEESECURE, partenaire officiel (consultant) du Ministère de l’éducation au Luxembourg du projet ”MySecureIT“, partenaire officiel du Ministère du Commerce au Luxembourg du projet ”CASES” (Cyberworld Awareness andSecurityEnhancementStructure).
The author Gust MEES is ICT Course Instructor, ”Member of the Advisory Board” from “Luxembourg Safer Internet” (LuSI), BEESECURE, Official Partner (Consultant) from the Ministry of Education in Luxembourg, project “MySecureIT“, Official Partner from the Ministry of Commerce in Luxembourg, project “CASES” (Cyberworld Awareness and Security Enhancement Structure).
CitiZEN-Science: WHAT is it and is it worth to follow?!!
[Begin Text Wikipedia]:
Citizen science (CS; also known as community science, crowd science, crowd-sourced science, civic science, volunteer monitoring, or online citizen science) is scientific research conducted, in whole or in part, by amateur (or nonprofessional) scientists.[1] Citizen science is sometimes described as “public participation in scientific research,” participatory monitoring, and participatory action research whose outcomes are often advancements in scientific research, as well as an increase in the public’s understanding of science.[2][3] Based on Alexa rankings[4]iNaturalist is currently the most popular citizen science website[5] followed by eBird[6] and then Zooniverse[7] in second and third place respectively.
[End Text Wikipedia]
Find below a GREAT article, who explains very well:
[Begin Text SciStarter]:
As we face global challenges, we may want to find local ways to make a difference in protecting endangered species, safeguarding water sources, preventing disease, or accelerating medical research. Science needs more eyes, ears and perspectives than any scientist possesses. Enter citizen science: a collaboration between scientists and those of us who are just curious or concerned and motivated to make a difference. People just like you are collecting data by taking photos of clouds or streams, documenting changes in nature, using smartphone sensors to help scientists monitor water and air quality, or playing games to help advance health and medical research. A citizen science project can involve one person or millions of people collaborating towards a common goal. Typically, public involvement is in data collection, analysis, or reporting.
There are thousands of opportunities to participate in this movement that’s sweeping the globe! Find them on SciStarter.org .
[End Text SciStarter]:
Well, I don’want to say much more about this, apart that I back it up! I find it extremely interesting and it should get used in schools as it would certainly make students interested into Science.
As far as I know, it is ALSO used in a school in my country Luxembourg:
Key words necessary for me to create this blog post: CitiZEN-Science, STEM, MakerED, Maker-Spaces, PracTICE, LEARNing-By-Doing,
.
L’auteur Gust MEES est Formateur andragogique / pédagogique TIC, membre du “Comité Conseil” de “Luxembourg Safer Internet” (LuSI), appelé maintenant BEESECURE, partenaire officiel (consultant) du Ministère de l’éducation au Luxembourg du projet ”MySecureIT“, partenaire officiel du Ministère du Commerce au Luxembourg du projet ”CASES” (Cyberworld Awareness andSecurityEnhancementStructure).
The author Gust MEES is ICT Course Instructor, ”Member of the Advisory Board” from “Luxembourg Safer Internet” (LuSI), BEESECURE, Official Partner (Consultant) from the Ministry of Education in Luxembourg, project “MySecureIT“, Official Partner from the Ministry of Commerce in Luxembourg, project “CASES” (Cyberworld Awareness and Security Enhancement Structure).
Actually (January 2020 and even before…) there are a lot of warnings from Cyber-Security experts and EVEN from the FBI concerning Smart-homes and its connected devices:
SO NOW, after having bought a Smart-TV and other so-called smart devices which are connecting to the internet, WHAT to do? First of all: do YOU really need it, as nearly any devices are getting sold with IoT capabilities? IF NOT, WHAT to do?
Before connecting the power:
Check your Router settings and block any unknown devices!
IF you are able to access your IT device, change straight the manufacturer password; give it a STRONG password!
Concerning passwords: I recommend to use a Password-Manager such as:
With a Password-Manager you just need to remember a Master-Password and ALL other Passwords will get generated with a STRONG Password from the software itself!!
L’auteur Gust MEES est Formateur andragogique / pédagogique TIC, membre du “Comité Conseil” de “Luxembourg Safer Internet” (LuSI), appelé maintenant BEESECURE, partenaire officiel (consultant) du Ministère de l’éducation au Luxembourg du projet ”MySecureIT“, partenaire officiel du Ministère du Commerce au Luxembourg du projet ”CASES” (Cyberworld Awareness andSecurityEnhancementStructure).
The author Gust MEES is ICT Course Instructor, ”Member of the Advisory Board” from “Luxembourg Safer Internet” (LuSI), BEESECURE, Official Partner (Consultant) from the Ministry of Education in Luxembourg, project “MySecureIT“, Official Partner from the Ministry of Commerce in Luxembourg, project “CASES” (Cyberworld Awareness and Security Enhancement Structure).
.
. Stay tuned for next blog post(s) 😉
.
.
.
.
.
.
.
.
.
Keywords necessary for me to create this blog post: Routers, Passwords, authorization, IoT, Smart Home, Smart TVs, vigilance, connected stuff, Responsibility, Cyber-Hygiene, Digital CitiZENship,
THEY JUST WANT MY information?!!! WHERE is SOCIAL?!!!
Excuse-me, please, BUT I am getting more than upset about WHAT is happening actually on Social-Media!!! Online since 1998 and having reached the internet maturity (more than 21 years online…), I have serious concerns about WHAT STILL is ===> social <=== with Social-Media!!! It is actually becoming ONLY and purely a platform(s) for collecting information about persons to collect the MAXIMUM of information to GET a MAXIMUM out for state spying and commercial use to track the users!!!
I DON’T go in further in here, YOU have a brain, use it and GO for #CriticalTHINKing and #ProactiveTHINKing, worth to do!!! It’s YOUR future with #ICT, do YOU really want THIS to happen???!!! ME NOT!!!
I am fed up with such behavior and I am backing UP Tim BERNERS-LEE, check below please:
You might be interested in having MORE information about Critical-Thinking AND Proactive-Thinking to make YOUR OWN “Thinking” and “Understanding“, please check below and read it 😉
Key words necessary for me to create this blog post: Tim BERNERS-LEE, Trump, US, Privacy, AI, Big Data, Critical Thinking, Proactive Thinking
.
L’auteur Gust MEES est Formateur andragogique / pédagogique TIC, membre du “Comité Conseil” de “Luxembourg Safer Internet” (LuSI), appelé maintenant BEESECURE, partenaire officiel (consultant) du Ministère de l’éducation au Luxembourg du projet ”MySecureIT“, partenaire officiel du Ministère du Commerce au Luxembourg du projet ”CASES” (Cyberworld Awareness andSecurityEnhancementStructure).
The author Gust MEES is ICT Course Instructor, ”Member of the Advisory Board” from “Luxembourg Safer Internet” (LuSI), BEESECURE, Official Partner (Consultant) from the Ministry of Education in Luxembourg, project “MySecureIT“, Official Partner from the Ministry of Commerce in Luxembourg, project “CASES” (Cyberworld Awareness and Security Enhancement Structure).
Facts: Being locked by Twitter as a SPAM producer?!! From WHERE does it come really?!!!
Analyzing:I recently got locked out from my Twitter account by Twitter (meaning I can’t use my account anymore) itself since 01-01-2020, AND since that time (10-01-2020) I nearly don’t have ANYMORE SPAM in my email box, strange, ISN’T it?!!! it’s NOT ME who is a SPAM producer, BUT is it Twitter itself OR is it my #VPN service?!!! Well, I can’t prove it, BUT that is a fact!!! A fact WHICH Twitter has to go for investigation and to adjust THEIR Algorithm!!! It’s NOT ME, for sure, THE bad boy!!!
UP to Twitter to sort out THAT problem!!! THEY won’t GET my phone number to unlock my account!!! NO WAY, that I will do that, EVEN if I will lose the account!!!
As on 11 January 2020, my Twitter account was unlocked!
.
Click image, please, to enlarge.
.
L’auteur Gust MEES est Formateur andragogique / pédagogique TIC, membre du “Comité Conseil” de “Luxembourg Safer Internet” (LuSI), appelé maintenant BEESECURE, partenaire officiel (consultant) du Ministère de l’éducation au Luxembourg du projet ”MySecureIT“, partenaire officiel du Ministère du Commerce au Luxembourg du projet ”CASES” (Cyberworld Awareness andSecurityEnhancementStructure).
The author Gust MEES is ICT Course Instructor, ”Member of the Advisory Board” from “Luxembourg Safer Internet” (LuSI), BEESECURE, Official Partner (Consultant) from the Ministry of Education in Luxembourg, project “MySecureIT“, Official Partner from the Ministry of Commerce in Luxembourg, project “CASES” (Cyberworld Awareness and Security Enhancement Structure).
THE stupidity of companies to ask (force!!!) for a 2FA authentication… BUT in the mood actually, WHY???!!!
WE are in 2020: It is well known THAT a 2FA authentication ISN’T anymore secure, proven by Cyber-Security experts and EVEN the FBI reported and sent out awareness posts!!!
SO, first of all let us find out about WHAT a 2FA is to make sure THAT WE understand WHAT WE are talking about, please check below for more information:
WHAT is happening NOW (January 2020)?!!! Companies like Twitter and Google (Gmail) are forcing people (users) to give THEM their smartphone number (telephone number) to create a new account and/or in case of any trouble with an account to ONLY get unlocked the account by giving THEM the telephone number, like Twitter does actually!!! WTF is THIS for an unethical behavior to force people (users) to GET THEIR phone numbersfor WHAT EVER reason?!!! Check some screenshots below please…
.
.
THUS meaning: I can’t GET a Google Gmail account WITHOUT giving THEM my phone number, WTF is THAT???!!! THEY have already collected ALL my information, my behavior etc. and NOW THEY want ALSO to have my phone number under the guise of security, seriously???!!!
And WHAT’s about Twitter (as mentioned above)? THEY try out a new trick; one gets a message from THEM that one is detected as a robot behavior and considered as a Spam producer??!!! Really??? Well, this happens to me since 02 January 2020 ( a #HappyNewYear message…)!
.
.
Looks like Twitter’s algorithm ISN’T working well, as I didn’t break any rules! It is ONLY the 3d time that THIS is happening to me, BUT this time (08-01-2020) I didn’t get a return (reply) message from them after 6 days!!! Strange, looks like THEY will force me to unlock my Twitter account for the solely reason of getting my phone number, as I asked THEM to unlock my account manually, which didn’t happen till NOW!!!? THEY DON’T get my phone number, NO WAY!!!
OK, enough complained now: Let us have a look WHY I created THIS blog post to show YOU the stupidity of a 2FA authentication, check below please:
L’auteur Gust MEES est Formateur andragogique / pédagogique TIC, membre du “Comité Conseil” de “Luxembourg Safer Internet” (LuSI), appelé maintenant BEESECURE, partenaire officiel (consultant) du Ministère de l’éducation au Luxembourg du projet ”MySecureIT“, partenaire officiel du Ministère du Commerce au Luxembourg du projet ”CASES” (Cyberworld Awareness andSecurityEnhancementStructure).
The author Gust MEES is ICT Course Instructor, ”Member of the Advisory Board” from “Luxembourg Safer Internet” (LuSI), BEESECURE, Official Partner (Consultant) from the Ministry of Education in Luxembourg, project “MySecureIT“, Official Partner from the Ministry of Commerce in Luxembourg, project “CASES” (Cyberworld Awareness and Security Enhancement Structure).
. . Stay tuned for next blog post(s) 😉
.
Keywords necessary for me to create this blog post: 2FA, Two Factor Authentication, Cyber-Security, Twitter, GMail…
Safer Internet Day (SID) is organised by Insafe in February of each year to promote safer and more responsible use of online technology and mobile phones, especially among children and young people across the world.
Safer Internet Day 2020 will be celebrated on Tuesday 11 February 2020, with the strapline of ===> “Together for a better internet” <=== following the success of last year’s campaign.
My participation for the SID2020
WHAT is special this year with my participation on SID2020?
I created a ===> #GlobalCollaboration blog in 2017 <=== from @knolinfos (my pseudo on twitter) & @ICTPHMS& @kimmindy7 for #LEARNing about #DigitalCitizenShip. The authors are from Luxembourg/Europe (me), one female teacher from the USA and a male teacher from the USA WHO are using my blog post to learn together and sharing THEIR practice with YOU dear readers.
Well, there is a lot of different views about ===> Digital CitiZENship <=== WE will explore WHAT could be THE BEST way to teach and to learn about Digital CitiZENship (hashtag on Twitter is #digcit).
How does it come that I post Global-Collaboration blog posts? Well, once the #ProfessionalDevelopment is Upto-Date, one does understand THAT learning in a team brings out a win-win situation and that a generation exchange is benefit for all of the participants as anyone learns from each other. BTW: here below other Global-Collaboration blogs with teaching persons from Australia, USA, France, Luxembourg (me):
Contributions de Gust MEES: Publications sur leBlog de Gust MEES (in English) avec 202K (202.000) views „Digital Citizenship“ Global Education Collaboration Blog (in English),
Publications sur le Blog von Gust MEES (auf Deutsch),
Cyber-Security is a shared responsibility, WE are ALL responsible for a more secure Internet and it is ===>OUR responsibility to build up the future for OUR kids, learners and students!<===
WE can do it by learning and teaching the basics of Cyber-Security and ALSO by helping international organizations such as “Safer Internet Day” to become a catalyst for such a difficult task!!!
.
======> WE are living in a world of connected technology, Cyber-Security is a MUST!!! <======
.
.
That is why I am participating on SID2020 with my FREE courses here:
MOTIVATION: Knowing NOW how important it is to take part of such a great Event, I encourage YOU ALL to take part of it by any possible action, even as a private person! I encourage especially private persons to display the banner from SID2020 on their blogs and/or websites
People who are on Twitter may use the hashtag #SID2020 to promote that Event, thanks for Helping to make the Internet a more secure place!
.
L’auteur Gust MEES est Formateur andragogique / pédagogique TIC, membre du “Comité Conseil” de “Luxembourg Safer Internet” (LuSI), appelé maintenant BEESECURE, partenaire officiel (consultant) du Ministère de l’éducation au Luxembourg du projet ”MySecureIT“, partenaire officiel du Ministère du Commerce au Luxembourg du projet ”CASES” (Cyberworld Awareness andSecurityEnhancementStructure).
The author Gust MEES is ICT Course Instructor, ”Member of the Advisory Board” from “Luxembourg Safer Internet” (LuSI), BEESECURE, Official Partner (Consultant) from the Ministry of Education in Luxembourg, project “MySecureIT“, Official Partner from the Ministry of Commerce in Luxembourg, project “CASES” (Cyberworld Awareness and Security Enhancement Structure).
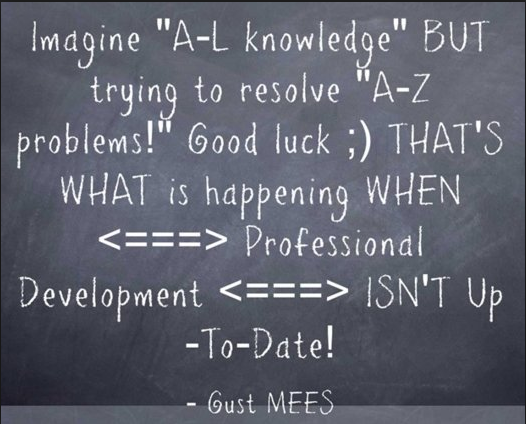
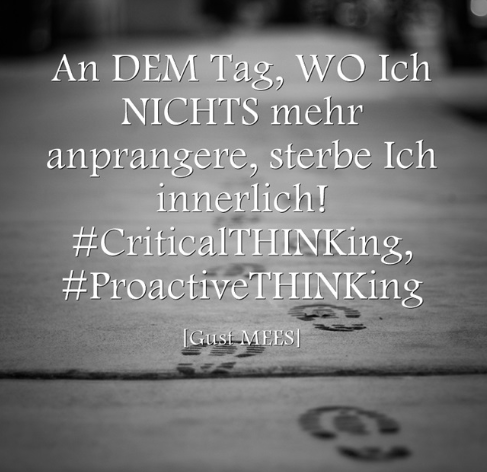
As every new year there is a new challenge to perform for a BETTER Professional-Development for TEACHers, EDUcators, LEHRENDE, Instructors. Especially for Modern-EDU, Modern-Pedagogy, Modern-Learning there is still a lot to LEARN! Here below some thoughts in form of quotes from me.
L’auteur Gust MEES est Formateur andragogique / pédagogique TIC, membre du “Comité Conseil” de “Luxembourg Safer Internet” (LuSI), appelé maintenant BEESECURE, partenaire officiel (consultant) du Ministère de l’éducation au Luxembourg du projet ”MySecureIT“, partenaire officiel du Ministère du Commerce au Luxembourg du projet ”CASES” (Cyberworld Awareness andSecurityEnhancementStructure)…
The author Gust MEES is ICT Course Instructor, ”Member of the Advisory Board” from “Luxembourg Safer Internet” (LuSI), BEESECURE, Official Partner (Consultant) from the Ministry of Education in Luxembourg, project “MySecureIT“, Official Partner from the Ministry of Commerce in Luxembourg, project “CASES” (Cyberworld Awareness and Security Enhancement Structure).
Well, there is a LOT to say about on the How-To about people understand the handling with the internet, Smartphones, especially from EDUcation, but ALSO about people from different ages and nationalities in my country Luxembourg as also online, as well as the behavior of persons which is increasingly becoming aggressive and unsocial! Generally said: There is a brutalization of society (Verrohung der Gesellschaft), manners aren’t nearly existing anymore, social behavior WHAT is it?THE EGO is dominating!!! People DON’T listen anymore, they are responding straight with an EGO-Message NOT related to the discussion ===> vom Thema abkommen (DE), NOT following the TOPIC (EN)!! There is generally a lack of QUALITY anywhere!!
Concerning EDUcation online on Social-Media twitter:
WHEN one follows Twitter-Chats: Chats existing > 5 years are STILL ONLY related to EDUTech, the tools and NOT related to Modern-Pedagogy, Modern-LEARNing, a stubborn manner to stay on Status Quo!!!WHEN will THE necessary CHANGE come?!!! THAT’S a RED-CARD (Arschkarte) from me to EDUcators, TEACHers!!!
Unlucky wise I have a Bus-Stop +/- 10 cm in front of the house entrance with 2 and sometimes 3 different directions which means a HUGE traffic, noise and unsocial behavior. On the Bus-Stop there are rotating (mechanical) timetables, BUT a LOT of people aren’t able to use it and turn around themselves around the timetables (???) and walking inside my entrance of the house, which is private territory!!! ALSO they come in to the entrance and walk around, shouting in their smartphones and make a LOT of noise. NO respect, BUT they DON’T care about it!!! I installed an Alarm System to GET people away from it, LOTS don’t even care about it and when I go outside and explain that they are on private territory and that the Bus-Stop is outside my entrance they start to insult me, getting aggressive, some even wanted to give me a fight…
WE even had two times +/- 50 people in the entrance of the house and also in the garage entrance and wife was fearing as they didn’t move away after being told to leave the place; THEY became aggressive and rude!!!
Bus-Sto
Bus-Stop
Bus-Stop
Bus-Stop
.
.
.
In 2019 WE had +/- 200 alarms (siren noise…) which were provocatively made by teens for their fun by streaming videos about THEIR challenges to annoy the inhabitants of the house!!! These are no longer pranks and up from next year (2020) they will get reported to the local police!!! Enough is enough…
People think that WHATEVER THEY do is allowed as IF THEY were at home, which for sure ISN’T, looks like a turn to anarchy. Even elder persons (45-75 years old) are following this strange behavior, WHERE is or WHAT is Social in 2019?!!! A forgotten behavior, the comfort and the EGO took it over!!!Respect is a behavior which persons, whatever age, have forgotten!!!
Up from march 2020 transports (Bus, Tram and train) will be FREE in Luxembourg(as first country in the world) and wife and myself are already fearing WHAT will happen THEN!!! Hopefully NOT MORE asocial behavior in front of the house… Same situation for the increasing number in cyclists, they are driving on the side-walks, mostly in opposite direction as the traffic and I nearly got hit by them while walking on the side-walk! Even that there were 2 cyclists (male in the 30s-40s) were making “Freestyle Cycling” by running with +/- 40-50 Km/h over our entrance of the house, teen skaters used the entrance of the house for their training, teens are doing Parkour on the walls around and in the entrance of the house…
People take more freedom than the law allows!!!
Bus-Stop-Time Tables QR-Code
Concerning the use of Smartphones: nearly everyone has one, BUT they are not able to use it on the right way! Any time-tables in Luxembourg are accessible by an App and also by scanning the QR-Code which is printed on the time-tables. I have NEVER seen in 2 years ONE person who was using it in front of my house where the Bus-Stop is 10 cm in front. FYI: by turning around the time-tables that makes a LOT of mechanical noise as NOT greased and by hearing that noise more than hundred of times per day ====> GRRRRRRRRRRRRRR!!!
.
.
.
.
L’auteur Gust MEES est Formateur andragogique / pédagogique TIC, membre du “Comité Conseil” de “Luxembourg Safer Internet” (LuSI), appelé maintenant BEESECURE, partenaire officiel (consultant) du Ministère de l’éducation au Luxembourg du projet ”MySecureIT“, partenaire officiel du Ministère du Commerce au Luxembourg du projet ”CASES” (Cyberworld Awareness andSecurityEnhancementStructure).
The author Gust MEES is ICT Course Instructor, ”Member of the Advisory Board” from “Luxembourg Safer Internet” (LuSI), BEESECURE, Official Partner (Consultant) from the Ministry of Education in Luxembourg, project “MySecureIT“, Official Partner from the Ministry of Commerce in Luxembourg, project “CASES” (Cyberworld Awareness and Security Enhancement Structure).
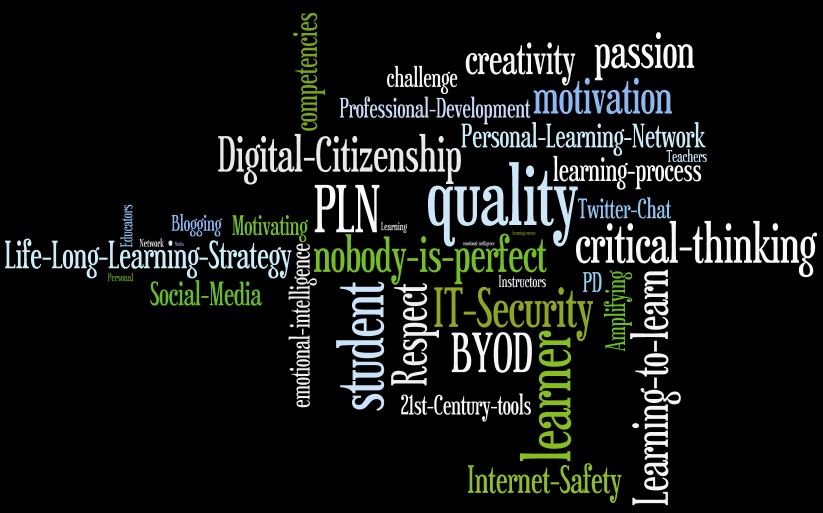
SO, you are in EDUcation and you need a Logo which reflects Modern-EDU, Modern-LEARNing, grab this one!
IF you are a student who learns to become a Teacher, EDUcator and/or if you are already on duty: when blogging and/or writing an article, sometimes one needs a logo or a “Word-Cloud” which represents Modern-EDUcation, Modern-Pedagogy and Modern-LEARNing. SO, the above logo you can use it with my permission by giving me credit with a link back to:
L’auteur Gust MEES est Formateur andragogique / pédagogique TIC, membre du “Comité Conseil” de “Luxembourg Safer Internet” (LuSI), appelé maintenant BEESECURE, partenaire officiel (consultant) du Ministère de l’éducation au Luxembourg du projet ”MySecureIT“, partenaire officiel du Ministère du Commerce au Luxembourg du projet ”CASES” (Cyberworld Awareness andSecurityEnhancementStructure).
The author Gust MEES is ICT Course Instructor, ”Member of the Advisory Board” from “Luxembourg Safer Internet” (LuSI), BEESECURE, Official Partner (Consultant) from the Ministry of Education in Luxembourg, project “MySecureIT“, Official Partner from the Ministry of Commerce in Luxembourg, project “CASES” (Cyberworld Awareness and Security Enhancement Structure).
When fixing a small object there isn’t any problem, you just drill a hole of the diameter of the axis of the Stepper-Motor and fix it with hot glue or instant glue. BUT, when it comes to make rotating larger objects it will become unstable!! We need then also a larger support plate to fix the object. I used two techniques, one with a copper-plate of 0.8 mm (was still in my cellar for 30 years…) and/or a single-sided copper-Epoxy plate. Copper-plates are expensive and single-sided copper-Epoxy plates are on a less expensive price. They are about 0.65-1€/piece on Amazon.
For our Xmas project we will use a plastic star with LEDs which will get fixed the following way, check below please.
Single-sided Copper-Epoxy plate
Single-sided Copper-Epoxy plate
Click image, please, to enlarge.
Single-sided Copper-Epoxy plate
Single-sided Copper-Epoxy plate
Click image, please, to enlarge.
Mounting and fixing of the Stepper-Motor
Click image, please, to enlarge.
Mounting and fixing of an object
Support for Xmas decoration
Click image, please, to enlarge.
Support for Xmas decoration
Support for Xmas decoration
Click image, please, to enlarge.
Support for Xmas decoration
Support for Xmas decoration
Click image, please, to enlarge.
.
As Xmas star I used one from Amazon, please check below:
Once the Xmas Star fixed together with the Stepper-Motor, cabled and the the Code tested, WE fix our LED matrix with hot-glue, cabling it and running the Code for a last test:
Rotating Xmas Star with Stepper-Motor and Scrolling Text with LED Matrix
.
Please, check above image (photo) where you will see the How-To to implement on an easy wiring way the components.
More explanations to come, stay tuned…
..
.
L’auteur Gust MEES est Formateur andragogique / pédagogique TIC, membre du “Comité Conseil” de “Luxembourg Safer Internet” (LuSI), appelé maintenant BEESECURE, partenaire officiel (consultant) du Ministère de l’éducation au Luxembourg du projet ”MySecureIT“, partenaire officiel du Ministère du Commerce au Luxembourg du projet ”CASES” (Cyberworld Awareness andSecurityEnhancementStructure)..
The author Gust MEES is ICT Course Instructor, ”Member of the Advisory Board” from “Luxembourg Safer Internet” (LuSI), BEESECURE, Official Partner (Consultant) from the Ministry of Education in Luxembourg, project “MySecureIT“, Official Partner from the Ministry of Commerce in Luxembourg, project “CASES” (Cyberworld Awareness and Security Enhancement Structure).
EDUcators, TEACHers, Instructors, LEHRENDE Online on SocialMedia
Well, it is nice and necessary to see people from EDUcation online, BUT THE way they post, the mentality behind makes me worry!! Bringing in NEW stuff with an OLD, outdated pedagogical mentality, running the SAME way as usual; THAT can’t work!!!
That reminds me a bit the century WHEN the first books were published and how many time it took to GET used to it and to bring it into EDUcation! THE fact is: it is HERE and it will STAY HERE! GET your mind OPEN and learn about the NEW <===> Modern-Pedagogy FIRST before you post ONLY about it by using mostly (ONLY) Apps, OER, and OTHER technical facilitators!!
As I mentioned it in above phrase, THAT are ONLY facilitators, which as YOU use THEM with OLD way of TEACHing won’t make THE necessary CHANGE!! IF you haven’t read yet those two books which I recommend strongly you won’t understand WHAT Modern-Pedagogy is and WHY it is necessary for OUR students, learners to succeed in an ever changing world!!
.
The MOST dangerous…
People WHO are following OECD online and getting THEIR E-Mail notifications (Newsletter) will for sure know it, BUT very rare are those online EDUcators, TEACHers, Instructors, LEHRENDE resulting from my analyzing on Social-Media Twitter!! AND even by reading the books, HOW MANY are understanding or willing to understand it as it is AGAIN the OLD way THEY will use it?!!!
And THEY are posting on the way as IF THEY would be STILL in a Class-Room, THEY DON’T understand THAT the WHOLE world is seeing it, listening to it <===> OUT of #SchoolCocoon Mentality <===> OPENMind, please!!!
.
.
Please check my OTHER Blog posts below, please for BETTER understanding:
Keywords necessary for me to create this Blog post: Unbelehrbar, stur, stubborn, Karriere geil, Professional Development, Social Media, Twitter, School-Cocoon,
.
L’auteur Gust MEES est Formateur andragogique / pédagogique TIC, membre du “Comité Conseil” de “Luxembourg Safer Internet” (LuSI), appelé maintenant BEESECURE, partenaire officiel (consultant) du Ministère de l’éducation au Luxembourg du projet ”MySecureIT“, partenaire officiel du Ministère du Commerce au Luxembourg du projet ”CASES” (Cyberworld Awareness andSecurityEnhancementStructure)..
The author Gust MEES is ICT Course Instructor, ”Member of the Advisory Board” from “Luxembourg Safer Internet” (LuSI), BEESECURE, Official Partner (Consultant) from the Ministry of Education in Luxembourg, project “MySecureIT“, Official Partner from the Ministry of Commerce in Luxembourg, project “CASES” (Cyberworld Awareness and Security Enhancement Structure).
Make objects rotating with a Stepper-Motor | Tips and Tricks
Well, in a previous tutorial <===> https://gustmees.wordpress.com/2018/09/19/halloween-project-with-skull-arduino-blinking-leds-and-scrolling-eyes-maker-makered-makerspaces/ <===> we created a Halloween Skull and it was fix, didn’t rotate. Fun? YES, BUT more fun when it is rotating by using a Stepper-Motor; looks then as it would observe, control the space around it 😉 And it is very easy to create, only a Stepper-Motor, an Arduino NANO and a bit Code; the rest is a bit manual work to fix mechanically the motor. And with the right tools the mechanical work is a piece of cake 😉. We will discuss ONLY the mechanical works and for the the code (Sketch) for the Arduino, please look at the following tutorial:
When fixing a small object there isn’t any problem, you just drill a hole of the diameter of the axis of the Stepper-Motor and fix it with hot glue or instant glue. BUT, when it comes to make rotating larger objects it will become unstable!! We need then also a larger support plate to fix the object. I used two techniques, one with a copper-plate of 0.8 mm (was still in my cellar for 30 years…) and/or a single-sided copper-Epoxy plate. Copper-plates are expensive and single-sided copper-Epoxy plates are on a less expensive price. They are about 0.65-1€/piece on Amazon.
First of all chose on what material you would like to fix the Stepper-Motor: this could be metal, plastic, cardboard or wood. As I like recycling, I ask in the Supermarket to get an empty wooden wine box. The Supermarket sometimes opens a six-pack of wine bottles in a wooden case (box) and they are happy NOT to recycle it themselves 😉 Here below an example for a Halloween project…
.
Wooden box front view
Click image, please, to enlarge.
Wooden box rear view
Click image, please, to enlarge.
Mounting and fixing of the Stepper-Motor
Click image, please, to enlarge.
Mounting and fixing of an object
Click image, please, to enlarge.
Skull glued on copperplate with Stepper-Motor
Click image, please, to enlarge.
Skull is fixed on the wooden box – happy-Halloween-rotating-skull
Click image, please, to enlarge.
.
Desription:
Drill a hole with a 6 mm drill in your support, then use the 32 mm Step-Drill to make the hole diameter fit to the diameter of the Stepper-Motor. Fix the Stepper-Motor. I used a copper-plate for having a large surface to fix the chosen rotating object. The axis from the Stepper-Motor is made from brass and that fits very well with copper for soldering them together. For the soldering you need an 80 Watt solder iron with a temperature of 430° C (806° F). Before you start soldering: clean the copper-plate, take off the patina first!! Same step for the single-sided Copper-Epoxy plate!!
.
Single-sided Copper-Epoxy plate
Single-sided Copper-Epoxy plate
Click image, please, to enlarge.
Single-sided Copper-Epoxy plate
Single-sided Copper-Epoxy plate
Click image, please, to enlarge.
Mounting and fixing of the Stepper-Motor
Click image, please, to enlarge.
Mounting and fixing of an object
Support for Xmas decoration
Click image, please, to enlarge.
Support for Xmas decoration
Support for Xmas decoration
Click image, please, to enlarge.
Support for Xmas decoration
Support for Xmas decoration
Click image, please, to enlarge.
.
Desription:
Above you see an example for a Xmas project, tutorial will follow soon, stay tuned 😉
.
L’auteur Gust MEES est Formateur andragogique / pédagogique TIC, membre du “Comité Conseil” de “Luxembourg Safer Internet” (LuSI), appelé maintenant BEESECURE, partenaire officiel (consultant) du Ministère de l’éducation au Luxembourg du projet ”MySecureIT“, partenaire officiel du Ministère du Commerce au Luxembourg du projet ”CASES” (Cyberworld Awareness andSecurityEnhancementStructure)..
The author Gust MEES is ICT Course Instructor, ”Member of the Advisory Board” from “Luxembourg Safer Internet” (LuSI), BEESECURE, Official Partner (Consultant) from the Ministry of Education in Luxembourg, project “MySecureIT“, Official Partner from the Ministry of Commerce in Luxembourg, project “CASES” (Cyberworld Awareness and Security Enhancement Structure).
How-To Start: requirements and where to buy the Raspberry PI
Being since years a BIG fan of Arduino and doing a LOT of projects with it, I was thinking about to start ALSO with the Raspberry PI. Here below my advice and thoughts….
As actually there is a NEW version available, THE “Raspberry PI 4”, which ISN’T compatible mostly with other versions (as far as I understood…), AND that the “Desktop Kit” ISN’T available yet, I STOP here and waiting for WHEN it is available to make a decision IF I will START with it!!!
Keywords necessary for me to create this Blog post:Xmas gift, where to buy, tutorials, Raspberry PI, how to get started, Starter kit,
.
.
L’auteur Gust MEES est Formateur andragogique / pédagogique TIC, membre du “Comité Conseil” de “Luxembourg Safer Internet” (LuSI), appelé maintenant BEESECURE, partenaire officiel (consultant) du Ministère de l’éducation au Luxembourg du projet ”MySecureIT“, partenaire officiel du Ministère du Commerce au Luxembourg du projet ”CASES” (Cyberworld Awareness andSecurityEnhancementStructure)..
The author Gust MEES is ICT Course Instructor, ”Member of the Advisory Board” from “Luxembourg Safer Internet” (LuSI), BEESECURE, Official Partner (Consultant) from the Ministry of Education in Luxembourg, project “MySecureIT“, Official Partner from the Ministry of Commerce in Luxembourg, project “CASES” (Cyberworld Awareness and Security Enhancement Structure).
Well, in a previous tutorial <===> https://gustmees.wordpress.com/2018/09/19/halloween-project-with-skull-arduino-blinking-leds-and-scrolling-eyes-maker-makered-makerspaces/ <===> we created a Halloween Skull and it was fix, didn’t rotate. Fun? YES, BUT more fun when it is rotating by using a Stepper-Motor; looks then as it would observe, control the space around it 😉 And it is very easy to create, only a Stepper-Motor, an Arduino NANO and a bit Code; the rest is a bit manual work to fix mechanically the motor. And with the right tools the mechanical work is a piece of cake 😉 Let us have first a look of the parts and the costs, followed by the mechanical works and then the code (Sketch) for the Arduino.
First of all chose on what material you would like to fix the Stepper-Motor: this could be metal, plastic, cardboard or wood. As I like recycling, I ask in the Supermarket to get an empty wooden wine box. The Supermarket sometimes opens a six-pack of wine bottles in a wooden case (box) and they are happy NOT to recycle it themselves 😉 Here below an example for a Halloween project…
.
Wooden box front view
Click image, please, to enlarge.
Wooden box rear view
Click image, please, to enlarge.
Mounting and fixing of the Stepper-Motor
Click image, please, to enlarge.
Mounting and fixing of an object
Click image, please, to enlarge.
Skull glued on copperplate with Stepper-Motor
Click image, please, to enlarge.
Skull is fixed on the wooden box – happy-Halloween-rotating-skull
Click image, please, to enlarge.
.
Desription:
Drill a hole with a 6 mm drill in your support, then use the 32 mm Step-Drill to make the hole diameter fit to the diameter of the Stepper-Motor. Fix the Stepper-Motor. I used a copper-plate for having a large surface to fix the chosen rotating object. The axis from the Stepper-Motor is made from brass and that fits very well with copper for soldering them together. For the soldering you need an 80 Watt solder iron with a temperature of 430° C (806° F). Before you start soldering: clean the copper-plate, take off the patina first!!
.
The wiring
.
Stepper-Motor example
.
The wiring is actually very simple, please look below:
.
Click image, please, to access the tutorial and the source of the image.
.
The Code
Please find below the Sketch (Code) which is very simple
.
Click image, please, to access the source of the code.
L’auteur Gust MEES est Formateur andragogique / pédagogique TIC, membre du “Comité Conseil” de “Luxembourg Safer Internet” (LuSI), appelé maintenant BEESECURE, partenaire officiel (consultant) du Ministère de l’éducation au Luxembourg du projet ”MySecureIT“, partenaire officiel du Ministère du Commerce au Luxembourg du projet ”CASES” (Cyberworld Awareness andSecurityEnhancementStructure)..
The author Gust MEES is ICT Course Instructor, ”Member of the Advisory Board” from “Luxembourg Safer Internet” (LuSI), BEESECURE, Official Partner (Consultant) from the Ministry of Education in Luxembourg, project “MySecureIT“, Official Partner from the Ministry of Commerce in Luxembourg, project “CASES” (Cyberworld Awareness and Security Enhancement Structure).
SO, you are a retired EDUcator, TEACHer, Instructor, LEHRENDER: WHAT to do NOW?!!
Well, that was the question I was asking myself when I became retired in 2014. As I did innovation in Modern-EDUcation in my country Luxembourg, there was NO WAY to give that up, BTW! SO, years before my retirement I was already present on Social-Media Twitter (2009), Facebook, and I did Curation (2011), as I was blogging (2010-2011) ALSO, actually very successful with > 197K (197.132) views (November 2019).
Giving up something which was already well known worldwide, was NO OPTION! Well, please check below HOW YOU can stay informed and trying to help others as well; remember: you are NOT anymore in the “School-Cocoon” and MORE FREE to say WHAT YOU want!! YOU DON’T have to go to “stupid” meetings anymore which are time-killing and mostly useless!!!
A BIG difference, use it, please to make a CHANGE!! Others will listen and maybe follow your advice for a BETTER EDUcation, a Modern-EDUcation! Advice: Please check below to follow and to stay Up-To-Date!
AND, why not starting with tinkering and coding, being part of the Maker-Community and trying it out to be able to share it with your community in the MakerED, Maker-Spaces? You have time NOW, use it, please for the benefit of the LEARNERS! Check below please:
NEW Words, Trends to Know and to LEARN about in 21st Century
Are YOU feeling overwhelmed with strange words, NEW trends, when you are reading and following posts, tweets, articles about/and in Social Media!? Well, I can understand YOU!!! There are SO MUCH, if I wouldn’t do curation, I wouldn’t understand it anymore as well, to be honest! 😉 Through my daily curation I see it and I read those articles, from WHERE I learn a lot as an autodidact. WHEN there are some words which I DON’T understand I am going MOSTLY to Wikipedia to find its explication and if NOT sufficient, I use GOOGLE and other online resources to know MORE about it!
For ME it’s THE BEST way (Curation) to learn and to stay up-to-date with my Professional Development! I tried out a lot of different ways after being online since 1998 and believe me, please, it’s the fastes way to keep it UP! 😉 Through Curation I build up my <===> PKM <===> Personal [Professional] Knowledge Management from where I can use it in ANY of my blogs, twitter posts and other Social Media to share it to people willing to learn.
Let us FIRST have a look about WHAT Curation and PKM is (first stuff to read and bring into PracTICE) before WE continue with THE strange words and trends later:
SO, let’s have a look on some (actually a lot…) NEW words and trends in EDUcation and WHO will influence EDUcation below, as THEY are actually running in Real-World, let us START first with the words:
P.S.: The present words with NOT YET a link will get updated later, otherwise I wouldn’t finish this blog post! 😉
Dynamic Learning
Does your classroom offer one-and-done types of learning activities, or does the learning grow, inspire, and evolve throughout the year and beyond? With digital tools like G Suite for Education that are available 24/7, the learning doesn’t have to stop when the bell rings at the end of class, or when the worksheet is turned in, or even when the school year ends. The learning takes on a life of its own; it becomes dynamic. This concept alone should change the way you think about learning in general and change the way you facilitate learning in the classroom.
Through Curation, Social Media twitter and by building a PLN this is perfectly possible!
BTW : Did YOU actually realize that NOW it’s the PracTICE WHICH is dominating the Real-World before it EVEN is taught by EDUcation, a BIG CHANGE, isn’t it!!! Because of Entrepreneurship (bold actions…) the internet helped to CHANGE the world and flipped EDUcation to bring it MORE close to the needs of the workforce/Industry!!!
The NEW Pedagogy is MORE about the learners, students and to put THEM into the drivers seat; looking to find a Win-Win situation about THE How-To to GET THEM learning together in a team (EVEN outside the School-Cocoon with Social Media…) and to prepare THEM for the workforce/labor/industry by being able for <===> Learning-To-Learn <===> for a Life-Long Learning once out of school!
Related Music as MOTIVATION: Listen to <===> Simple Minds – Alive And Kicking and enjoy it 😎🎵🎶🤘🤪🤪🤪
.
.
Keywords for me to create this blog post: Cybersecurity, Curation, Blogs, Digital CitiZENship,Modern EDUcation, Modern Pedagogy, Modern LEARNing, LEARNing-To-LEARN, Life-Long-LEARNing, Coaching, Collaboration, Social Media, Twitter, Digital CitiZENship, Digital Responsibility, Curation…
.
.
L’auteur Gust MEES est Formateur andragogique / pédagogique TIC, membre du “Comité Conseil” de “Luxembourg Safer Internet” (LuSI), appelé maintenant BEESECURE, partenaire officiel (consultant) du Ministère de l’éducation au Luxembourg du projet ”MySecureIT“, partenaire officiel du Ministère du Commerce au Luxembourg du projet ”CASES” (Cyberworld Awareness andSecurityEnhancementStructure)..
The author Gust MEES is ICT Course Instructor, ”Member of the Advisory Board” from “Luxembourg Safer Internet” (LuSI), BEESECURE, Official Partner (Consultant) from the Ministry of Education in Luxembourg, project “MySecureIT“, Official Partner from the Ministry of Commerce in Luxembourg, project “CASES” (Cyberworld Awareness and Security Enhancement Structure).
Strange, I make an introduction about Hygiene in an Cyber-Security Blog, ISN’T it?!! Well, there is a reason behind:
WHEN WE use a computer, Smartphone and/or any OTHER technical device (such as cars as well…) WE need to take care of them! AND our body? The same: WE need to have the daily reflexes to make for sure that WE don’t expose it to invasions of bacteria, virus, etc. Examples given: brushing teeth, showers, washing the hands after a toilet go, washing the hands before and after a meal, etc. Wearing a Condom when having sex, a necessary protection! Well OUR condom for the technical devices is the Anti-Virus, a MUST for Any-devices!!! Any-Devices, Apple as well?!!! YES!!! Please check the WHY in my Curation below please:
WE are used to these reflexes, aren’t WE?! At least WE should be!! SO, for computers, Laptops, Smartphones, tablets (iPads etc.), IoT devices (Smart-Home), WE should do the same, they costs a LOT of money and expensive stuff should get taken care of!! THE OTHER reason as well is, THAT WE are using the internet with THEM and so WE are meeting OTHER people with OUR technical device (which ever one it is…).
SO, that exactly the same as WHEN WE are meeting (as persons) OTHER people in Real-World: WHEN WE have a flu, WE will infect OTHER persons with it and an epidemic will occur!! WHEN OUR technical devices (which ever one it is…), connected to the internet, are NOT Up-To-date with the latest Updates they are vulnerable to threats (see it as a virus, e.g.) and once infected, WE will infect ALL the OTHERS as well (epidemic…)!!
As WE use these #AnyDevices with #AnyOS on a daily base, WE SHOULD be aware and develop a sense of Responsibility to protect each other!
Well, the above written is ONLY an introduction, please read my Blog posts in different languages (EN, FR, DE):
L’auteur Gust MEES est Formateur andragogique / pédagogique TIC, membre du “Comité Conseil” de “Luxembourg Safer Internet” (LuSI), appelé maintenant BEESECURE, partenaire officiel (consultant) du Ministère de l’éducation au Luxembourg du projet ”MySecureIT“, partenaire officiel du Ministère du Commerce au Luxembourg du projet ”CASES” (Cyberworld Awareness andSecurityEnhancementStructure)..
The author Gust MEES is ICT Course Instructor, ”Member of the Advisory Board” from “Luxembourg Safer Internet” (LuSI), BEESECURE, Official Partner (Consultant) from the Ministry of Education in Luxembourg, project “MySecureIT“, Official Partner from the Ministry of Commerce in Luxembourg, project “CASES” (Cyberworld Awareness and Security Enhancement Structure).
Servo Motor Position displayed on 0.96 inch 128X64 I2C OLED
WE were playing around already with OLED displays in previous tutorials <===> https://gustmees.wordpress.com/?s=oled <===> where WE created an Analog-Digital Clock a Temperature/Humidity Monitor with “Heat-Index” and Text messages on the OLED. In this tutorial WE will display the angle of a rotating Servo-Motor on an OLED.
This is actually very easy and WE will learn also (for those who want so…) the different coding for OLEDs here below:
Click the image, please, to access the source of the image and tutorials.
.
TIP
Fix the Servo-Motor on cardboard or on a wooden, plastic, plate. Glue a white paper on it and mark the angles on the paper. This would be a nice project for schools 😉
Play around with the code to add some more angles ===> LEARNing-By-Doing 😉
L’auteur Gust MEES est Formateur andragogique / pédagogique TIC, membre du “Comité Conseil” de “Luxembourg Safer Internet” (LuSI), appelé maintenant BEESECURE, partenaire officiel (consultant) du Ministère de l’éducation au Luxembourg du projet ”MySecureIT“, partenaire officiel du Ministère du Commerce au Luxembourg du projet ”CASES” (Cyberworld Awareness andSecurityEnhancementStructure)..
The author Gust MEES is ICT Course Instructor, ”Member of the Advisory Board” from “Luxembourg Safer Internet” (LuSI), BEESECURE, Official Partner (Consultant) from the Ministry of Education in Luxembourg, project “MySecureIT“, Official Partner from the Ministry of Commerce in Luxembourg, project “CASES” (Cyberworld Awareness and Security Enhancement Structure).
WE were playing around already with OLED displays in previous tutorials <===> https://gustmees.wordpress.com/?s=oled <===> where WE created an Analog-Digital Clock and a Temperature/Humidity Monitor with “Heat-Index”. In this tutorial WE will display text on an OLED.
This is actually very easy and WE will learn also (for those who want so…) the different coding for OLEDs here below:
L’auteur Gust MEES est Formateur andragogique / pédagogique TIC, membre du “Comité Conseil” de “Luxembourg Safer Internet” (LuSI), appelé maintenant BEESECURE, partenaire officiel (consultant) du Ministère de l’éducation au Luxembourg du projet ”MySecureIT“, partenaire officiel du Ministère du Commerce au Luxembourg du projet ”CASES” (Cyberworld Awareness andSecurityEnhancementStructure)..
The author Gust MEES is ICT Course Instructor, ”Member of the Advisory Board” from “Luxembourg Safer Internet” (LuSI), BEESECURE, Official Partner (Consultant) from the Ministry of Education in Luxembourg, project “MySecureIT“, Official Partner from the Ministry of Commerce in Luxembourg, project “CASES” (Cyberworld Awareness and Security Enhancement Structure).
This time WE will create a “Analog-Digital Clock” using the RTC DS3231 + 0.96 inch 128X64 I2C OLED. It’s quite easy to realize: only a few connections for the wiring and a Copy&Paste of an existing Sketch (Code)..
.
.
The Code
It’s very easy, just Copy&Paste the Sketch (Code) from below address.
L’auteur Gust MEES est Formateur andragogique / pédagogique TIC, membre du “Comité Conseil” de “Luxembourg Safer Internet” (LuSI), appelé maintenant BEESECURE, partenaire officiel (consultant) du Ministère de l’éducation au Luxembourg du projet ”MySecureIT“, partenaire officiel du Ministère du Commerce au Luxembourg du projet ”CASES” (Cyberworld Awareness andSecurityEnhancementStructure)..
The author Gust MEES is ICT Course Instructor, ”Member of the Advisory Board” from “Luxembourg Safer Internet” (LuSI), BEESECURE, Official Partner (Consultant) from the Ministry of Education in Luxembourg, project “MySecureIT“, Official Partner from the Ministry of Commerce in Luxembourg, project “CASES” (Cyberworld Awareness and Security Enhancement Structure).
Temperature & Humidity monitor using Arduino NANO + DHT22 + 0.96 inch 128X64 I2C OLED
WE were playing around a lot already with I2C-LCD displays <===> https://gustmees.wordpress.com/?s=i2c+lcd <===> but not yet with I2C-OLEDs. In this tutorial WE will create a <===> Temperature & Humidity monitor using Arduino NANO + DHT22 + 0.96 inch 128X64 I2C OLED <===> which displays the temperature in °F AND °C, as well as it displays the “Heat Index“.
FIRST of all, let us talk about the “Heat Index“, what it is and WHY it could be important to display it:
Let us have a look on the wiring and check the below Fritzing, please. It shows a DHT11 Sensor instead of a DHT22 Sensor, but the wiring is the same. It shows ALSO a 220 Ohm resistor instead of a 10K resistor!! Use a 10K resistor please!!
.
.
Once finished the wiring, WE will need to go for the coding by using a Sketch, we will use a already done Sketch, which WE can transform to our needs from:
IF you use “°Fahrenheit” you can use it without any changes, but IF you use “°Celsius” in your country WE will need to make some changes in the code, which WE will discuss the How-To here below.
First step: you can change the text, IF wanted: Original says "DHTxx test!", I changed it to what you see below; GET creative ;)
.
Click image, please, to enlarge
.
SO, here below the changes to make to display in “°Celsius“:
Click image, please, to enlarge
.
You might need to add certain libraries, see below please which ones will GET needed, please.
.
.
IF a newbie, please check the below tutorial for the How-To:
L’auteur Gust MEES est Formateur andragogique / pédagogique TIC, membre du “Comité Conseil” de “Luxembourg Safer Internet” (LuSI), appelé maintenant BEESECURE, partenaire officiel (consultant) du Ministère de l’éducation au Luxembourg du projet ”MySecureIT“, partenaire officiel du Ministère du Commerce au Luxembourg du projet ”CASES” (Cyberworld Awareness andSecurityEnhancementStructure)..
The author Gust MEES is ICT Course Instructor, ”Member of the Advisory Board” from “Luxembourg Safer Internet” (LuSI), BEESECURE, Official Partner (Consultant) from the Ministry of Education in Luxembourg, project “MySecureIT“, Official Partner from the Ministry of Commerce in Luxembourg, project “CASES” (Cyberworld Awareness and Security Enhancement Structure).
We will use the tutorial from <===> Arduino datalogger with SD card, DS3231 and DHT22 sensor, where we will NOT use the datalogger for our project to make it as easy as possible; courageous ones, once the project is working for them, may add the datalogger 😉 In that tutorial you will find also the code…
Check the schematic above please to know how to wire it; first we will do it on a breadboard and later we could solder it… Do the wiring as shown, without the Datalogger-SDCard-Module. See PIC below, please.
.
.
In the above image you will see an DHT11 Sensor (blue case) as at the time I didn’t have it yet (was ordered…) a DHT22 Sensor (white case) as shown on the finished project. As the project works we can now solder everything together on a strip-board, choosing a case; I used a cardboard box with the dimensions of 140 mm X 130 mm X 60 mmm, fixing the LCD2004 and the DHT22-Sensor on the front of the cardboard box.
.
Components soldered on a Stripboard
.
Soldering cables on the DHT22 sensor and isolating pins with heatshrink tube
.
Soldering cables on the I2C adapter of the LCD2004 and isolating pins with heatshrink tube
.
Fixing the LCD2004 display on the frontpanel and the distance bolts
.
Final assembling of the parts
.
The finished project
.
.
As you can see in above image, I added some text with a Dymo tape, looks better 😉
The Sketch (Code) for the project
One thing missing, the sketch (code). Please find it below and open it , copy it and paste it to the Arduino IDE:
L’auteur Gust MEES est Formateur andragogique / pédagogique TIC, membre du “Comité Conseil” de “Luxembourg Safer Internet” (LuSI), appelé maintenant BEESECURE, partenaire officiel (consultant) du Ministère de l’éducation au Luxembourg du projet ”MySecureIT“, partenaire officiel du Ministère du Commerce au Luxembourg du projet ”CASES” (Cyberworld Awareness andSecurityEnhancementStructure)..
The author Gust MEES is ICT Course Instructor, ”Member of the Advisory Board” from “Luxembourg Safer Internet” (LuSI), BEESECURE, Official Partner (Consultant) from the Ministry of Education in Luxembourg, project “MySecureIT“, Official Partner from the Ministry of Commerce in Luxembourg, project “CASES” (Cyberworld Awareness and Security Enhancement Structure).
WHO doesn’t have that error already with LCD-Displays: Once uploaded (compiling) the code to the Arduino IDE there could be some errors happening, it happens to me… Please check PIC below:
Click image, please, to enlarge
.
Well I made some searches on the internet and I found the right answer on a forum about this error, which says that one should scan the I2C Address of the device and replace the “lcd.init();” by “lcd.begin (0x3F,16,2);” whereby “0x3F” is the I2C Address of my LCD1602/I2C module. I scanned to find out the I2C Addess with this sketch, please check here:
Here below the results of the scan of the I2C-Address, shown in the Serial-Monitor of the Arduino IDE:.
Click image, please, to enlarge.
.
Click image, please, to enlarge.
.
SO, make sure to FIRST scan the I2C-Address through the above mentioned Sketch, will save you a lot of stress! 😉
TIP: Use a DYMO, print out the I2C-Addresses and glue them on the backside of the LCD1602 Display, so you know for next projects WHAT I2C-Address the module has! 😉 In a couple of weeks you wouldn’t remind it anymore!
.
Click image, please, to enlarge.
.
Resolving the ERROR message
Coming back to resolve our ERROR-message and how to resolve it:
Please check the PIC below:
.
Click the image, please, to enlarge.
.
Check the lines marked with ***************************, in my case it is lines 36 and 40-52! Change it as it is displayed above, save it and upload it; it should work correctly now!
.
Stay tuned for next blog posts and enjoy it 😉
Have FUN with your “LEARNing-By-Doing project” and try out ALSO the other examples 😉
.
Keywords necessary for me to create this blog post: Arduino, Coding, Maker, MakerED, MakerSpaces, Learning By Doing, Learning To Learn, PracTICE, LCD-Displays, I2C,
.
.
L’auteur Gust MEES est Formateur andragogique / pédagogique TIC, membre du “Comité Conseil” de “Luxembourg Safer Internet” (LuSI), appelé maintenant BEESECURE, partenaire officiel (consultant) du Ministère de l’éducation au Luxembourg du projet ”MySecureIT“, partenaire officiel du Ministère du Commerce au Luxembourg du projet ”CASES” (Cyberworld Awareness andSecurityEnhancementStructure). L’auteur était aussi gagnant d’un concours en électronique en 1979 ( Pays germaniques ) et voyait son projet publié dans le magazine électronique “ELO”.
The author Gust MEES is ICT Course Instructor, ”Member of the Advisory Board” from “Luxembourg Safer Internet” (LuSI), BEESECURE, Official Partner (Consultant) from the Ministry of Education in Luxembourg, project “MySecureIT“, Official Partner from the Ministry of Commerce in Luxembourg, project “CASES” (Cyberworld Awareness and Security Enhancement Structure).
The author was also a winner of an electronics contest (Germanic countries) in 1979 and got his project published in the “Electronics Magazine ELO”.
Up from a certain moment when you get a bit more experience, you start more projects and sometimes you need to resolve a problem. One of those problems could be that you want to feed a project with a 9 Volts battery, accumulator, BUT you need 12 Volts or even more. AND sometimes also less than the 9 Volts. Here comes the need to use a DC/DC Converter. I found a very interesting one on Amazon (DE) for +/- 5€, so cheap investment. It comes even with a 3 digit LED display which shows the voltage which you can adjust through an adjustable trimmer potentiometer. There is also a push-button which allows to show the input voltage as well as the output voltage. No needs to solder, it is a full functional module. All you need is a small screwdriver to adjust the voltage on the potentiometer trimmer. Check out the photo below, please…
.
.
In above image you can see that the input voltage from the 9 Volts accumulator is at 7.3 Volts which STILL gets a 12 Volts output!! The current could be even on 2.5 Amp (max.) on the output which is a lot!!
Stay tuned for next blog posts and enjoy it 😉
Have FUN with your “LEARNing-By-Doing project” and try out ALSO the other examples 😉
.
Keywords necessary for me to create this blog post: Arduino, Coding, Maker, MakerED, MakerSpaces, Learning By Doing, Learning To Learn, PracTICE, DC/DC Converter
.
.
L’auteur Gust MEES est Formateur andragogique / pédagogique TIC, membre du “Comité Conseil” de “Luxembourg Safer Internet” (LuSI), appelé maintenant BEESECURE, partenaire officiel (consultant) du Ministère de l’éducation au Luxembourg du projet ”MySecureIT“, partenaire officiel du Ministère du Commerce au Luxembourg du projet ”CASES” (Cyberworld Awareness andSecurityEnhancementStructure). L’auteur était aussi gagnant d’un concours en électronique en 1979 ( Pays germaniques ) et voyait son projet publié dans le magazine électronique “ELO”.
The author Gust MEES is ICT Course Instructor, ”Member of the Advisory Board” from “Luxembourg Safer Internet” (LuSI), BEESECURE, Official Partner (Consultant) from the Ministry of Education in Luxembourg, project “MySecureIT“, Official Partner from the Ministry of Commerce in Luxembourg, project “CASES” (Cyberworld Awareness and Security Enhancement Structure).
The author was also a winner of an electronics contest (Germanic countries) in 1979 and got his project published in the “Electronics Magazine ELO”.
Well, after a couple of years online and checking Maker, MakerED projects on YouTube and elsewhere I encountered a LOT of projects WHICH DIDN’T work and later I found out the right addresses to follow WHERE I could say THAT’s the guys to follow to make sure NOT wasting time and efforts!!!
Here below a list of professional accounts and Blogs worth to follow:
L’auteur Gust MEES est Formateur andragogique / pédagogique TIC, membre du “Comité Conseil” de “Luxembourg Safer Internet” (LuSI), appelé maintenant BEESECURE, partenaire officiel (consultant) du Ministère de l’éducation au Luxembourg du projet ”MySecureIT“, partenaire officiel du Ministère du Commerce au Luxembourg du projet ”CASES” (Cyberworld Awareness andSecurityEnhancementStructure).
.
The author Gust MEES is ICT Course Instructor, ”Member of the Advisory Board” from “Luxembourg Safer Internet” (LuSI), BEESECURE, Official Partner (Consultant) from the Ministry of Education in Luxembourg, project “MySecureIT“, Official Partner from the Ministry of Commerce in Luxembourg, project “CASES” (Cyberworld Awareness and Security Enhancement Structure).
EASTER Egg with NeoPixels WS2812B made from cardboard
.
.
Soon there will be EASTER and decorations are getting put around the house worldwide as it is tradition since ages to do so. That’s also the time for tinkerers, makers to GET some new ideas. Well, I thought on a project which everybody could do without having a 3D-Printer NOR a Laser cutter at home and not having access to them on other places. SO, I tried out to create a EASTER-EGG from cardboard using an Arduino UNO and Neopixels…
I recently bought 1 Meter of Neopixels WS2812B with 60 LEDs and tried it out while wife was looking at it and she told me if that wouldn’t be an idea for making a Easter-Decoration, e.g. an egg. I took that challenge and a day later it was working, LOL 😉 I used a 3,5 mm thick cardboard from a red wine box which was stable enough to create the project.
I copied an image (the orange egg) from an Easter-Egg which I found on the internet (license-free), glued it on the cardboard and cut it out.
You may have a look on this Tutorial to know a bit more about the handling of Neopixel LEDS, please:
The project itself by cabling is actually VERY easy, ONLY 3 wires, the MOST work is on the mechanical part by cutting the cardboard, painting, soldering the Neopixels WS2812B strip and to put everything into a box with the necessary parts, while drilling, etc. WE will see this in detail by following PICS… But first let us solder and interconnecting the Neopixels LEDs strips, you need to follow the arrows on the strips to connect each of the LED strips, thus meaning: see PICs please:
.
.
Once all the LED strips are interconnected, you can connect the other 28 LEDs to the point marked with “START” and connect them to the ARDUINO UNO board through a screw terminal to make the first tests.Please check the tutorial below with the code for the How-To:
IF everything is working, hopefully, we can go for the integration of the components into a housing. TIP: prepare the ARDUINO UNO (NANO) already with the code uploaded and test after each LED strips connected to make sure it will work!! it’s BETTER to invest time for NOT later having trouble and NOT knowing from where the fault comes 😉
.
.
.
Housing (case) for Xmas Star
Click image, please, to enlarge
Housing (case) for Xmas Star
Click image, please, to enlarge.
Housing (case) for Xmas Star
Housing (case) for Xmas Star
Click image, please, to enlarge.
Soldering inside the housing (case) for Xmas star
Click image, please, to enlarge.
Soldering inside the housing (case) for Xmas star
Click image, please, to enlarge.
Well, you have seen NOW the different mechanical steps and the soldering inside the housing, that’s the preparation, now we have to connect as well the Xmas star to the Arduino… We will use a 3 x 0.75 mm² cable to do so, find below, please, some PICs which show you the How-To, as well as the components with links to purchase them (I used AMAZON.DE), feel FREE to purchase them where you want:
..Here below the video of the same project done with a Xmas-Star…
.
L’auteur Gust MEES est Formateur andragogique / pédagogique TIC, membre du “Comité Conseil” de “Luxembourg Safer Internet” (LuSI), appelé maintenant BEESECURE, partenaire officiel (consultant) du Ministère de l’éducation au Luxembourg du projet ”MySecureIT“, partenaire officiel du Ministère du Commerce au Luxembourg du projet ”CASES” (Cyberworld Awareness andSecurityEnhancementStructure). L’auteur était aussi gagnant d’un concours en électronique en 1979 ( Pays germaniques ) et voyait son projet publié dans le magazine électronique “ELO”.
The author Gust MEES is ICT Course Instructor, ”Member of the Advisory Board” from “Luxembourg Safer Internet” (LuSI), BEESECURE, Official Partner (Consultant) from the Ministry of Education in Luxembourg, project “MySecureIT“, Official Partner from the Ministry of Commerce in Luxembourg, project “CASES” (Cyberworld Awareness and Security Enhancement Structure).
The author was also a winner of an electronics contest (Germanic countries) in 1979 and got his project published in the “Electronics Magazine ELO”.
..
Keywords necessary for me to create this blog post: Arduino UNO R3, Arduino NANO, UNO R3 Project, Xmas Star, WM2812B RGB LEDs, Heatshrinking-Tube, coding, learning to learn, learning by doing, easter, easter-egg
Well, I made some searches on the internet and I found the right answer on a forum about this error, which says that one should scan the I2C Address of the device and replace the “lcd.init();” by “lcd.begin (0x3F,16,2);” whereby “0x3F” is the I2C Address of my LCD1602/I2C module. I scanned to find out the I2C Addess with this sketch, please check here:
Here below the results of the scan of the I2C-Address, shown in the Serial-Monitor of the Arduino IDE:.
Click image, please, to enlarge.
.
Click image, please, to enlarge.
.
SO, make sure to FIRST scan the I2C-Address through the above mentioned Sketch, will save you a lot of stress! 😉
TIP: Use a DYMO, print out the I2C-Addresses and glue them on the backside of the LCD1602 Display, so you know for next projects WHAT I2C-Address the module has! 😉 In a couple of weeks you wouldn’t remind it anymore!
.
Click image, please, to enlarge.
.
Resolving the ERROR message
Coming back to resolve our ERROR-message and how to resolve it:
Please check the PIC below:
.
Click the image, please, to enlarge.
.
Check the lines marked with ***************************, in my case it is lines 36 and 40-52! Change it as it is displayed above, save it and upload it; it should work correctly now!
.
.
L’auteur Gust MEES est Formateur andragogique / pédagogique TIC, membre du “Comité Conseil” de “Luxembourg Safer Internet” (LuSI), appelé maintenant BEESECURE, partenaire officiel (consultant) du Ministère de l’éducation au Luxembourg du projet ”MySecureIT“, partenaire officiel du Ministère du Commerce au Luxembourg du projet ”CASES” (Cyberworld Awareness andSecurityEnhancementStructure).
The author Gust MEES is ICT Course Instructor, ”Member of the Advisory Board” from “Luxembourg Safer Internet” (LuSI), BEESECURE, Official Partner (Consultant) from the Ministry of Education in Luxembourg, project “MySecureIT“, Official Partner from the Ministry of Commerce in Luxembourg, project “CASES” (Cyberworld Awareness and Security Enhancement Structure).
Image credit. please click on it to view its source.
.
Maker Inspiration-WHERE to GET Information to Stay Informed?
Well, you jumped in into the world of makers (OR want to do SO soon…) and you feel comfortable with it? You found out THAT it is important to learn about THAT movement as it brings out creativity and a BETTER understanding in EDUcation WHEN one touches the stuff and it is done by YOURSELF???!!! You learned THAT <===> #LEARNingByDoing <===> is VERY important???!!! THEN, of course you would like to stay informed about WHAT is going on around in the world of THAT movement, ISN’T it???
I would suggest you to read my following blog posts first, please, before I will give you some VERY interesting links to stay Up-To-Date:
L’auteur Gust MEES est Formateur andragogique / pédagogique TIC, membre du “Comité Conseil” de “Luxembourg Safer Internet” (LuSI), appelé maintenant BEESECURE, partenaire officiel (consultant) du Ministère de l’éducation au Luxembourg du projet ”MySecureIT“, partenaire officiel du Ministère du Commerce au Luxembourg du projet ”CASES” (Cyberworld Awareness andSecurityEnhancementStructure).
The author Gust MEES is ICT Course Instructor, ”Member of the Advisory Board” from “Luxembourg Safer Internet” (LuSI), BEESECURE, Official Partner (Consultant) from the Ministry of Education in Luxembourg, project “MySecureIT“, Official Partner from the Ministry of Commerce in Luxembourg, project “CASES” (Cyberworld Awareness and Security Enhancement Structure).
Safer Internet Day (SID) is organised by Insafe in February of each year to promote safer and more responsible use of online technology and mobile phones, especially among children and young people across the world.
Safer Internet Day 2019 will be celebrated on Tuesday 05 February 2019, with the strapline of ===> “Together for a better internet” <=== following the success of last year’s campaign.
.
Check the video below, please, who explains about it.
.
My participation for the SID2019
WHAT is special this year with my participation on SID2019?
I created a ===> #GlobalCollaboration#blog in 2017 <=== from @knolinfos (my pseudo on twitter) & @ICTPHMS& @kimmindy7 for #LEARNing about #DigitalCitizenShip. The authors are from Luxembourg/Europe (me), one female teacher from the USA and a male teacher from the USA WHO are using my blog post to learn together and sharing THEIR practice with YOU dear readers.
Well, there is a lot of different views about ===> Digital CitiZENship <=== WE will explore WHAT could be THE BEST way to teach and to learn about Digital CitiZENship (hashtag on Twitter is #digcit).
How does it come that I post Global-Collaboration blog posts? Well, once the #ProfessionalDevelopment is Upto-Date, one does understand THAT learning in a team brings out a win-win situation and that a generation exchange is benefit for all of the participants as anyone learns from each other. BTW: here below other Global-Collaboration blogs with teaching persons from Australia, USA, France, Luxembourg (me):
Cyber-Security is a shared responsibility, WE are ALL responsible for a more secure Internet and it is ===>OUR responsibility to build up the future for OUR kids, learners and students!<===
WE can do it by learning and teaching the basics of Cyber-Security and ALSO by helping international organizations such as “Safer Internet Day” to become a catalyst for such a difficult task!!!
.
======> WE are living in a world of connected technology, Cyber-Security is a MUST!!! <======
.
.
That is why I am participating on SID2019 with my FREE courses here:
MOTIVATION: Knowing NOW how important it is to take part of such a great Event, I encourage YOU ALL to take part of it by any possible action, even as a private person! I encourage especially private persons to display the banner from SID2019 on their blogsand/or websites
People who are on Twitter may use the hashtag #SID2019 to promote that Event, thanks for Helping to make the Internet a more secure place!
.
L’auteur Gust MEES est Formateur andragogique / pédagogique TIC, membre du “Comité Conseil” de “Luxembourg Safer Internet” (LuSI), appelé maintenant BEESECURE, partenaire officiel (consultant) du Ministère de l’éducation au Luxembourg du projet ”MySecureIT“, partenaire officiel du Ministère du Commerce au Luxembourg du projet ”CASES” (Cyberworld Awareness andSecurityEnhancementStructure).
The author Gust MEES is ICT Course Instructor, ”Member of the Advisory Board” from “Luxembourg Safer Internet” (LuSI), BEESECURE, Official Partner (Consultant) from the Ministry of Education in Luxembourg, project “MySecureIT“, Official Partner from the Ministry of Commerce in Luxembourg, project “CASES” (Cyberworld Awareness and Security Enhancement Structure).
How-To transform an LCD1602 SPI Sketch to an LCD1602 I2C Sketch
We were already playing around, as seen on my tutorials below, with the Temperature/Humidity sensors DHT11, DHT22 and LCD1602, without I2C possibility. There were a lot of cables to connect, we will try out this time to use a LCD with I2C bus connection as it uses ONLY 4 wires to connect. It’s a perfect project for newbies in coding as they will see the measured values directly on the LCD screen, the success and happy factor is guaranteed!
Let us have first a look on the wiring (cabling) which is actually very easy, have a look below please:
.
====> Click image, please, to enlarge.
The wiring (cabling) will take about +/- 5-10 minutes depending on your own rhythm… Let us have a look on the coding now: we will use exactly the same code (Sketch) as in our first tutorial here, which we will change just a bit to fit for I2C LCD1602 display:
Copy&Paste the code from above tutorial where it is marked “I also made an example where I display the results on a LCD. Here’s the source code of that example:” and paste it into the Arduino IDE. Connect the Arduino NANO with your computer now. Open the Arduino IDE and choose the board “Arduino NANO”, see screenshot below, please:
Click image, please, to enlarge.
.
Next step, on the same Arduino IDE select the Processor:
.
Click image, please, to enlarge.
.
TIP: when the LED on the Arduino NANO is lightning GREEN it is an original NANO and you must choose “Atmega328P”; if the LED is lightning RED, it is a clone and you must choose “Atmega328P (Old Bootloader)”.
.
NOW it is about time to adapt the code (Sketch) to an I2C-LCD1602 display, let us have a look on the Sketch (the original):
.
Click image, please, to enlarge.
.
As we can see in line 10: the library is meant for a normal LCD display, it needs to get changed for a “I2C LCD Library”.
In line 15: the same it shows the wiring pins for a normal LCD display, it needs to get changed for a “I2C LCD” display.
In line19: It is BETTER to add as well the I2C-Address, mostly “0x27” OR “0x3F”.
That is NOT much to change, we will see in the screenshot below the How-To:
.
Click image please, to enlarge.
.
By enlarging (click on the image) you will see by comparing where the changes are. I commented in the lines the WHY… Try it out to change it yourselves or just download the Sketch (Code) here below who is working:
Copy&Paste this code into a NEW Sketch on the Arduino IDE and upload now the code to the Arduino NANO (or Arduino UNO) and enjoy it!
.
Stay tuned for next blog post(s) 😉
.
.
L’auteur Gust MEES est Formateur andragogique / pédagogique TIC, membre du “Comité Conseil” de “Luxembourg Safer Internet” (LuSI), appelé maintenant BEESECURE, partenaire officiel (consultant) du Ministère de l’éducation au Luxembourg du projet ”MySecureIT“, partenaire officiel du Ministère du Commerce au Luxembourg du projet ”CASES” (Cyberworld Awareness andSecurityEnhancementStructure). L’auteur était aussi gagnant d’un concours en électronique en 1979 ( Pays germaniques ) et voyait son projet publié dans le magazine électronique “ELO”.
The author Gust MEES is ICT Course Instructor, ”Member of the Advisory Board” from “Luxembourg Safer Internet” (LuSI), BEESECURE, Official Partner (Consultant) from the Ministry of Education in Luxembourg, project “MySecureIT“, Official Partner from the Ministry of Commerce in Luxembourg, project “CASES” (Cyberworld Awareness and Security Enhancement Structure).
The author was also a winner of an electronics contest (Germanic countries) in 1979 and got his project published in the “Electronics Magazine ELO”.
.
.
Keywords necessary for me to create this blog post: Arduino UNO R3, Arduino NANO, UNO R3 Project, LCD 1602, Sensors, DHT11, DHT22, Temperature/Humidity Sensor, coding, learning to learn, learning by doing, trouble shooting, hygrometer, I2C, LCD 20×4, transforming normal LCD1602 Sketch into I2C Sketch
Xmas Star with NeoPixels WS2812B made from cardboard
Soon there will be Christmas and decorations are getting put around the house worldwide as it is tradition since ages to do so. That’s also the time for tinkerers, makers to GET some new ideas. Well, I thought on a project which everybody could do without having a 3D-Printer NOR a Laser cutter at home and not having access to them on other places. SO, I tried out to create a Xmas-Star from cardboard using an Arduino UNO and Neopixels…
I recently bought 1 Meter of Neopixels WS2812B with 60 LEDs and tried it out while wife was looking at it and she told me if that wouldn’t be an idea for making a Christmas-Decoration, e.g. a star. I took that challenge and a day later it was working, LOL 😉 I used a 3,5 mm thick cardboard from a red wine box which was stable enough to create the project.
The measures are 160 mm x 160 mm and there are 8 segments with an angle of 45° (8 x 45 = 360°). This is quiet easy to draw on cardboard… Once the lines drawn, up from the middle line draw a 1 cm to the left and to the right so that it makes a 2 cm width of each segment. On the middle cut out a square hole from 1,6 cm. That is the perfect outfit for the Christmas-Star. Cut it out with a sharp cutter and paint it with the color of your choice, I used green… NOW take the 1 meter long ribbon and cut off 8 x 4 LEDs. THEN take off the protection paper from the Neopixels WS2812B ribbon and glue them on the cardboard, see PIC please.
Find below, please, a drawing with the dimensions and where to cut out:
You may have a look on this Tutorial to know a bit more about the handling of Neopixel LEDS, please:
The project itself by cabling is actually VERY easy, ONLY 3 wires, the MOST work is on the mechanical part by cutting the cardboard, painting, soldering the Neopixels WS2812B strip and to put everything into a box with the necessary parts, while drilling, etc. WE will see this in detail by following PICS… But first let us solder and interconnecting the 8 x 4 Neopixels LEDs strips, you need to follow the arrows on the strips to connect each of the 8 x 4 LED strips, thus meaning: see PICs please:
.
Please have a look on how this will look in our project; we use color flat cable to make the connections.
.
Back side view of the Xmas star: click image, please, to enlarge.
The flat cable will get fixed with hot-glue on the cardboard.
Front side view of the Xmas star: click image, please, to enlarge.
.
Once the 8 x 4 LED strips are interconnected, you can connect the other 28 LEDs to the point marked with “START” and connect them to the ARDUINO UNO board through a screw terminal to make the first tests.Please check the tutorial below with the code for the How-To:
IF everything is working, hopefully, we can go for the integration of the components into a housing. TIP: prepare the ARDUINO UNO (NANO) already with the code uploaded and test after each 4 LED strips connected to make sure it will work!! it’s BETTER to invest time for NOT later having trouble and NOT knowing from where the fault comes 😉
.
Housing (case) for Xmas Star
Click image, please, to enlarge
Housing (case) for Xmas Star
Click image, please, to enlarge.
Housing (case) for Xmas Star
Housing (case) for Xmas Star
Click image, please, to enlarge.
Soldering inside the housing (case) for Xmas star
Click image, please, to enlarge.
Soldering inside the housing (case) for Xmas star
Click image, please, to enlarge.
Well, you have seen NOW the different mechanical steps and the soldering inside the housing, that’s the preparation, now we have to connect as well the Xmas star to the Arduino… We will use a 3 x 0.75 mm² cable to do so, find below, please, some PICs which show you the How-To, as well as the components with links to purchase them (I used AMAZON.DE), feel FREE to purchase them where you want:
L’auteur Gust MEES est Formateur andragogique / pédagogique TIC, membre du “Comité Conseil” de “Luxembourg Safer Internet” (LuSI), appelé maintenant BEESECURE, partenaire officiel (consultant) du Ministère de l’éducation au Luxembourg du projet ”MySecureIT“, partenaire officiel du Ministère du Commerce au Luxembourg du projet ”CASES” (Cyberworld Awareness andSecurityEnhancementStructure). L’auteur était aussi gagnant d’un concours en électronique en 1979 ( Pays germaniques ) et voyait son projet publié dans le magazine électronique “ELO”.
The author Gust MEES is ICT Course Instructor, ”Member of the Advisory Board” from “Luxembourg Safer Internet” (LuSI), BEESECURE, Official Partner (Consultant) from the Ministry of Education in Luxembourg, project “MySecureIT“, Official Partner from the Ministry of Commerce in Luxembourg, project “CASES” (Cyberworld Awareness and Security Enhancement Structure).
The author was also a winner of an electronics contest (Germanic countries) in 1979 and got his project published in the “Electronics Magazine ELO”.
..
Keywords necessary for me to create this blog post: Arduino UNO R3, Arduino NANO, UNO R3 Project, Xmas Star, WM2812B RGB LEDs, Heatshrinking-Tube, coding, learning to learn, learning by doing,
Halloween Project with Skull, Arduino, Blinking LEDs and Scrolling Eyes
Soon is Halloween, so let us create a scary project while coding and DIY (tinkering a bit…). The tutorial is made for people who don’t have a 3D-Printer, we will use a 21 cm plastic Skull for 13€ bought on Amazon, 3 ARDUINO NANO’s and two 8 mm WHITE LEDs to realize this project. First let us have a look how the project will look to give you the right motivation to start it, check the video below, please:
.
.
As you might have realized while watching the video, there are 3 different effects in it:
The rolling eyes, we were talking about it already in following tutorial:
In the above mentioned tutorials, you will find the wiring as well as the codes (Sketches):
First start with one of the 3 projects, make the wiring and upload the code to the ARDUINO Nano and test it. IF it is working start the second one and so on… Once finished the above mentioned we will need to integrate the hardware into the Skull…
SO, we have seen now ALL the necessary steps to make this project working, up to YOU now to bring in the electronics into the Skull and seal the Skull later with hot glue. You can use the above showing cable solution or to try to put everything on a Strip-Board and solder it; YOUR choice! 😉
Idea: You could try to include as well a proximity sensor which enables the playing of the devil laughter in the video 😉
L’auteur Gust MEES est Formateur andragogique / pédagogique TIC, membre du “Comité Conseil” de “Luxembourg Safer Internet” (LuSI), appelé maintenant BEESECURE, partenaire officiel (consultant) du Ministère de l’éducation au Luxembourg du projet ”MySecureIT“, partenaire officiel du Ministère du Commerce au Luxembourg du projet ”CASES” (Cyberworld Awareness andSecurityEnhancementStructure). L’auteur était aussi gagnant d’un concours en électronique en 1979 ( Pays germaniques ) et voyait son projet publié dans le magazine électronique “ELO”.
The author Gust MEES is ICT Course Instructor, ”Member of the Advisory Board” from “Luxembourg Safer Internet” (LuSI), BEESECURE, Official Partner (Consultant) from the Ministry of Education in Luxembourg, project “MySecureIT“, Official Partner from the Ministry of Commerce in Luxembourg, project “CASES” (Cyberworld Awareness and Security Enhancement Structure).
The author was also a winner of an electronics contest (Germanic countries) in 1979 and got his project published in the “Electronics Magazine ELO”.
..
Keywords necessary for me to create this blog post: Arduino UNO R3, Arduino NANO, UNO R3 Project, Halloween, scary, EMO LED Matrix, devil laugh, WM2812B RGB LEDs, 8 mm WHITE LEDS, Plastic Skull, Heatshrinking-Tube, coding, learning to learn, learning by doing,
We were already playing around, as seen on my tutorials below, with the Temperature/Humidity sensors DHT11, DHT22 and LCD1602, without I2C possibility. There were a lot of cables to connect, we will try out this time to use a LCD with I2C bus connection as it uses ONLY 4 wires to connect. It’s a perfect project for newbies in coding as they will see the measured values directly on the LCD screen, the success and happy factor is guaranteed!
Let us have first a look on the wiring (cabling) which is actually very easy, have a look below please:
.
====> Click image, please, to enlarge.
The wiring (cabling) will take about +/- 5-10 minutes depending on your own rhythm… Let us have a look on the coding now: we will use exactly the same code (Sketch) as in our first tutorial here, which we will change just a bit to fit for I2C LCD1602 display:
Copy&Paste the code from above tutorial where it is marked “I also made an example where I display the results on a LCD. Here’s the source code of that example:” and paste it into the Arduino IDE. Connect the Arduino NANO with your computer now. Open the Arduino IDE and choose the board “Arduino NANO”, see screenshot below, please:
Click image, please, to enlarge.
.
Next step, on the same Arduino IDE select the Processor:
.
Click image, please, to enlarge.
.
TIP: when the LED on the Arduino NANO is lightning GREEN it is an original NANO and you must choose “Atmega328P”; if the LED is lightning RED, it is a clone and you must choose “Atmega328P (Old Bootloader)”.
.
NOW it is about time to adapt the code (Sketch) to an I2C-LCD1602 display, let us have a look on the Sketch (the original):
.
Click image, please, to enlarge.
.
As we can see in line 10: the library is meant for a normal LCD display, it needs to get changed for a “I2C LCD Library”.
In line 15: the same it shows the wiring pins for a normal LCD display, it needs to get changed for a “I2C LCD” display.
In line19: It is BETTER to add as well the I2C-Address, mostly “0x27” OR “0x3F”.
That is NOT much to change, we will see in the screenshot below the How-To:
.
Click image please, to enlarge.
.
By enlarging (click on the image) you will see by comparing where the changes are. I commented in the lines the WHY… Try it out to change it yourselves or just download the Sketch (Code) here below who is working:
Copy&Paste this code into a NEW Sketch on the Arduino IDE and upload now the code to the Arduino NANO (or Arduino UNO) and enjoy it! 😉 Here below a photo of the working sketch:
.
.
And in case of that you have a I2C LCD with 20×4 configuration it works also, check photo below please:
.
.
As you can see the two first lines from 4 possible lines are only used, that is normal as the Sketch (Code) is actually written for a 2 line LCD. BUT we can add some lines of code in the original Sketch to make it working on 4 lines, which is very easy actually, check below please for explication:
.
Click image, please, to enlarge.
.
As you can see in line 30 in above screenshot of the code ===> “lcd.setCursor(0,0); // Sets the location at which subsequent text written to the LCD will be displayed” the the line is set to “0” which means the first line on the LCD1602. By changing the value to “lcd.setCursor(0,1)” in line 30 and in line 34 to “”lcd.setCursor(0,2)” the text will be displayed as follows, see photo below please:
.
.
NOW, as you can see, we have two lines without any text where we could bring in some text. Let us try to find out HOW! We have seen already that “lcd.setCursor(0,0) above. We used in above example the lines 2 and 3 from 4 lines which were displayed as shown in above photo, right?
Click image, please, to enlarge.
.
Check lines 26 and 27 and also lines 37 and 38: I added them, do the same and the text between the “………” you may change it with your OWN text what will result in following, check photo below, please:
.
.
BUT wait, my text looks centralized and yours NOT, HOW?! Check photo below, please which explains:
L’auteur Gust MEES est Formateur andragogique / pédagogique TIC, membre du “Comité Conseil” de “Luxembourg Safer Internet” (LuSI), appelé maintenant BEESECURE, partenaire officiel (consultant) du Ministère de l’éducation au Luxembourg du projet ”MySecureIT“, partenaire officiel du Ministère du Commerce au Luxembourg du projet ”CASES” (Cyberworld Awareness andSecurityEnhancementStructure). L’auteur était aussi gagnant d’un concours en électronique en 1979 ( Pays germaniques ) et voyait son projet publié dans le magazine électronique “ELO”.
The author Gust MEES is ICT Course Instructor, ”Member of the Advisory Board” from “Luxembourg Safer Internet” (LuSI), BEESECURE, Official Partner (Consultant) from the Ministry of Education in Luxembourg, project “MySecureIT“, Official Partner from the Ministry of Commerce in Luxembourg, project “CASES” (Cyberworld Awareness and Security Enhancement Structure).
The author was also a winner of an electronics contest (Germanic countries) in 1979 and got his project published in the “Electronics Magazine ELO”.
.
.
Keywords necessary for me to create this blog post: Arduino UNO R3, Arduino NANO, UNO R3 Project, LCD 1602, Sensors, DHT11, DHT22, Temperature/Humidity Sensor, coding, learning to learn, learning by doing, trouble shooting, hygrometer, I2C, LCD 20×4,
Sometimes it might be useful to write a text which should be displayed on a LCD display without any cabling, that is possible to do over your own Wi-Fi network and a NodeMCU ESP8266 module. And the project uses ONLY 4 wires as the LCD1602 gets addressed over the I2C bus. Let us remember WHAT the I2C bus is in our previous tutorial:
Let us have a look on the video below who shows how it works:
.
.
SO, knowing now how it works, let us have a look on the Sketch (Code). I changed a bit the code, as I am using an I2C LCD1602 and I added as well some more text displayed on the LCD1602 display. Check below, please, the original code. I will explain WHAT could (should) GET changed later with a screenshot of the changes and/or a download…
The Arduino code and the library for this project can be found at the links below. The library has to be saved in the Arduino libraries folder of the same name:
The download is a text file created with OpenOffice, copy the content and place it into a new Sketch on the Arduino IDE. ALL you have to do now is to change some lines, e.g.:
in line 47: Enter your SSID
in line 48 Enter your Wi-Fi Network Password
See PIC below, please:
.
Click image, please, to enlarge.
.
This should work for you now; in case of that you wouldn’t see the display working find here the trouble-shooting:
Mostly it is that your LCD1602 uses a different I2C-Address and/or that the ESP8266 isn’t allowed in your network for security reasons, to make sure check my blog post here, please:
Here below a working Sketch which shows how it is working: for security reasons you won’t see my SSID, nor my real IP-Address! 😉
.
.
.
L’auteur Gust MEES est Formateur andragogique / pédagogique TIC, membre du “Comité Conseil” de “Luxembourg Safer Internet” (LuSI), appelé maintenant BEESECURE, partenaire officiel (consultant) du Ministère de l’éducation au Luxembourg du projet ”MySecureIT“, partenaire officiel du Ministère du Commerce au Luxembourg du projet ”CASES” (Cyberworld Awareness andSecurityEnhancementStructure). L’auteur était aussi gagnant d’un concours en électronique en 1979 ( Pays germaniques ) et voyait son projet publié dans le magazine électronique “ELO”.
The author Gust MEES is ICT Course Instructor, ”Member of the Advisory Board” from “Luxembourg Safer Internet” (LuSI), BEESECURE, Official Partner (Consultant) from the Ministry of Education in Luxembourg, project “MySecureIT“, Official Partner from the Ministry of Commerce in Luxembourg, project “CASES” (Cyberworld Awareness and Security Enhancement Structure).
The author was also a winner of an electronics contest (Germanic countries) in 1979 and got his project published in the “Electronics Magazine ELO”.
.
Stay tuned for next blog post(s) 😉.. .
Keywords necessary for me to create this blog post: NodeMCU, ESP8266, Web Server, I2C, LCD1602, Coding, Maker, MakerED, MakerSpaces…
I was looking for a simple project for beginners, newbies on Coding and MakerED. A looong time ago since we did a project with ONLY four (4) wires, isn’t it! Well here is one which is very easy to create, a “Scrolling text on a LCD1602 with “I2C-Bus”. In previous blog post we were already using and explaining the “I2C-Bus” with an LCD, so it will be easy to create this one…
In the tutorial are mentioned also the download link for the code in the upper side of the website, download it and check it; there are some bugs in 😉 I will explain where to look for changing the code, it’s actually very easy, here we GO!
The code looks like this (partial view for WHAT is interesting us…).
.
Click image, please, to enlarge.
.
When we look at line 6, it is just a “comment” and so it will result in an ERROR, it should become uncommented by ” // “. In my case I didn’t get any text displayed, so I had a look at line 18 which is ” lcd.begin (16,2);” and I changed it into ===> “lcd.begin (0x3F,16,2);” which worked!! SO, that’s my recommendations, otherwise the Sketch works fine and you can change the lines 9 and 10 where you bring in your own text; NOT more than 16 characters, please 😉 Well, give it a try and find out yourselves… Here below a screenshot with the working code…
.
Click image, please, to enlarge.
.
Click the image, please, to enlarge it and find the necessary instructions to make the code work correctly, IF you have the same problem as I had.
Please check video below to see the Sketch in action, e.g.
.
.
SO, now that your sketch is working, play a bit around while changing the variables, such as:
delays
text
etc.
Have fun and stay tuned for next blog posts 😉
.
L’auteur Gust MEES est Formateur andragogique / pédagogique TIC, membre du “Comité Conseil” de “Luxembourg Safer Internet” (LuSI), appelé maintenant BEESECURE, partenaire officiel (consultant) du Ministère de l’éducation au Luxembourg du projet ”MySecureIT“, partenaire officiel du Ministère du Commerce au Luxembourg du projet ”CASES” (Cyberworld Awareness andSecurityEnhancementStructure). L’auteur était aussi gagnant d’un concours en électronique en 1979 ( Pays germaniques ) et voyait son projet publié dans le magazine électronique “ELO”.
The author Gust MEES is ICT Course Instructor, ”Member of the Advisory Board” from “Luxembourg Safer Internet” (LuSI), BEESECURE, Official Partner (Consultant) from the Ministry of Education in Luxembourg, project “MySecureIT“, Official Partner from the Ministry of Commerce in Luxembourg, project “CASES” (Cyberworld Awareness and Security Enhancement Structure).
The author was also a winner of an electronics contest (Germanic countries) in 1979 and got his project published in the “Electronics Magazine ELO”.
Keywords necessary for me to create this blog post: Arduino UNO R3, Arduino NANO, LCD 1602, I2C Bus, coding, learning to learn, learning by doing, trouble shooting, I2C scan, LCD160/I2C, Scrolling Text,
Make your Maker-Life less stressful with some tips and tools
You were certainly in some situations where you were shouting and swearing about situations when things didn’t work as well as expected as you didn’t have the right tools to finish a project… Well, I encountered as well such situations on projects and it wouldn’t for sure not be the last time that it will happen… SO, I was browsing internet catalogs about tools and I will present to you the most helpful ones which I found to make my Maker-Life less stressful.
It will be about some special tools as well as about complementary stuff which would be GOOD to have for a BETTER and stress-less working on projects.
Please check below some photos which show you how easy it will become with the shown tools and Tips & Tricks. You will find as well the links to order them in case of… You might choose of course ALSO your favorite supplier…
I strongly recommend the magnetic telescope and the magnetic screwdriver set with bits for any assembling!
L’auteur Gust MEES est Formateur andragogique / pédagogique TIC, membre du “Comité Conseil” de “Luxembourg Safer Internet” (LuSI), appelé maintenant BEESECURE, partenaire officiel (consultant) du Ministère de l’éducation au Luxembourg du projet ”MySecureIT“, partenaire officiel du Ministère du Commerce au Luxembourg du projet ”CASES” (Cyberworld Awareness andSecurityEnhancementStructure). L’auteur était aussi gagnant d’un concours en électronique en 1979 ( Pays germaniques ) et voyait son projet publié dans le magazine électronique “ELO”.
The author Gust MEES is ICT Course Instructor, ”Member of the Advisory Board” from “Luxembourg Safer Internet” (LuSI), BEESECURE, Official Partner (Consultant) from the Ministry of Education in Luxembourg, project “MySecureIT“, Official Partner from the Ministry of Commerce in Luxembourg, project “CASES” (Cyberworld Awareness and Security Enhancement Structure).
The author was also a winner of an electronics contest (Germanic countries) in 1979 and got his project published in the “Electronics Magazine ELO”.
.
Keywords necessary for me to create this blog post: Caliper, Cutting Set, Magnetic Telescope, Screw Drive BITS, M3 hexagon spacers, 9 V clips with plug, Tips & Tricks…
Social Distancing Monitor, Arduino NANO and Neopixel Ring
We realized already several projects for Social Distancing with LCD and OLEDs ===> https://gustmees.wordpress.com/?s=social+distancing and this time WE will use a Neopixel Ring who changes the color from green to orange and then to red depending on how close WE come to the 2 metres.
WE will have a look on the video who inspired me and where you will find more information:
Copy and paste it into the Arduino IDE and have fun 😉
.
.
L’auteur Gust MEES est Formateur andragogique / pédagogique TIC, membre du “Comité Conseil” de “Luxembourg Safer Internet” (LuSI), appelé maintenant BEESECURE, partenaire officiel (consultant) du Ministère de l’éducation au Luxembourg du projet ”MySecureIT“, partenaire officiel du Ministère du Commerce au Luxembourg du projet ”CASES” (Cyberworld Awareness andSecurityEnhancementStructure)..
The author Gust MEES is ICT Course Instructor, ”Member of the Advisory Board” from “Luxembourg Safer Internet” (LuSI), BEESECURE, Official Partner (Consultant) from the Ministry of Education in Luxembourg, project “MySecureIT“, Official Partner from the Ministry of Commerce in Luxembourg, project “CASES” (Cyberworld Awareness and Security Enhancement Structure).
Check my #curation to find best articles, blogs and courses about #education #itsecurity #CyberSecurity #EdCollCoach #GlobalEDU #cyberbullying, #AR #RA #augmentedreality #health #science #QR #qrcodes in EN, FR, DE…
Play the FREE Game and Learn about Cyber Security and Coding
App Advisor
App Advisor helps safe-guard your personal data by telling you exactly which apps you should be cautious of, before they become a threat to your privacy.
Click image to use this free service and find out of your installed Apps are “privacy-friendly” or check new Apps before installing them!


 L’auteur Gust MEES est Formateur andragogique / pédagogique TIC, membre du “Comité Conseil” de “Luxembourg Safer Internet” (LuSI), appelé maintenant BEESECURE, partenaire officiel (consultant) du Ministère de l’éducation au Luxembourg du projet ”MySecureIT“, partenaire officiel du Ministère du Commerce au Luxembourg du projet ”CASES” (Cyberworld Awareness and Security Enhancement Structure).