Blog posts about Education, CyberSecurity, Digital Citizenship, Privacy, InternetSafety, curation, PKM, PLN, blogging, Global Collaboration, Coaching, Collaboration, eSkills, eLeadership, Coding, MakerED, MakerSpace, Social Media, How to learn, learning to learn
Through the Maker-Movement and IoT (Internet of Things) there is already a LOT happening and different Networks are collecting Data through Sensorsand make them available for everybody to have access and study them! Such sensors are e.g.:
Air Quality
Meteo
Street traffic
Radiation
People (counter) traffic
Water Quality
Wind velocity
Radar for excess of car speed
Inundation prevention
Observations on:
Nature (birds, etc.)
Archaeology discovering
…
Those, above mentioned applications can even be assembled together and so being a precious source for communes and Governments! Mostly such projects are done with an ARDUINO and/or Raspberry PI based micro controller and a mini computer: The main difference between them is Arduino is microcontroller board while Raspberry PI is a mini computer.
Thus meaning: that fits perfect for the Maker-Movement and could GET integrated easily into STEM projects!
Well, after following for a long time different possibilities on the How-To to get globally access to such IMPORTANT Big-Data for everyone, I found out THAT “The Things Network” is a perfect way! Please find below the address and the projects:
Key words necessary for me to create this blog post: CitiZEN-Science, STEM, MakerED, Maker-Spaces, PracTICE, LEARNing-By-Doing, TTN, The Things Network, Arduino, Raspberry PI, LoraWAN, SigFox (Low Power consumption…)
.
L’auteur Gust MEES est Formateur andragogique / pédagogique TIC, membre du “Comité Conseil” de “Luxembourg Safer Internet” (LuSI), appelé maintenant BEESECURE, partenaire officiel (consultant) du Ministère de l’éducation au Luxembourg du projet ”MySecureIT“, partenaire officiel du Ministère du Commerce au Luxembourg du projet ”CASES” (Cyberworld Awareness andSecurityEnhancementStructure).
The author Gust MEES is ICT Course Instructor, ”Member of the Advisory Board” from “Luxembourg Safer Internet” (LuSI), BEESECURE, Official Partner (Consultant) from the Ministry of Education in Luxembourg, project “MySecureIT“, Official Partner from the Ministry of Commerce in Luxembourg, project “CASES” (Cyberworld Awareness and Security Enhancement Structure).
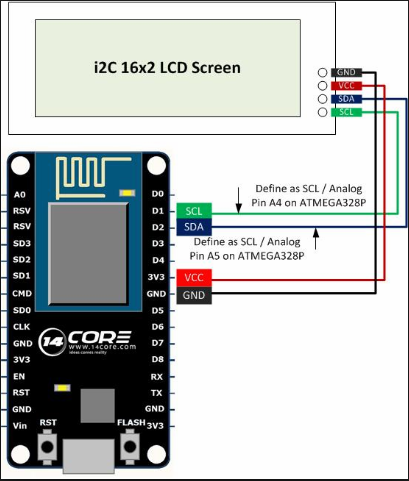
Sometimes it might be useful to write a text which should be displayed on a LCD display without any cabling, that is possible to do over your own Wi-Fi network and a NodeMCU ESP8266 module. And the project uses ONLY 4 wires as the LCD1602 gets addressed over the I2C bus. Let us remember WHAT the I2C bus is in our previous tutorial:
Let us have a look on the video below who shows how it works:
.
.
SO, knowing now how it works, let us have a look on the Sketch (Code). I changed a bit the code, as I am using an I2C LCD1602 and I added as well some more text displayed on the LCD1602 display. Check below, please, the original code. I will explain WHAT could (should) GET changed later with a screenshot of the changes and/or a download…
The Arduino code and the library for this project can be found at the links below. The library has to be saved in the Arduino libraries folder of the same name:
The download is a text file created with OpenOffice, copy the content and place it into a new Sketch on the Arduino IDE. ALL you have to do now is to change some lines, e.g.:
in line 47: Enter your SSID
in line 48 Enter your Wi-Fi Network Password
See PIC below, please:
.
Click image, please, to enlarge.
.
This should work for you now; in case of that you wouldn’t see the display working find here the trouble-shooting:
Mostly it is that your LCD1602 uses a different I2C-Address and/or that the ESP8266 isn’t allowed in your network for security reasons, to make sure check my blog post here, please:
Here below a working Sketch which shows how it is working: for security reasons you won’t see my SSID, nor my real IP-Address! 😉
.
.
.
L’auteur Gust MEES est Formateur andragogique / pédagogique TIC, membre du “Comité Conseil” de “Luxembourg Safer Internet” (LuSI), appelé maintenant BEESECURE, partenaire officiel (consultant) du Ministère de l’éducation au Luxembourg du projet ”MySecureIT“, partenaire officiel du Ministère du Commerce au Luxembourg du projet ”CASES” (Cyberworld Awareness andSecurityEnhancementStructure). L’auteur était aussi gagnant d’un concours en électronique en 1979 ( Pays germaniques ) et voyait son projet publié dans le magazine électronique “ELO”.
The author Gust MEES is ICT Course Instructor, ”Member of the Advisory Board” from “Luxembourg Safer Internet” (LuSI), BEESECURE, Official Partner (Consultant) from the Ministry of Education in Luxembourg, project “MySecureIT“, Official Partner from the Ministry of Commerce in Luxembourg, project “CASES” (Cyberworld Awareness and Security Enhancement Structure).
The author was also a winner of an electronics contest (Germanic countries) in 1979 and got his project published in the “Electronics Magazine ELO”.
.
Stay tuned for next blog post(s) 😉.. .
Keywords necessary for me to create this blog post: NodeMCU, ESP8266, Web Server, I2C, LCD1602, Coding, Maker, MakerED, MakerSpaces…
In our previous tutorials we were using already the NodeMCU ESP8266 Wi-Fi Module and we discussed about “Security“, “Cyber-Security” issues while using “IoT“, “Internet of Things” and the importance that the router MUST be protected by a NEW password and NOT ALLOW to let connect any devices to our router/internet, unless we decide to let them (ONLY our owns) connect!
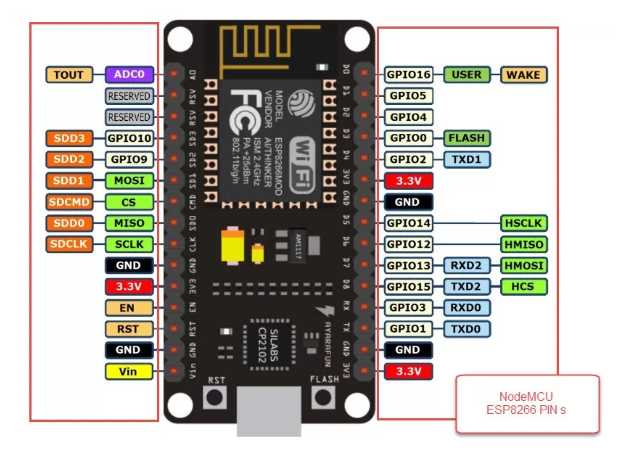
It was a bit a difficult procedure to find out the “MAC Address” of the NodeMCU ESP8266 Wi-Fi Module, isn’t it?! Well there is a more easy way to find out with a little Sketch.
Please check the tutorial and copy the Sketch from:
Now it is much more easy to run a project with a NodeMCU ESP8266 Wi-Fi Module. Connect your module to the computer through the USB cable, chose the board in the Arduino IDE and upload the sketch. Check below the how-to, please.
Click the image, please, to enlarge.
.
Please check again (I don’t want to reinvent the wheel…) the tutorial below who explains very well in detail:
Once having the “MAC Address” of our NodeMCU ESP8266 Wi-Fi Module we can now easily incorporate it into the allowed devices in our router.
.
NOW, click on the button “Add Wireless Device” as shown in above image.
.
Click image, please, to enlarge.
.
A new window opens where you can add the new devices “MAC Address” which you wrote down before. Do so please and then click the button “OK“. Go back and have a look if the device is now in the authorized devices in your Network.
SO, now when you use a Sketch with “IoT” with the NodeMCU ESP8266 Wi-Fi Module, the device is recognized and allowed in your Network!
.
.
L’auteur Gust MEES est Formateur andragogique / pédagogique TIC, membre du “Comité Conseil” de “Luxembourg Safer Internet” (LuSI), appelé maintenant BEESECURE, partenaire officiel (consultant) du Ministère de l’éducation au Luxembourg du projet ”MySecureIT“, partenaire officiel du Ministère du Commerce au Luxembourg du projet ”CASES” (Cyberworld Awareness andSecurityEnhancementStructure). L’auteur était aussi gagnant d’un concours en électronique en 1979 ( Pays germaniques ) et voyait son projet publié dans le magazine électronique “ELO”.
The author Gust MEES is ICT Course Instructor, ”Member of the Advisory Board” from “Luxembourg Safer Internet” (LuSI), BEESECURE, Official Partner (Consultant) from the Ministry of Education in Luxembourg, project “MySecureIT“, Official Partner from the Ministry of Commerce in Luxembourg, project “CASES” (Cyberworld Awareness and Security Enhancement Structure).
The author was also a winner of an electronics contest (Germanic countries) in 1979 and got his project published in the “Electronics Magazine ELO”.
.
Stay tuned for next blog post(s) 😉.. .
Keywords necessary for me to create this project: ESP8266, Wi-Fi module, ESP8266 and Adafruit Feather HUZZAH NOT the same pinout!!, where to buy?, Arduino IDE, web server, Coding, Maker, MakerED, MakerSpaces, IoT, Internet of Things, Router,
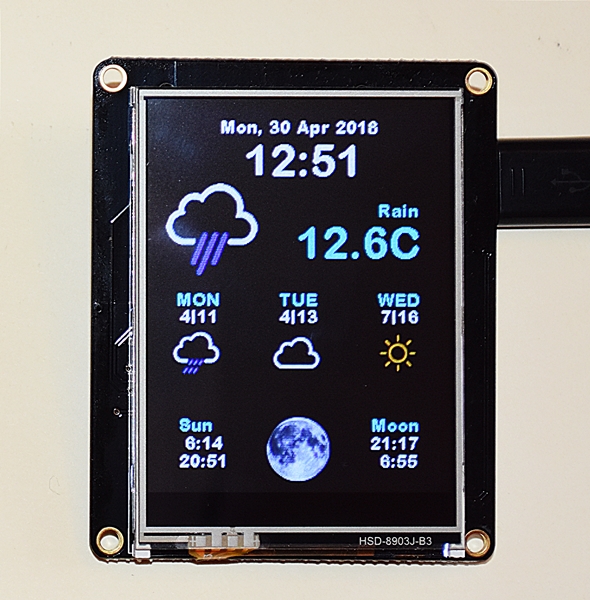
ESP8266 WiFi Weather Station with Color TFT Display
We were playing around already with LED MATRIX’s, devices to visualize measured values and/or texts. In this blog post (Tutorial) we will use a TFT Display (Thin-film-transistor liquid-crystal display) with touch screen to display a three (3) days weather forecast with moon phases. This little weather station acquires its data over a Wi-Fi connection from an online weather server, Wunderground.
What is GREAT with this project, there ISN’T any wiring, no cables to connect; apart from plugging in the accumulator! 😉 BUT, please check the video below who explains in detail:
.
.
Detailed parts list, supplier and prices
Please find below the detailed parts list as well as the supplier and the prices.
As you can see the price is reasonable for this project, ONLY 62.40$and easy to realize! ALL what YOU need is a bit time, passion and here we GO! 😉 Have FUN!
There is some preparation needed before we can test our code for the weather station: I suggest that you read and that you follow each step as shown in this tutorial by ADAFRUIT (very important, otherwise it won’t work!!):
It isn’t difficult, but it needs some time and you must be careful to follow each step!
We need ALSO an account on the weather server Wunderground to create our “API” (Application Programming Interface) which we need to implement in our code settings! THIS is also well explained here:
Same procedure as explained already above, follow very carefully each action step by step!
.
Are there some pit falls?
YES, this could be!
It ONLY works with the ADAFRUIT Feather HUZZAH!!! It’s an ESP8266 but it has a different PINOUT as the normal ESP8266!!
When it doesn’t work, you won’t GET an internet connection, thus meaning that you see on the screen “Internet Connection” for a loooong time, without that the weather data gets shown, you didn’t follow step by step the instructions!! Check our previous blog post (Tutorial) on How-To let the NEW device GET access to your Network:
Well, you haven’t encounter any problem or the problems are solved, this is WHAT you will see appearing on the TFT:
1
2
3
4
5
6
.
As you can see in “Picture 6“, that is what shows up on the first start! Is it the right time which is displayed? Is it the right measure unit which is displayed (°C OR °F)? If SO, it is OK then, if NOT, then we have to look on the code and change some settings!!
Here below the How-To:
Open the Arduino IDE and click on the “Settings.h” tab, check below where and how to change (adapt) the settings to your country and time zone.
.
Click the image, please, to enlarge
Once done, save the code and upload it again. You will GET the right data displayed then as shown below:
.
.
.
L’auteur Gust MEES est Formateur andragogique / pédagogique TIC, membre du “Comité Conseil” de “Luxembourg Safer Internet” (LuSI), appelé maintenant BEESECURE, partenaire officiel (consultant) du Ministère de l’éducation au Luxembourg du projet ”MySecureIT“, partenaire officiel du Ministère du Commerce au Luxembourg du projet ”CASES” (Cyberworld Awareness andSecurityEnhancementStructure). L’auteur était aussi gagnant d’un concours en électronique en 1979 ( Pays germaniques ) et voyait son projet publié dans le magazine électronique “ELO”.
The author Gust MEES is ICT Course Instructor, ”Member of the Advisory Board” from “Luxembourg Safer Internet” (LuSI), BEESECURE, Official Partner (Consultant) from the Ministry of Education in Luxembourg, project “MySecureIT“, Official Partner from the Ministry of Commerce in Luxembourg, project “CASES” (Cyberworld Awareness and Security Enhancement Structure).
The author was also a winner of an electronics contest (Germanic countries) in 1979 and got his project published in the “Electronics Magazine ELO”.
.
Stay tuned for next blog post(s) 😉.. .
Keywords necessary for me to create this project: Adafruit Feather HUZZAH, ESP8266, Adafruit Feather TFT Display, 3 days weather station, weather forecast, moon phases, Wunderground, Wi-Fi module, ESP8266 and Adafruit Feather HUZZAH NOT the same pinout!!, where to buy?, time zone, metric, imperial, °C, °F, Arduino IDE, web server, weather server,
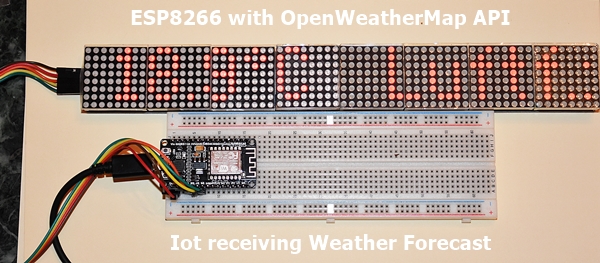
First Steps with the ESP8266 Wi-Fi Module | Scrolling Text (Time, Temp., Humidity…) with 8×8 LED MATRIX
In our previous blog post (Tutorial…), we were playing around with a LED MATRIX <===> First Steps with the Arduino-UNO R3 | Maker, MakerED, Coding | Scrolling Text with 8×8 LED MATRIX <===> and we will continue to use the LED MATRIX, but this time with a Wi-Fi connection. We will use the module “ESP8266” which you can purchase worldwide around as it is very popular and it costs ONLY 7.49 €. I ordered mine on Amazon in Germany:
Check the How-To on the video below @ 5:51 minutes.
.
Check the video below please who explains the first steps with the ESP8266:
.
.
Now that we have configured the ESP8266 in the Arduino IDE we need some other information which are necessary to implement into the code. It is the name of the Wi-Fi Network (SSID) and the Password for the Wi-Fi Network. AND a new device connecting to the router (the ESP8266) must GET allowed to do so, if your router is well configured for Cyber-Security! Thus meaning for Cyber-Security reasons: in the router security settings any device connecting to your Wi-Fi Network SHOULD NOT have access unless it is your own ones and unless you allow THEM to access!
.
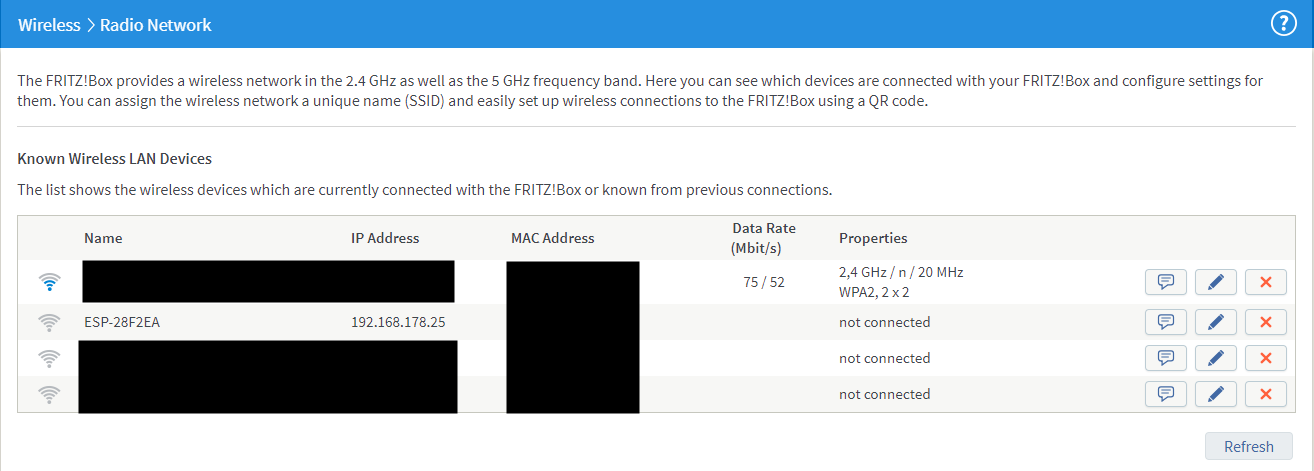
My shown images from the Router are from a “FritzBox Router“, but it should be similar in other Routers!!
.
Click image, please, to enlarge.
In the above image you see which devices are connected to your Network, to do so: open your router with your login and/or password and look under “Radio Network” (or similar). IF you don’t see your “ESP8266” in the Network while you run the code and it isn’t working does mean that your Network is well secured as it doesn’t allow any other device connecting to the Network!
Click above image, please, to enlarge.
.
You need then to give permission to the device to connect. To do so: Open the Security settings in your Router and click on “Allow all new wireless devices“. NOW, you will see that the “ESP8266” is part of the Network! Note down on a piece of paper its “MAC Address” and protect your Network again by clicking on “Do not allow new wireless devices“!!
.
Click on the image, please, to enlarge.
.
NOW, click on the button “Add Wireless Device” as shown in above image.
.
Click image, please, to enlarge.
.
A new window opens where you can add the new devices “MAC Address” which you wrote down before. Do so please and then click the button “OK“. Go back and have a look if the device is now in the authorized devices in your Network.
Required:
SSID
WLAN Password
Acces authorization for the Wi-Fi
…
The Code for the ESP8266 and first try
I used a video tutorial in German from Switzerland as well as its Code for this project as it is very well explained. Even if you don’t understand German, you can follow step by step in the video:
.
.
While watching the video on YouTube, you will find the download link for the code, check below please:
.
Click image, please, to enlarge.
.
You can find another interesting code here on the blog as well as the wiring diagram and a GREAT description (in German):
Unzip the code and install it by following the video instructions; check @ 8.30 minutes and follow step by step…
After everything is installed and the code is in the Arduino IDE you need to adapt the code to your needs: check video @ 10.36 minutes
Entering your Network name, the SSID
Entering the Network-Key; Check above Router images…
…
.
When you run the code for the first time: disconnect the two wires for the power supply (GND and VCC) as the LED Matrix will light all the dots and the power consumption will be by 1.5 Ampere; thus meaning the components, especially the chips will become hot, even could get overheated!! Once the Arduino IDE shows you that the code is uploaded reconnect them and it should work.
.
That’s it folks; now you can run the code and have fun! I takes a bit time before the code runs: first “Compiling Sketch…“, followed by “Uploading…” and “Done Uploading…” and the ESP8266 tries to connect with the Wi-Fi Network…
.
If everything was made correctly as described above you should receive now your personal weather data… FIRST the time will GET displayed for a couple of seconds (that period could GET changed by your settings in the code…)…
.
.
Then the scrolling text starts displaying the temperature, humidity, air pressure, rain risk in % and wind speed…
.
.
Stay tuned for next blog posts and enjoy it 😉
Have FUN with your “LEARNing-By-Doing project” and try out ALSO the other examples 😉
.
Keywords necessary for me to create this blog post: Arduino, Wi-Fi, wireless, ESP8266, Weather received through Wi-Fi, LED Matrix, Coding, Maker, MakerED, MakerSpaces, Learning By Doing, Learning To Learn, PracTICE,
.
.
L’auteur Gust MEES est Formateur andragogique / pédagogique TIC, membre du “Comité Conseil” de “Luxembourg Safer Internet” (LuSI), appelé maintenant BEESECURE, partenaire officiel (consultant) du Ministère de l’éducation au Luxembourg du projet ”MySecureIT“, partenaire officiel du Ministère du Commerce au Luxembourg du projet ”CASES” (Cyberworld Awareness andSecurityEnhancementStructure). L’auteur était aussi gagnant d’un concours en électronique en 1979 ( Pays germaniques ) et voyait son projet publié dans le magazine électronique “ELO”.
The author Gust MEES is ICT Course Instructor, ”Member of the Advisory Board” from “Luxembourg Safer Internet” (LuSI), BEESECURE, Official Partner (Consultant) from the Ministry of Education in Luxembourg, project “MySecureIT“, Official Partner from the Ministry of Commerce in Luxembourg, project “CASES” (Cyberworld Awareness and Security Enhancement Structure).
The author was also a winner of an electronics contest (Germanic countries) in 1979 and got his project published in the “Electronics Magazine ELO”.
.
Stay tuned for next blog post(s) 😉.. .
Keywords necessary for me to create this blog post: Arduino UNO R3, Arduino NANO, MAX7219 LRD DISPLAY, Coding, Maker, MakerED, MakerSpaces…
Check my #curation to find best articles, blogs and courses about #education #itsecurity #CyberSecurity #EdCollCoach #GlobalEDU #cyberbullying, #AR #RA #augmentedreality #health #science #QR #qrcodes in EN, FR, DE…
Play the FREE Game and Learn about Cyber Security and Coding
App Advisor
App Advisor helps safe-guard your personal data by telling you exactly which apps you should be cautious of, before they become a threat to your privacy.
Click image to use this free service and find out of your installed Apps are “privacy-friendly” or check new Apps before installing them!


 L’auteur Gust MEES est Formateur andragogique / pédagogique TIC, membre du “Comité Conseil” de “Luxembourg Safer Internet” (LuSI), appelé maintenant BEESECURE, partenaire officiel (consultant) du Ministère de l’éducation au Luxembourg du projet ”MySecureIT“, partenaire officiel du Ministère du Commerce au Luxembourg du projet ”CASES” (Cyberworld Awareness and Security Enhancement Structure).


 with 8×8 LED MATRIX")