.
.
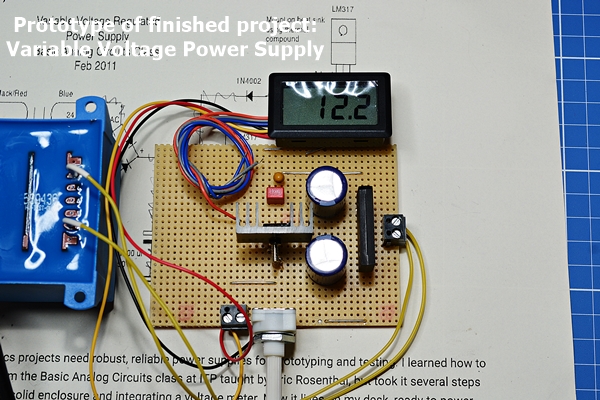
Building a Variable Power Supply With Few Components

Click the image please to enlarge
In previous tutorial Maker-First Steps in Electronics, the basics WE got a bit the PracTICE of soldering and WE learned ALSO about schematics, resistors, LEDs, diodes and OHM’s Law. WE used ALSO a 9 Volt battery as a power supply for our projects; BUT batteries are expensive (3,99 €) and when playing around a lot on experimenting WE would use a lot of them. This will certainly be the case as on the beginning while tinkering around, my personal experience, as one is curios and tries out everything. Which is good by the way, but better is to build a variable power supply for few money and for small projects like WE are working on.
SO, let us have a look on the schematic about WHAT WE will create next. WE will discover some NEW components, such as a voltage regulator integrated circuit (IC), a variable resistor (potentiometer), capacitors, electrolytic capacitors… which WE will learn more about as well in this tutorial.
WE had already the experience with a stripboard, which we will continue (on the beginning) to build our variable power supply. It will be a very easy one with ONLY 10 components to solder on the stripboard. The tension will be adjustable by a potentiometer (variable resistor) from 0-24 Volts and a maximum current of 1 Ampere. WE will ALSO provide it with a switch so that we can ALSO use it as a Volt-Meter to measure the tensions on our strip-board projects…
WE will ALSO learn to drill and to rasp as WE will enclose our project into an enclosure; well mechanics are part as well when one tinkers with electronics 😉
WE will solder measure points on the strip-board as well. so we can learn about measuring and to understand what is going on when AC gets through a rectifier bridge and becomes DC…
.
Schematics
Electronic Schematics – Need-To-Know
BEST explication I have found and WHICH I agree!!! Electronic schematics are like recipes for electronics. They tell you what ingredients to use and how to mix the ingredients. But instead of using text to explain the recipe, a drawing is used.
Learn more:
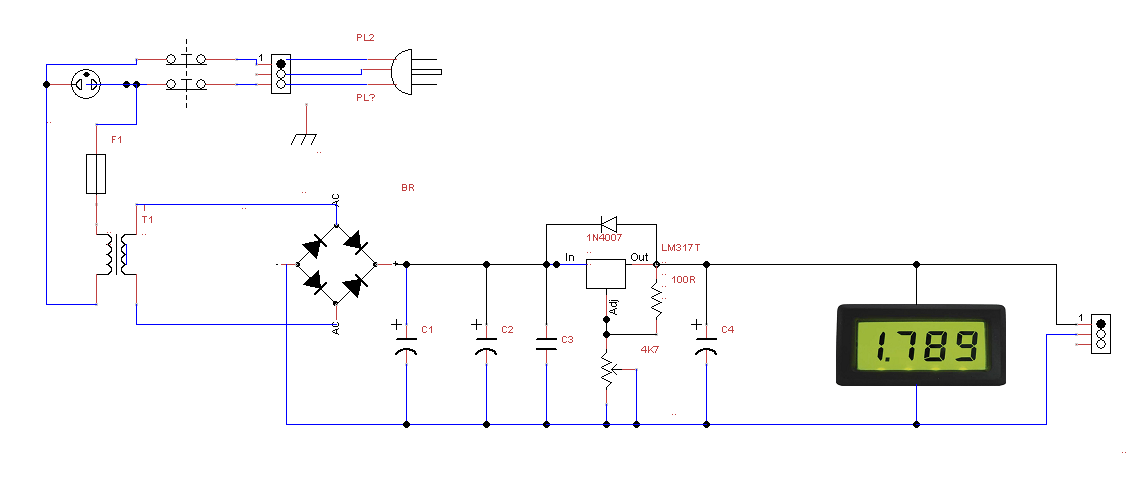
Please check the schematics of OUR project below:
.
.
The above schema was created with:
- TinyCAD
- …
.
| Fuse
|
Rectifier bridge
|
Voltage Regulator
|
| Transformer
|
Capacitors and Polarized Capacitors (Electrolytic Capacitors)
|
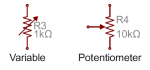
Variable Resistor (Potentiometer)
|
| Resistors
|
|


.
Learn more:
.
.
The Components and the Parts List
Please check below the photo to get familiarized with the parts.
.

.
In above image WE see parts which we used already in first tutorial <===> Electronics Starter Kit for Makers <===> such as resistors, diodes and the stripbord. NEW components are (please check the links below to learn more):
- AC Waveform and AC Circuit Theory
- Capacitors
- Kunststoff-Folien Kondensatoren (Deutsch)
- Electrolyte Capacitors (polarized)
- Elektrolyt Kondensatoren (Deutsch)
- Adjustable Voltage Regulator (such as LM317T)
- Potentiometer (variable resistor)
- Potentiometer (Deutsch)
- Bridge Rectifier (4 Diodes)
- Gleichrichter (Deutsch)
- LCD-Panelmeter
- Transformer
- Resistors
- Widerstände (Deutsch)
- My curation about Electronics
- Liste elektrischer und elektronischer Bauelemente (Wikipedia)
- Elektronik-Wissen (Deutsch)
- …
This time WE will ALSO need to use some tools and mechanical parts; well electronics without mechanics doesn’t exist 😉 Will get explained in a new tutorial…
.
List of online Electronics shops (mostly for Europe, but some are delivering ALSO global):
- CONRAD
- VÖLKNER
- REICHELT
- POLLIN
- BÜRKLIN
- RUTRONIK
- RS Components International the world’s largest distributor of electronics and maintenance products.
- Sparkfun
- ALLELECTRONICS
- BUDGETRONICS
- …
.
Detailed parts list, supplier and prices
Please find below the detailed parts list as well as the supplier and the prices.
.
|
Item and quantity |
Supplier and order number |
Price |
| 1 x Transformer 230V/1A | CONRAD: 710422 | 15,99€ |
| 1 x Bridge rectifier B40/C7000-4000 | CONRAD: 501980 | 4,49€ |
|
2 x Electrolyte capacitor 1000uF/63V |
CONRAD: 1472875 à 1,49€ |
2,98€ |
| 1 x Diode 1N4007 | CONRAD: 1262766 | 0,22€ |
| 1 x Resistor 100 Ω | CONRAD: 405132 | 0,10€ |
|
1 x Potentiometer 4K7 Ω |
CONRAD: 440778 |
1,99€ |
| 1 x Knob for potentiometer | CONRAD: 715840 | 1,09€ |
| 1 x LM317T | CONRAD: 176001 | 0,34€ |
|
1 x Capacitor MKS2-1uF/63V |
CONRAD: 455318 |
1,49€ |
| 1 x Panel-Meter | CONRAD: 101950 | 35,99€ |
| 1 Heatsink for LM317T | CONRAD: 183870 | 1,03€ |
| 1 x Mounting-Kit TO220 | CONRAD: 155140 | 0,72€ |
|
1 x Stripboard |
CONRAD: 529531 |
2,19€ |
| 2 x PCB Connector 2 pins | CONRAD: 1192188 à 0,28€ | 0,56€ |
| Total: | 69,18€ |
.
Check out this video tutorial to understand
A GREAT video tutorial to watch for understanding about the used “Voltage Regulator Chip LM317T“:
.
.
First tests without the transformer
I propose to make the first test(s) without the transformer; by using a 9 Volts battery! This to make sure that there isn’t any mistake on the wiring as a short-circuit could cause damage!! Check photo below please:
.

Click image please to enlarge
Using a copy of the schematics and a pen to erase the done connections already; this allows to keep an eye on how far one is…
.

.
Safety FIRST as WE are working with 230 Volts!!
 I will propose two different projects, one for NEWBIES and one for advanced users! NEWBIES will NOT solder the transformer on the stripboard, BUT will connect it to the stripboard by <===> Safety FIRST rules <===> and advanced users could solder it on the stripboard by respecting these Safety rules! WE will use ALSO heat-shrinking tubes to insulate ALL the components where 230 Volts is connected to assume that nobody could touch them to avoid electrical shock by touching!!!
Learn more about heat-shrinking tubes:
I am NOT the guy WHO follows any rules, BUT THESE ONE I follow myself ALSO as it is mandatory!! YOUR life and/or the life of OTHERS could be in danger if NOT followed!!! SO, take YOUR responsibility, please 😉 Well, enough blabla, let us have a look WHY:
Learn more:
- Electric shock (English)
- Stromunfall (Deutsch)
- …
Check photos below please:
.

Click image please to enlarge.
.

Click image please to enlarge
.
Let us protect and ALSO our workbench with a plastic underground (plastic is insulating…), check below please:
.

Click above image please to enlarge it.
.
Two different projects, one for NEWBIES and one for advanced users: thus meaning; NEWBIES will NOT solder the transformer on the stripboard, BUT fixing and connecting it apart! Advanced users will be able to solder the transformer on the stripboard by taking care of safety rules, check above image please for connected transformer on the stripboard and image below please for transformer connected with wires to the stripboard .
.

.
Building UP from the beginning a system for wiring
WE have two different possibilities for the wiring and connection of the components on the stripboard:
- Using really wiring with colored insulated wires
- Using ONLY the copper strips on the stripboard to make the connections
- OR using both as I did in above; one red colored wire was used to make a connection…
.
WHEN WE use the wiring with colored insulated wires, we need to have a system in it, let us define UP from the beginning which colors mean WHAT! I propose this:
- Red for the “PLUS” of DC Power Supply
- Blue for the “Minus” (Ground) of DC Power Supply
- Green for the connections of AC
- White or blank silver wire for bridges on the stripboard: connections from one component to the other…
.
List of free electronics circuit simulators
.
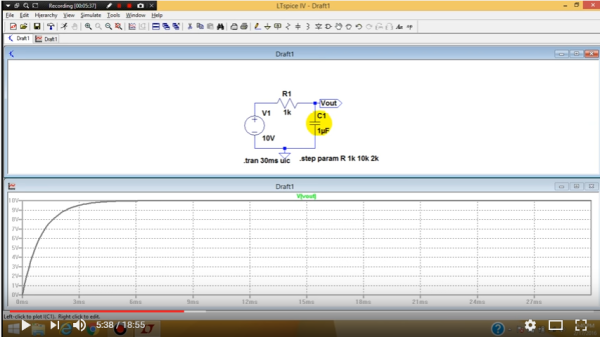
Click image please to access the video
Nowadays WE have the chance to profit from FREE Simulator software to examine the How-To circuits work, please find below some useful links:
Please check below for useful articles on Software:
.
Learn more:
Next steps to come
Well, first build the above and finish it! Later WE will bring in ALSO some test points (soldering them on the stripboard) for measuring the voltage on different points and we will solder as well on the stripboard some more components to protect out project against short circuits, an electronic fuse with ONLY five (5) components. WE, once finished the above mentioned will then go for mechanical works as the whole will get fit into an enclosure. There will be then a bit drilling, rasping and…
.
Some electronics projects made +/- 25-30 years ago, check video below please 😉 I stopped tinkering around for the peace of our conjugal life, well wife was right! I had to much hobbies; NOW I am retired and I have too much time, SO I started again…
.
.
Keywords necessary for me to create this blog post: Learning about alternative current (AC), Direct current (DC), Zenerdiodes, Voltage regulators, 7809, LM317T, Panelmeter, Digital Voltmeter, testing, measuring, test points, potentiometer, variable resistors, capacitors, electrolytic capacitors, LCD Display…
.
.
|
The author Gust MEES is ICT Course Instructor, ”Member of the Advisory Board” from “Luxembourg Safer Internet” (LuSI), BEESECURE, Official Partner (Consultant) from the Ministry of Education in Luxembourg, project “MySecureIT“, Official Partner from the Ministry of Commerce in Luxembourg, project “CASES” (Cyberworld Awareness and Security Enhancement Structure). The author was also a winner of an electronics contest (Germanic countries) in 1979 and got his project published in the “Electronics Magazine ELO”). |

.
Stay tuned for next blog post(s) 😉
.
.
.
.
.