.
.
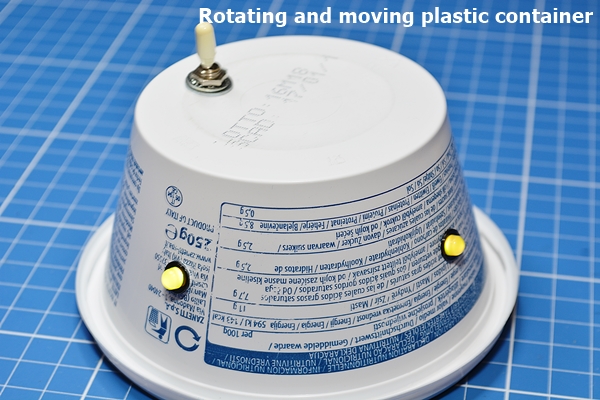
The rotating and moving plastic container
.
In previous blog post (tutorial) WE used a vibration motor from an old smartphone and we were learning also about the How-To about a vibration motor is working; it is about “Unbalance“. This unbalance is normally unwanted for motors, but for vibration motors it is a MUST. The motor we used was a 3 Volts motor and very small. In THIS NEW project we will use a 9 Volts DC-Motor and we will create from a normal motor a vibration motor with a little trick.
.
.
..
.
.
.
.
We will use a square nut and saw it in the middle, then taking the hot glue pistol and gluing it (one half) on the shaft of the 9 Volts DC-Motor.
.
.
.
.
Learn more:
9 Volts DC Motors are actually very cheap, check below please:
.
Let us have a look on the unbalance and vibrations motors
A vibrating motor is essentially a motor that is improperly balanced. In other words, there is an off-centered weight attached to the motor’s rotational shaft that causes the motor to wobble. The amount of wobble can be changed by the amount of weight that you attach, the weight’s distance from the shaft, and the speed at which the motor spins.
Learn more:
.
.
.
The schematics
Let us first have a look on the schematics where WE will discover some NEW stuff, a mini motor; in this case it is an “vibration motor“.
.
.
.
As you can see there is NOTHING special; we just put five (5) elements (4 flashing LEDS, a vibration motor) in parallel. The motor will get fixed with hot glue on the bottom. And we have a switch to switch on/off our circuit. As battery we use a 9 Volts battery which will get fixed with “VELCRO” on the bottom.
.
.
.
Learn more:
Calculating the resistor value with a 9 Volts battery and knowing that the flashing LEDs will be 3 Volts and consuming 20 mA. SO: 9-3=6 Volts which will get needed to take away from the LEDs. Check below please:
.
.
The shown value is 300 Ohms, but that is NOT a standard value. We will use a 330 Ohm resistor, as it is a standard value.
Useful online help:
The tools needed
Check below please WHAT the tools are that you will need for this project. The small saw is needed to cut out a small piece of 55 x 45 mm from the stripboard. That part is needed for soldering the resistor and the switch and is used to make the necessary connections to the other parts.
.
.
.
Concerning the hot-glue pistol which you need as well, I recommend the one from “STEINEL” as it is a Cordless all-purpose glue applicator. Neat, practical, accurate. Cordless hot-melt glue pen neo1 for all gluing jobs around the home, particularly lightweight and practical, cordless gluing with rechargeable Li-Ion battery, ready for gluing in 15 sec.
.
.
Learn more:
The price is around 35€, but worth to spend that money, comfortable precise working…
The Parts List
As mostly usual in my tutorials, WE will create on the beginning ONLY small stuff with some effects and a little bit of theory to give YOU the fun and the sense for electronics. SO, in this project there also ONLY a few components, such as: 9 Volts DC-Motor, Flashing LEDs, 1 resistor, 1 switch, a 9 Volts Battery, a plastic container (actually a Ricotta Cheese plastic container).
.
|
Item and quantity |
Supplier and order number |
Price |
| 1 x Stripboard | CONRAD: 529531 | 2,19€ |
| VELCRO tape +/- 10 cm needed à 16,99€/1 m | CONRAD: 546887 | 1,70€ |
|
1 x Empty plastic container +/- 10 cm diameter |
||
| 1 x Switch | CONRAD: 1377837 | 2,19€ |
| 1 x 9 Volts battery | CONRAD: 658014 | 3,99€ |
|
1 x 9 Volt Battery Clip |
CONRAD: 624691 |
0,44€ |
| 4 x 5mm flashing LEDs pack of 10 is $4.95 | ADAFRUIT: ID 680 | 2,40€ |
| 1 x Flat Bandcable | CONRAD: 604069 | 0,30€ |
|
1 x 9 Volts DC-Motor |
ADAFRUIT: ID711 | 1,95 € |
| 1 x Resistor 330 Ohm
4 x LED clips 5 mm 100 pces is 9,99€ |
CONRAD: 405191
CONRAD: 185806 |
0,10€
0,40€ |
| TOTAL: | 15,66€ |
.
As you can see it is a very cheap project, ONLY 15,66€ and easy to realize! ALL what YOU need is a bit time, passion and here we GO! 😉 Have FUN!
.
The video of the project
Please check the video below to see it in action.
.
.
.
|
The author Gust MEES is ICT Course Instructor, ”Member of the Advisory Board” from “Luxembourg Safer Internet” (LuSI), BEESECURE, Official Partner (Consultant) from the Ministry of Education in Luxembourg, project “MySecureIT“, Official Partner from the Ministry of Commerce in Luxembourg, project “CASES” (Cyberworld Awareness and Security Enhancement Structure). The author was also a winner of an electronics contest (Germanic countries) in 1979 and got his project published in the “Electronics Magazine ELO”). |
..
.
Keywords necessary for me to create this blog post: Bandkabel, Unbalance explication, DC Motors, vibration motors,
.
Stay tuned for next blog post(s) 😉
.
.
.


