Blog posts about Education, CyberSecurity, Digital Citizenship, Privacy, InternetSafety, curation, PKM, PLN, blogging, Global Collaboration, Coaching, Collaboration, eSkills, eLeadership, Coding, MakerED, MakerSpace, Social Media, How to learn, learning to learn
Make objects rotating with a Stepper-Motor | Tips and Tricks
Well, in a previous tutorial <===> https://gustmees.wordpress.com/2018/09/19/halloween-project-with-skull-arduino-blinking-leds-and-scrolling-eyes-maker-makered-makerspaces/ <===> we created a Halloween Skull and it was fix, didn’t rotate. Fun? YES, BUT more fun when it is rotating by using a Stepper-Motor; looks then as it would observe, control the space around it 😉 And it is very easy to create, only a Stepper-Motor, an Arduino NANO and a bit Code; the rest is a bit manual work to fix mechanically the motor. And with the right tools the mechanical work is a piece of cake 😉. We will discuss ONLY the mechanical works and for the the code (Sketch) for the Arduino, please look at the following tutorial:
When fixing a small object there isn’t any problem, you just drill a hole of the diameter of the axis of the Stepper-Motor and fix it with hot glue or instant glue. BUT, when it comes to make rotating larger objects it will become unstable!! We need then also a larger support plate to fix the object. I used two techniques, one with a copper-plate of 0.8 mm (was still in my cellar for 30 years…) and/or a single-sided copper-Epoxy plate. Copper-plates are expensive and single-sided copper-Epoxy plates are on a less expensive price. They are about 0.65-1€/piece on Amazon.
First of all chose on what material you would like to fix the Stepper-Motor: this could be metal, plastic, cardboard or wood. As I like recycling, I ask in the Supermarket to get an empty wooden wine box. The Supermarket sometimes opens a six-pack of wine bottles in a wooden case (box) and they are happy NOT to recycle it themselves 😉 Here below an example for a Halloween project…
.
Wooden box front view
Click image, please, to enlarge.
Wooden box rear view
Click image, please, to enlarge.
Mounting and fixing of the Stepper-Motor
Click image, please, to enlarge.
Mounting and fixing of an object
Click image, please, to enlarge.
Skull glued on copperplate with Stepper-Motor
Click image, please, to enlarge.
Skull is fixed on the wooden box – happy-Halloween-rotating-skull
Click image, please, to enlarge.
.
Desription:
Drill a hole with a 6 mm drill in your support, then use the 32 mm Step-Drill to make the hole diameter fit to the diameter of the Stepper-Motor. Fix the Stepper-Motor. I used a copper-plate for having a large surface to fix the chosen rotating object. The axis from the Stepper-Motor is made from brass and that fits very well with copper for soldering them together. For the soldering you need an 80 Watt solder iron with a temperature of 430° C (806° F). Before you start soldering: clean the copper-plate, take off the patina first!! Same step for the single-sided Copper-Epoxy plate!!
.
Single-sided Copper-Epoxy plate
Single-sided Copper-Epoxy plate
Click image, please, to enlarge.
Single-sided Copper-Epoxy plate
Single-sided Copper-Epoxy plate
Click image, please, to enlarge.
Mounting and fixing of the Stepper-Motor
Click image, please, to enlarge.
Mounting and fixing of an object
Support for Xmas decoration
Click image, please, to enlarge.
Support for Xmas decoration
Support for Xmas decoration
Click image, please, to enlarge.
Support for Xmas decoration
Support for Xmas decoration
Click image, please, to enlarge.
.
Desription:
Above you see an example for a Xmas project, tutorial will follow soon, stay tuned 😉
.
L’auteur Gust MEES est Formateur andragogique / pédagogique TIC, membre du “Comité Conseil” de “Luxembourg Safer Internet” (LuSI), appelé maintenant BEESECURE, partenaire officiel (consultant) du Ministère de l’éducation au Luxembourg du projet ”MySecureIT“, partenaire officiel du Ministère du Commerce au Luxembourg du projet ”CASES” (Cyberworld Awareness andSecurityEnhancementStructure)..
The author Gust MEES is ICT Course Instructor, ”Member of the Advisory Board” from “Luxembourg Safer Internet” (LuSI), BEESECURE, Official Partner (Consultant) from the Ministry of Education in Luxembourg, project “MySecureIT“, Official Partner from the Ministry of Commerce in Luxembourg, project “CASES” (Cyberworld Awareness and Security Enhancement Structure).
Maker-First Steps in Electronics-Moving and rotating statue
In OUR previous electronics projects WE were tinkering around with vibration motors and flashing LEDs, well we will continue on the same schema to get a bit more soldering practice and to discover ALSO the use of heat shrink tube. This is ALSO a soldering exercise with some fun, and knowledge acquirement as usually in my tutorials. WE will learn also about Lithium batteries and their power by connecting them in parallel.
Practical Tip: LEDs are transparent, so the Cathode (Minus) looks always a bit larger as the Anode (Plus).
.
.
.
When working with electronics WE need to learn a bit theory and mathematics, BUT DON’T worry, it is very easy! First of all which is mandatory, is the “OHM’s Law“. YOU DON’T need to calculate! 😉 There is an online calculatorwho will do the job for YOU! Click the image below please to access the online calculator and play a bit around with it to get used to it, have fun.
..
Click the image please to access the online calculator
Here below the schematics where YOU will see how the components are represented; YOU will remark that we have three (3) times a parallel circuit. Two batteries in parallel, two flashing LEDs in parallel and two vibration motors in parallel.The resistors are NOT shown in the schematic as THEY are NOT connected, they are just used as stabilization of the statue!
.
.
WHY connecting batteries in parallel!? Check below, please:
To find it out I recommend to make a bit PracTICE:
Try first to use ONLY 1 battery CR2032 and let run the statue.
NOW use two (2) batteries CR2032 and let run the statue.
Use NOW ONLY one (1) battery CR2430 (they are bigger in diameter and on power) and let run the statue.
NOW use two (2) batteries CR2430 and let run the statue.
Both batteries deliver 3 Volts, BUT there is a difference in the possible current they can deliver. The CR2032 delivers 225 mAh and the CR2430 delivers 280 mAh!
Through THIS “Learning-By-Doing” YOU will easily understand it!
.
Detailed parts list, supplier and prices
Please find below the detailed parts list as well as the supplier and the prices.
.
Item and quantity
Supplier and order number
Price
1 x Stripboard
CONRAD: 529531
2,19€
Silver wire 1 mm / 14 m <===> +/- 30 cm needed
CONRAD: 607657
0,40€
1 x Switch
Adafruit: ID 805
0,95€
2 x Button cell holder à 1,29€
CONRAD: 650546
2,58€
2 x Vibration motor from Adafruit
Adafruit: ID 1201
1,95€
2 x 5mm flashing LEDs from Adafruit pack of 10 is $4.95
Adafruit: ID 680
1 €
2 x Cell CR2032 à 4,19€
CONRAD: 651088
8,358€
2 x Cell CR2430 à 3,99€
CONRAD: 612987
7,98€
Total:
25,43€
.
As you can see it is a very cheap project, ONLY 25,43€ and easy to realize! ALL what YOU need is a bit time, passion and here we GO! 😉 Have FUN!
Check below please WHAT the tools are that you will need for this project. The small saw is needed to cut out a small piece of 55 x 45 mm from the stripboard.
.
Click image please to enlarge.
.
Working with heat shrink tube
[START text from Wikipedia] Heat shrink tubing (or, commonly, heat shrink or heatshrink) is a shrinkable plastic tube used to insulate wires, providing abrasion resistance and environmental protection for stranded and solid wire conductors, connections, joints and terminals in electrical work. It can also be used to repair the insulation on wires or to bundle them together, to protect wires or small parts from minor abrasion, and to create cable entry seals, offering environmental sealing protection. Heat shrink tubing is ordinarily made of nylon or polyolefin, which shrinks radially (but not longitudinally) when heated, to between one-half and one-sixth of its diameter. [END text from Wikipedia]
Watch the video below please to see the How-To to work with heat shrink tube.
.
.
The video of our project
Please check the video below to see our project on action.
.
.
Very important
In OUR above project we are using two (2) 3 mm red LEDs in parallel. It DOESN’T work when YOU take two different colors, I tried it out 😉 WHY!??? Please check links below:
Keywords necessary for me to create this blog post: Power resistors, flashing LEDs, switch, CR2032, CR2430, Lithium Batteries, stripboard, heat shrinking tube,
.
L’auteur Gust MEES est Formateur andragogique / pédagogique TIC, membre du “Comité Conseil” de “Luxembourg Safer Internet” (LuSI), appelé maintenant BEESECURE, partenaire officiel (consultant) du Ministère de l’éducation au Luxembourg du projet ”MySecureIT“, partenaire officiel du Ministère du Commerce au Luxembourg du projet ”CASES” (Cyberworld Awareness andSecurityEnhancementStructure). L’auteur était aussi gagnant d’un concours en électronique en 1979 ( Pays germaniques ) et voyait son projet publié dans le magazine électronique “ELO”.
The author Gust MEES is ICT Course Instructor, ”Member of the Advisory Board” from “Luxembourg Safer Internet” (LuSI), BEESECURE, Official Partner (Consultant) from the Ministry of Education in Luxembourg, project “MySecureIT“, Official Partner from the Ministry of Commerce in Luxembourg, project “CASES” (Cyberworld Awareness and Security Enhancement Structure).
The author was also a winner of an electronics contest (Germanic countries) in 1979 and got his project published in the “Electronics Magazine ELO”).
In previous blog post (tutorial) WE used a vibration motor from an old smartphone and we were learning also about the How-To about a vibration motor is working; it is about “Unbalance“. This unbalance is normally unwanted for motors, but for vibration motors it is a MUST. The motor we used was a 3 Volts motor and very small. In THIS NEW project we will use a 9 Volts DC-Motor and we will create from a normal motor a vibration motorwith a little trick.
.
.
..
.
Click image please to enlarge.
.
.
.
We will use a square nut and saw it in the middle, then taking the hot glue pistol and gluing it (one half) on the shaft of the 9 Volts DC-Motor.
Let us have a look on the unbalance and vibrations motors
A vibrating motor is essentially a motor that is improperly balanced. In other words, there is an off-centered weight attached to the motor’s rotational shaft that causes the motor to wobble. The amount of wobble can be changed by the amount of weight that you attach, the weight’s distance from the shaft, and the speed at which the motor spins.
Let us first have a look on the schematics where WE will discover some NEW stuff, a mini motor; in this case it is an “vibration motor“.
.
Click image please to enlarge
.
.
.
As you can see there is NOTHING special; we just put five (5) elements (4 flashing LEDS, a vibration motor) in parallel. The motor will get fixed with hot glue on the bottom. And we have a switch to switch on/off our circuit. As battery we use a 9 Volts battery which will get fixed with “VELCRO” on the bottom.
Calculating the resistor value with a 9 Volts battery and knowing that the flashing LEDs will be 3 Volts and consuming 20 mA. SO: 9-3=6 Volts which will get needed to take away from the LEDs. Check below please:
.
.
The shown value is 300 Ohms, but that is NOT a standard value. We will use a 330 Ohm resistor, as it is a standard value.
Check below please WHAT the tools are that you will need for this project. The small saw is needed to cut out a small piece of 55 x 45 mm from the stripboard. That part is needed for soldering the resistor and the switch and is used to make the necessary connections to the other parts.
Click image please to enlarge.
.
.
.
.
Concerning the hot-glue pistol which you need as well, I recommend the one from “STEINEL” as it is a Cordless all-purpose glue applicator. Neat, practical, accurate. Cordless hot-melt glue pen neo1 for all gluing jobs around the home, particularly lightweight and practical, cordless gluing with rechargeable Li-Ion battery, ready for gluing in 15 sec.
The price is around 35€, but worth to spend that money, comfortable precise working…
The Parts List
As mostly usual in my tutorials, WE will create on the beginning ONLY small stuff with some effects and a little bit of theory to give YOU the fun and the sense for electronics. SO, in this project there also ONLY a few components, such as: 9 Volts DC-Motor, Flashing LEDs, 1 resistor, 1 switch, a 9 Volts Battery, a plastic container (actually a Ricotta Cheese plastic container).
.
Item and quantity
Supplier and order number
Price
1 x Stripboard
CONRAD: 529531
2,19€
VELCRO tape +/- 10 cm needed à 16,99€/1 m
CONRAD: 546887
1,70€
1 x Empty plastic container +/- 10 cm diameter
1 x Switch
CONRAD: 1377837
2,19€
1 x 9 Volts battery
CONRAD: 658014
3,99€
1 x 9 Volt Battery Clip
CONRAD: 624691
0,44€
4 x 5mm flashing LEDs pack of 10 is $4.95
ADAFRUIT: ID 680
2,40€
1 x Flat Bandcable
CONRAD: 604069
0,30€
1 x 9 Volts DC-Motor
ADAFRUIT: ID711
1,95 €
1 x Resistor 330 Ohm
4 x LED clips 5 mm 100 pces is 9,99€
CONRAD: 405191
CONRAD: 185806
0,10€
0,40€
TOTAL:
15,66€
.
As you can see it is a very cheap project, ONLY 15,66€ and easy to realize! ALL what YOU need is a bit time, passion and here we GO! 😉 Have FUN!
.
The video of the project
Please check the video below to see it in action.
.
.
.
L’auteur Gust MEES est Formateur andragogique / pédagogique TIC, membre du “Comité Conseil” de “Luxembourg Safer Internet” (LuSI), appelé maintenant BEESECURE, partenaire officiel (consultant) du Ministère de l’éducation au Luxembourg du projet ”MySecureIT“, partenaire officiel du Ministère du Commerce au Luxembourg du projet ”CASES” (Cyberworld Awareness andSecurityEnhancementStructure). L’auteur était aussi gagnant d’un concours en électronique en 1979 ( Pays germaniques ) et voyait son projet publié dans le magazine électronique “ELO”.
The author Gust MEES is ICT Course Instructor, ”Member of the Advisory Board” from “Luxembourg Safer Internet” (LuSI), BEESECURE, Official Partner (Consultant) from the Ministry of Education in Luxembourg, project “MySecureIT“, Official Partner from the Ministry of Commerce in Luxembourg, project “CASES” (Cyberworld Awareness and Security Enhancement Structure).
The author was also a winner of an electronics contest (Germanic countries) in 1979 and got his project published in the “Electronics Magazine ELO”).
..
.
Keywords necessary for me to create this blog post: Bandkabel, Unbalance explication, DC Motors, vibration motors,
Maker-First Steps in Electronics-Soldering Learning
When WE start with electronics on the beginning we can work with so-called “Breadboards“(see photo below please), but soon or later soldering will become a MUST and an habit! SO, the BEST WE can do is to GET some PracTICE with soldering; in this tutorial we will make a bit “Electronics-Art“. WE will use already known electronic components such as resistors, stripboard parts (we will need to saw and rasp…), a LED and an IC (Integrated Circuit), a NEW component. OUR project will ONLY serve as soldering PracTICE as there will be NO function of the electronic used, SO the IC could be ALSO a damaged one (useful recycling) 😉
Please click image to access the article for more information.
.
.
As YOU might have seen in the image of “JOHNNY the ski-man“, some resistors are BIGGER then others! WHY and what is its meaning!? Well, WE have to go back to “OHM’s Law“, as BIGGER resistors in size are, as MORE POWER they can dissipate; I used 1/2 Watt and 1 Watt resistors. Please check below.
Six (6) resistors of 1/2 Watt, two (2) resistors of 1 Watt, one (1) IC (14 or 16 pins), one (1) LED, two (2) diodes (1N4007), some colored rigid wire for the scarf, 1 mm² rigid copper cable wire and 1 mm silver wire.
.
.
.
Tools needed.
Click image please to enlarge.
.
.
.
The following tools are required:
Vise, rasp, solder iron and solder wire, electronic cutter, electronic flat-nosed pliers, small handsaw and don’t forget the vacuum cleaner for cleaning up the working place later, please 😉
WE will start with the hardest part of the job, the skis. The skis are made of a small part of a stripboard which has to be sawn; we count four (4) holes and saw along the strips there, see pic. The length would be about 5 cm ( +/- 2 inches).
.
.
.
Click image please to enlarge.
.
.
.
Once the two (2) pieces of the stripboard sawn they must get rasped to look smooth. See pic please.
.
.
.
.
Click image please to enlarge.
.
.
As the stripboard pieces are rectangular on the edges they must get rounded as well with the rasp, see pic details please.
Solder together now the three rows on the top of the stripboard as shown in image, this will give a bit weight to keep the balance once the other electronic components are soldered.
.
.
.
The soldering
Click image please to enlarge.
.
.
.
SO, the hardest job is done now! UP to solder the electronic components, but where to start!? Start first with the soldering of the diode (1N4007) on both skis, followed by soldering the small resistors, check pic please.
SO, that’s it folks! Wishing YOU some fun with this project and hopefully you will get more interested about electronics 😉 Check the video below please to see OUR STAR in action… BTW: The “Mini BUG Robot” present in the video will get proposed ALSO in another tutorial…
.
.
.
.
L’auteur Gust MEES est Formateur andragogique / pédagogique TIC, membre du “Comité Conseil” de “Luxembourg Safer Internet” (LuSI), appelé maintenant BEESECURE, partenaire officiel (consultant) du Ministère de l’éducation au Luxembourg du projet ”MySecureIT“, partenaire officiel du Ministère du Commerce au Luxembourg du projet ”CASES” (Cyberworld Awareness andSecurityEnhancementStructure). L’auteur était aussi gagnant d’un concours en électronique en 1979 ( Pays germaniques ) et voyait son projet publié dans le magazine électronique “ELO”.
The author Gust MEES is ICT Course Instructor, ”Member of the Advisory Board” from “Luxembourg Safer Internet” (LuSI), BEESECURE, Official Partner (Consultant) from the Ministry of Education in Luxembourg, project “MySecureIT“, Official Partner from the Ministry of Commerce in Luxembourg, project “CASES” (Cyberworld Awareness and Security Enhancement Structure).
The author was also a winner of an electronics contest (Germanic countries) in 1979 and got his project published in the “Electronics Magazine ELO”).
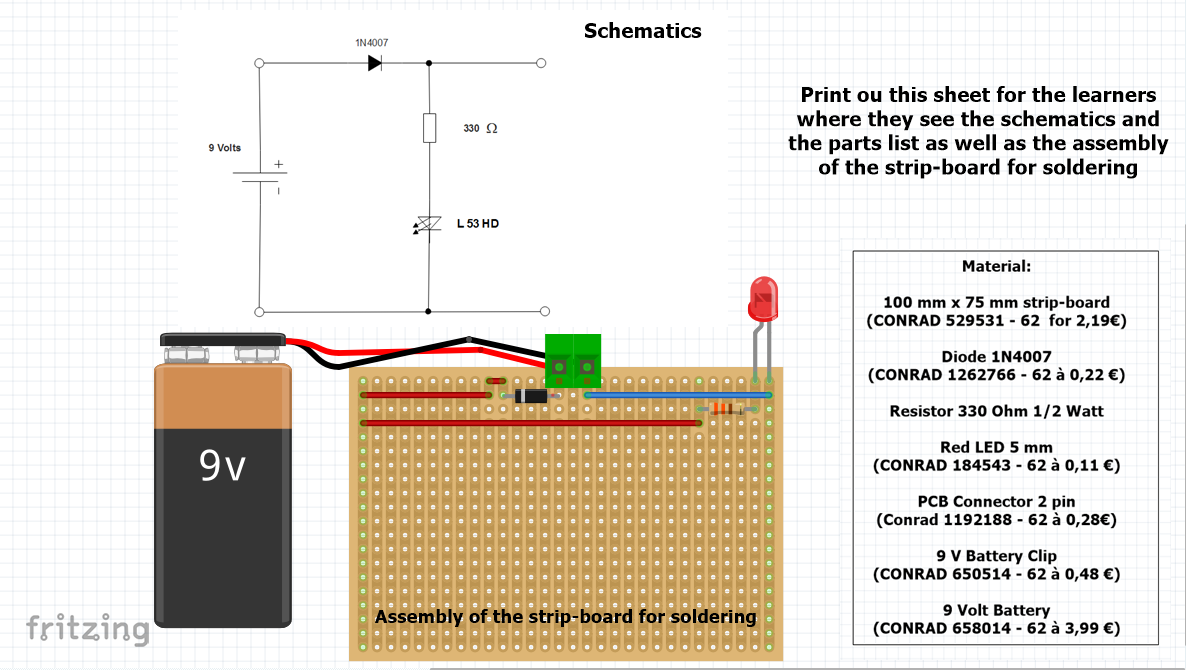
I propose to work with system when WE use strip-boards; thus meaning: preparing them ALL the same way. Any electronics project will need a power supply, so WE will start with the power supply which will mostly be a 9 Volt battery. WE will use the outside strips to connect them to plus and minus and WE will ALSO provide a diode (1N4007) to protect against polarity reversal. As a newbie in electronics this might be the best way to protect you to destroy the electronic parts if + and – would get reversed 😉 With normal rectifier diodes the power supply voltage will typically drop by 0.8 volts. WE will have then ONLY 8.2 Volts which is enough in most cases.
WE will solder also a PCB-Connector (Printed Circuit Board Connector) where we can feed the strip-board with the power supply.
.
SO, as WE will solder a bit, it will be also a soldering training before we start on more serious projects later 😉
Check below please how the finished project will look, which we will discuss in detail on the How-To. WE use a 100 mm x 75 mm strip-board (CONRAD 529531 – 62 for 2,19€).
.
.
Necessary material
.
.
.
In above image I used a 2 pin screw terminal from CONRAD (1192188 – 62) for 0,28€ and for the wire I choose from a “Wire Kit from Velleman” (60 m from different colors).
full core, 0.2mm²
colours: 5 metres : white / blue / brown / green / yellow / orange / grey / violet + 10 metres : black / red
external diameter: 1.4 mm
max. voltage: 60 V
max. current: 4.3 A
PVC insulation
tinned CU
AWG24
.
.
To make sure to have proper bent edges; I suggest to bend the diode (1N4007) over the left-hand side shown “Wire Bender” (CONRAD 425869 – 62 at 3,29€).
.
.
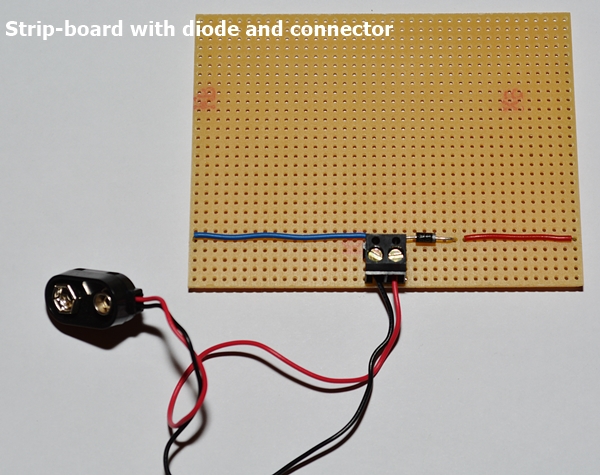
First start to solder the 2 pin screw terminal in the middle of the strip-board, followed by the diode (1N4007). Now measure the distance and cut the wires. For the red wire (Plus) it will be 4 cm (3 cm distance), the blue wire (Minus) will be 6 cm (5 cm distance). Take the electronics cutter and strip off o,5 cm of the insulation at each end and bend it. Put it into the holes in the strip-board and solder it. P.S.: WE will use the red wire for the Plus (+) and the blue wire for the Minus (-) of the power supply; that are internationally conventions in electronics. Sometimes for the Minus (-) is also used the black color (see 9 Volt battery clip).
.
.
Solder the wires and cut off the stick out wire close to the soldering with the electronics cutter.
.
.
Strip-board solder side
.
.
.
Click the above image please to enlarge it
.
Cutting off stick out wire
.
.
.
Click the above image please to enlarge it
.
Disconnect the upper strips from the lower
strips by breaking the copper with
a 4,5 mm HSS drill
.
Click the above image please to enlarge it
Selfmade stripboard cutter
with a grill handle
and an 4.5 mm HSS drill
Click image please to enlarge
When WE want to start with electronics there is a little bit theory to learn as well; in electronics there are special symbols who get used in schematics. Any component (even a battery) has its own symbol. In the following tutorials and projects, WE will learn by easy step-by-step WHAT they are and HOW to make OUR PracTICE (to GET used to it…) with them. I am certainly NOT a friend of learning by heart, BUT symbols need to get learned that way to understand schematics of electronics!
.
Symbols used in this tutorial: battery, resistors, LEDs and diodes…
Here below a small description about the How-To to work with strip-boards in general:
.
.
After viewing the above tutorial YOU will understand. The above tutorial uses the FREE software “Fritzing” which WE will use as well in the next blog posts; you can download it here:
Here the wiring and soldering on the strip-board, as well as the parts list:
.
.
.
As You have remarked, I added ALSO a resistor and a LED (Light-Emitting Diode); the red (could also bee a green one) LED is lightning when the power supply (9 Volt battery) is connected. SO, YOU might solder the two components (330 Ohm resistor and LED) as well, not mandatory BUT it will give YOU a bit more training on soldering and alerts YOU to NOT solder when it is on!! NEVER work on whatever project with connected (switched on) power supply <===> Safety first!
WHY has the resistor a value of 330 Ohm?
In above example we used a 5 mm red LED with this characteristics: 2.25 Volt and 20 mA current (that’s the maximum values which DON’T have to become higher otherwise the LED will get destroyed) and as power supply we use a 9 Volts battery. WE will use the “Online Calculator” to calculate the value of the resistor. First let us do some mental calculation, there WE DON’T need any calculator. WE have a 9 Volts battery and the LED will have maximum 2.25 Volts, so “9 V – 2.25 V = 6.75 V” which needs to get taken away from the LED to avoid destruction.
.
..
THAT value of 337.5 Ohms doesn’t exist! Resistors are manufactured by following <===> In 1952 the IEC (International Electrotechnical Commission) decided to define the resistance and tolerance values into a norm, to ease the mass manufacturing of resistors. These are referred to as preferred values or E-series, and they are published in standard IEC 60063:1963. These standard values are also valid for other components like capacitors, inductors and Zener diodes. The preferred values for resistors were established in 1952, but the concept of the geometric series was already introduced by army engineer Renard in the 1870s.
By checking the below link, WE will see that the closest value is 330 Ohm. BTW: The symbol for “Ohm” is “Ω“; SO, we write 330 Ω. Tip: You find it in the “Special Characters” in any editing software.
In the above website is a video integrated which explains very well about the How-To of that norm, give it a try.
.
MY experience described in ONLY some phrases: Give the LEARNers, students (whatever age) the freedom of LEARNing without squeezing THEM into a FRAME and concentrate on guiding them as a coach by analyzing THEIR behavior and show them the How-To to become self-directed learners, autodidacts. SHOW THEM ALSO up from the beginning WHAT THE <===> LEARNing Path <===> will be with design of it and explain THEM that they could design themselves it with a short introduction on the How-To. THEY will learn the ICT-PracTICE which will help them once out of the <===> #SchoolCocoon <===> to be ready for Life-Long LEARNing and to be able to adapt very quickly in the workforce! WHEN YOU show the LEARNers, students <===> WHAT the profit is for THEIR private life <===> YOU will engage them very quickly 😉 AND DON’T teach THEM more as necessary, propose them some links to go further ONLY for those who want!!
Check ALSO (Up from 11 years old, give THEM THE confidence THEY need to grow):
WHAT’S my message and WHY did I create this blog post!?
Well, I will encourage all youth and also adults, seniors, oldies to become <===>Life-Long LEARNers <===> and staying Up-To-Date with their knowledge, especially concerning their skills in ICT, called NOW <===> #eSkills <===>! In the modern world YOU will change YOUR job probably +/- 12 times in YOUR working career, it is very rare to stay life-long in the same job and/or same company!!! SO… The workforce is looking for people with ICT skills which YOU mostly didn’t learn at school, right!?
Bring in YOUR kids to such creative makerplaces WHERE THEY can develop (and perhaps parents as well…) THEIR creativity and GET interested in something WHICH could boost THEIR interest into ICT in their future 😉
YOU won’t have (mostly) the time to learn by visiting courses, right!? START to become Life-Long LEARNers by LEARNing on YOUR OWN pace, by becoming <===> Autodidacts <===> Self-Directed LEARNers. YOU are able to, I did it, so can YOU!? 😉
I found a job because of my ICT eSkills and I am STILL LEARNing on a daily base routine for being Up-To Date with my <===> Professional Development <===>, even being retired NOW! THE pleasure of LEARNing!
I did THE <===> ICT PracTICE <===> and THAT’S WHAT the workforce needs!!!
Due to my eSkills I could share my knowledge AND expertise ALSO with the below mentioned as well as to a broad range of visitors from around the globe!
Practical Tip: LEDs are transparent, so the Cathode (Minus) looks always a bit larger as the Anode (Plus).
.
.
.
When working with electronics WE need to learn a bit theory and mathematics, BUT DON’T worry, it is very easy! First of all which is mandatory, is the “OHM’s Law“. YOU DON’T need to calculate! 😉 There is an online calculatorwho will do the job for YOU! Click the image below please to access the online calculator and play a bit around with it to get used to it, have fun.
..
Click the image please to access the online calculator
Here below the schematics where YOU will see how the components are represented; YOU will remark that ANY component gets represented with its part number as well, apart from the battery.
.
.
LED’s explained in German in a Video Tutorial
Please check the video tutorial below, in Deutsch:
.
.
Print out this sheet for YOUR PracTICE
Here below THE sheet for PracTICE, ALL the necessary stuff is on it to make sure that the project will be successful. Print it out please and give it to YOUR learners, as well for YOU 😉
.
.
Have FUN and stay tuned for the next tutorials about electronics 😉
.
.
L’auteur Gust MEES est Formateur andragogique / pédagogique TIC, membre du “Comité Conseil” de “Luxembourg Safer Internet” (LuSI), appelé maintenant BEESECURE, partenaire officiel (consultant) du Ministère de l’éducation au Luxembourg du projet ”MySecureIT“, partenaire officiel du Ministère du Commerce au Luxembourg du projet ”CASES” (Cyberworld Awareness andSecurityEnhancementStructure). L’auteur était aussi gagnant d’un concours en électronique en 1979 ( Pays germaniques ) et voyait son projet publié dans le magazine électronique “ELO”.
The author Gust MEES is ICT Course Instructor, ”Member of the Advisory Board” from “Luxembourg Safer Internet” (LuSI), BEESECURE, Official Partner (Consultant) from the Ministry of Education in Luxembourg, project “MySecureIT“, Official Partner from the Ministry of Commerce in Luxembourg, project “CASES” (Cyberworld Awareness and Security Enhancement Structure).
The author was also a winner of an electronics contest (Germanic countries) in 1979 and got his project published in the “Electronics Magazine ELO”).
As on July 25th 2016 I had an interview with Nadine SCHIRTZ and Yvonne ZOTZ in the „The flagship makerspace of the national Youth Service SNJ“ “BASE 1” at Forum Geesseknäppchen in Luxembourg-City. This is the second interview of a series which I intend to do; the first one was about <===> Luxembourg EDUcation-Interviews | 1) The Luxembourg EDU-System.
I hereby thank a lot Mrs. Nadine SCHIRTZ for having accepted my request for having an interview with her. My first request was made over Social Media Facebook (on PM; Private Message) as WE are friends on Facebook (Social Media) and I am ALSO member of the “Advisory Board” from BEESECURE where Nadine is ALSO involved. Nadine replied to my request with giving me her work eMail Address. I sent her an official request by eMail and it was getting accepted; as YOU see Social Media has a lot of advantages 😉
I thank ALSO a lot Yvonne ZOTZ, the responsible person for the “BASE 1 at Forum Geesseknäppchen” (left-hand on the above photo).
It was a pleasure to talk together for 1h:30 to two lovely ladies with a LOT of competency and professional behavior! I enjoyed very much that conversation as especially WE were talking about the “Pedagogy” and “Social” behind and that it ISN’T pure “Technology”, THAT IS THE MOST IMPORTANT!
Nadine is officially working for http://www.snj.public.lu/fr. Makerspaces in Luxembourg are set up via the BEE CREATIVE project by SCRIPT and SNJ in both formal education (schools) and non-formal education(child daycare structures, youth houses,…) settings.
Yvonne is THE “Space-Keeper“, the responsible person for the Makerspace “BASE 1” and she is ALSO running under contract of http://www.snj.public.lu/fr. Let us mention ALSO that the “Makerspaces” in Luxembourg are embodied by the “SCRIPT” from Luxembourg EDUcation System, where M. Serge LINCKELS coordinates them; I interviewed M. Serge LINCKELS already <===> Luxembourg EDUcation-Interviews | 1) The Luxembourg EDU-System.
Let us remember HOW the STRATEGY of the Luxembourg EDUcation System is by watching the picture below, please:
.
Click the above image please, to access the article.
.
WHERE BEECREATIVE is making THIS part of the STRATEGY, check PIC please.
.
Click the above image please, to access the website of BEECREATIVE.
.
As mentioned already above, each Makerspace has its “Space-Keeper”, the responsible person of that place. These “Space-Keeper’s” connect together WITH THEIR TEAMS through “Networking“, Thus meaning: they have meetings over the internet through the “Cloud”<===>[NS]WHERE they meet regularly and in person in different makerspaces and at events to exchange views and projects. Of course, networking via IT-tools is another important aspect. They make an exchange of “GOOD PracTICEs”, NEW ideas, NEW projects…
More information about BEECREATIVE and Makerspaces:
A video WHO explains well WHAT the <===> Maker Movement is <===> from Marc TEUSCH (Luxembourg)
.
Let me ALSO tell YOU dear readers THAT the girls got my questions send per eMail as a preparation before I met them and that THEY even didn’t talk about it, well THAT is WHAT I call clever and smart at the same time; THEY knew WHAT I wanted to talk about and THEY used it to talk in a context and NOT as in a SCHOOL test!! Well done GIRLS 😉 I loved it!! 😉
WHAT is the STRATEGY and Pedagogy behind AND the Social!?
Well, that is VERY interesting as I found out by discussing in the interview with the two young ladies, who by the way were VERY professional and with a LOT of COMPETENCY: looks like Luxembourg will have a bright future on ICT in the next coming years!!
I was VERY OPEN-MINDED and listening to Yvonne as she explained me very well WHAT is behind such “Makerspace” places; well I knew it already WHAT it is, BUT HOW it is done in Luxembourg I didn’t know really NOR do OTHERS (my readers…) probably!! Nadine as well gave me ALSO some GOOD points and both girls (Ladies) explained me very well WHAT is the point behind!!
Well, Luxembourg is following NEW trends in EDUcation as well, as ICT is becoming THE MAJOR slogan for the country <===> #DigitalLëtzebuerg #DigitalLuxembourg #Digital4EDUcation <===> AND THAT Luxembourg has to do something OUT of the NORMAL to shine!! I agree with THAT by 100%!! Luxembourg doesn’t have enough qualified people in the ICT-sector and has to work for to get them soon! Through the “makerspaces” kids might get influenced as well to be interested in their future to study in ICT!
.
Learn more about “Digital Luxembourg“, called ALSO “Digital Lëtzebuerg“:
[NS] With BEE CREATIVE, Luxembourg has become the first country to develop e-skills and e-creativity by implementing makerspaces in both formal and non-formal education systems. This is a milestone in the thrive towards an enlightened and motivated generation of “cyber citizens” in the political frame of “Digital Luxembourg”.
SO WHAT did Yvonne and Nadine tell me WHICH made me listening MORE? Well, Makerspaces are THE first place to GET kids interested in something special, a place WHERE creativity could GET fostered, WHERE TEAMS get build WITH SAME interests without knowing on the beginning that such things could even happen!! Youth is invited by groups of minimum of six (6), MOSTLY from EDUcation, BUT if clever NOT necessarily to use the ONLY EDUcation!!! Contact the girls to find out 😉
Let us talk ALSO about Coaching, the little YOU exercised and trying to get everybody into the boat WHERE a Win-Win situation is exercised WITHOUT any sort of Hierarchy so that YOUTH can develop itself WITHOUT FEAR of WHATEVER (#SchoolCocoon in mind…); teachers become learners and learners become teachers… A GRATEFUL exchange of knowledge, ISN’T it!? WE are living in 21st Century right and here it gets practiced 😉
The “Forum Geesseknäppchen” in Luxembourg-Cityhas really ALL WHAT is needed to GET youth the possibilities to develop a creative mind as well that THEY are guided with GOOD trained coaches (teachers, educators…), supervised by “SCRIPT“; let us have a look:
As I got told the “Projet SQUAT” is: there is a special room in the “Forum Geesseknäppchen” who could get hired; this room is equipped with ALL the necessary stuff for holding meetings and to use the ICT stuff in it. It’s a place WHERE young entrepreneurs could come in and GET coached to realize THEIR projects, it’s about <===> Project Based LEARNing (PBL) <===>… My personal meaning. Luxembourg has NOW its “1€ Company Law” accepted, thus meaning: to boost “Entrepreneurship” companies could get created by ONLY investing 1€ for its creation, a simplified way of an “a.s.b.l.“; I guess that this concept together with “Projet SQUAT” will have a BIG success as soon as it will GET more known by young (and old, why not…) entrepreneurs! As on 16-January-2017 this would be possible!!
Well, there are some challenges in the air 😉 I got told THAT there is a <===> MakerFest <===> on 19-20 December 2016 in the “Forum Geesseknäppchen” in Luxembourg-City WHERE the organisators are looking to make it a VERY BIG EVENT while using as MUCH possible place as possible inside the building to give YOUTH its way to develop!! AND of course a LOT of prizes from http://www.snj.public.lu/frand from possible sponsors…
A fashion défilé (catwalk) will be organized and the kids will wear their clothes with wearables (which they created themselves…), kids will play THEIR OWN composed and/or sampled music for the background music and much more…
My curation about wearables(MOSTLY about the dangers when connected through the internet, BlueTooth and Wi-Fi)
…
Update (07-04-2017): Up from September 2017 there will be “BEE CREATIVE for kids” introduced! Makerspaces will get held ALSO THEN in the “Maisons Relais” and in the Primary School.
Update (04-07-2017): A <===> Makerfest <===> was organized at Lycée Technique ESCH/ALZETTE on 04-07-2017. Over 1.000 persons were present on the second Makerfest at LTESCH (Luxembourg) on 04-07-2017, organized by BEECREATIVE, Service National de la Jeunesse, SCRIPT. Lots of different schools from around the country were present with their students (learners) from any age!
It was a pleasure to see with HOW MANY fun the kids and teens were “making” and LEARNing 😉
Please check the video below:
.
.
.
.
.
BEECREATIVE has created its FIRST <===> Makermag <===> with lots of interesting articles showing the activities in the different MakerSpaces and ALSO with a tutorial!
.
…
.
.
Update (04-07-2017): The MakerSpace <===> BASE ONE <===> at <===> Forum Geesseknäppchen in Luxembourg-City <===> is NOW ALSO <===> Open Space <===> on Saturdays from 10:00h to 12:00h and from 13:00h to 15:00h where parents can come in together with their kids!!
.Concerning the questions and answers WE will use initials such as:
[GM] for Gust MEES
[NS] for Nadine SCHIRTZ
.
Questions for interview <===> Makerspaces
[GM] WHEN (date) were Makerspaces in Luxembourg opened ?
[NS]„The flagship makerspace of the national Youth Service SNJ“ was “Base1” which opened in November 2015. All of the six actually open Makerspaces were launched on the same day by Minister Claude Meisch in November 2015. After the launch event, the different makerspaces adopted their own rhythm. Some needed more time to fill up their space with workshops, others were ready to start right away. As for the SNJ makerspace “Base1”, it is active and open on a daily basis since January 2016.
[GM] How many Makerspaces do actually exist in Luxembourg ? (I know there are six & more will open soon?)
[NS] Actually six makerspaces are up and running in Luxembourg. 5 of them are set in high schools. As BEE CREATIVE grows, the interest in Makerspaces becomes bigger and bigger. Right now, SCRIPT has a full list of secondary schools and even a couple of primary schools who want to open their own makerspace in the coming schoolyear. As for SNJ, we are focusing on the non-formal education settings. Meaning that we are going to fully support at least 3 Maisons Relais across Luxembourg to open a makerspace in their premises. The maker movement and interest in IT creativity really is a milestone in Luxembourgish education.
[GM] Do You have actually some statistics on how many people (also by age…) have visited the Makerspaces ? Maybe ALSO graphs about it ?
[NS] I don’t know for the school makerspaces, but at “Base1”, we counted 1200 visits in the first six months. Tendency: growing… 😉
[GM] Is it possible for anyone to visit the “Makerspaces” OR are they ONLY available from persons of EDU (Educators, teachers, students, learners)?
[NS] Logistics sometimes make it difficult for school makerspaces to open their doors to non-students. They do their best however to welcome a large audience during events etc. It is free for every makerspace to choose how the access to their space should be handled. At Base1, young people are welcome to work on their projects. We don’t really care whether they come on their own during “Open space” times or with a group from school, a youth house, a Maison Relais. If you’re not sure whether you can come to Base1, just call and ask…
[GM] Are the Makerspaces ALSO OPEN during the school holidays ?
[NS] Right now, the only Makerspace open during school holidays is the Base1. (The one where we are for the interview). However this might change in the future. As I already said, each makerspace can choose when to open or close their doors and the need to keep them open during holidays might increase in the future.
[GM] I have recently read that « Girls in Tech » were ALSO in one Makerspace, are there more such events planned ? Next Girls in Tech Event to Explore Creative Programming and a Maker Space (31-05-2016) as I find this very important to boost it, especially in programming (coding). Girls are very GOOD in this 😉 Check history of programming (ADA, #WWII, encrypting, Apollo code for moon landing…)
[GM] Concerning <===> Girls in Tech <===> did YOU know that there were already a LOT of celebrities (today) in programming (coding) in history?
MY experience described in ONLY some phrases: Give the LEARNers, students (whatever age) the freedom of LEARNing without squeezing THEM into a FRAME and concentrate on guiding them as a coach by analyzing THEIR behavior and show them the How-To to become self-directed learners, autodidacts. SHOW THEM ALSO up from the beginning WHAT THE <===> LEARNing Path <===> will be with design of it and explain THEM that they could design themselves it with a short introduction on the How-To. THEY will learn the ICT-PracTICE which will help them once out of the <===> #SchoolCocoon <===> to be ready for Life-Long LEARNing and to be able to adapt very quickly in the workforce! WHEN YOU show the LEARNers, students <===> WHAT the profit is for THEIR private life <===> YOU will engage them very quickly 😉 AND DON’T teach THEM more as necessary, propose them some links to go further ONLY for those who want!!
WHAT’S my message and WHY did I create this blog post!?
Well, I will encourage all youth and also adults, seniors, oldies to become <===>Life-Long LEARNers <===> and staying Up-To-Date with their knowledge, especially concerning their skills in ICT, called NOW <===> #eSkills <===>! In the modern world YOU will change YOUR job probably +/- 12 times in YOUR working career, it is very rare to stay life-long in the same job and/or same company!!! SO… The workforce is looking for people with ICT skills which YOU mostly didn’t learn at school, right!?
Bring in YOUR kids to such creative makerplaces WHERE THEY can develop (and perhaps parents as well…) THEIR creativity and GET interested in something WHICH could boost THEIR interest into ICT in their future 😉
YOU won’t have (mostly) the time to learn by visiting courses, right!? START to become Life-Long LEARNers by LEARNing on YOUR OWN pace, by becoming <===> Autodidacts <===> Self-Directed LEARNers. YOU are able to, I did it, so can YOU!? 😉
I found a job because of my ICT eSkills and I am STILL LEARNing on a daily base routine for being Up-To Date with my <===> Professional Development <===>, even being retired NOW! THE pleasure of LEARNing!
I did THE <===> ICT PracTICE <===> and THAT’S WHAT the workforce needs!!!
Due to my eSkills I could share my knowledge AND expertise ALSO with the below mentioned as well as to a broad range of visitors from around the globe!
AND check my profile below as well, at the bottom of this blog post please! 😉
.
My Memories and Nostalgia
.
The <===> Makerspace Movement <===> ISN’T something NEW actually as it happend already +/- 45-50 years ago with an other name! At that time it was called <===> Do It Yourself (#DIY) <===> and was seen as pure HOBBY and NOT endorsed by EDUcation! SO, it took minimum 45 years before EDUcation realized its importance!
WHY do I say this? Well, I was one of those pioneers at that time in my youth; I used already electronics (transistors, integrated circuits, LED displays and also analog displays…) in my learning in PracTICE projects as it wasn’t foreseen yet… I won ALSO an electronics contest in 1979 from Germanic countries, which later helped me to find a BETTER job!
For evidence, here some pictures below:
.
.
.
..
L’auteur Gust MEES est Formateur andragogique / pédagogique TIC, membre du “Comité Conseil” de “Luxembourg Safer Internet” (LuSI), appelé maintenant BEESECURE, partenaire officiel (consultant) du Ministère de l’éducation au Luxembourg du projet ”MySecureIT“, partenaire officiel du Ministère du Commerce au Luxembourg du projet ”CASES” (Cyberworld Awareness andSecurityEnhancementStructure).
The author Gust MEES is ICT Course Instructor, ”Member of the Advisory Board” from “Luxembourg Safer Internet” (LuSI), BEESECURE, Official Partner (Consultant) from the Ministry of Education in Luxembourg, project “MySecureIT“, Official Partner from the Ministry of Commerce in Luxembourg, project “CASES” (Cyberworld Awareness and Security Enhancement Structure).
.
Nadine SCHIRTZ is working for the National Youth Service (SNJ) as a project manager for BEESECURE and coordinator of BEECREATIVE, two governmental initiatives to promote a safe Internet behavior and a creative use of ICT among the general public.
With BEE CREATIVE, Luxembourg has become the first country to develop e-skills and e-creativity by implementing makerspaces in both formal and non-formal education systems. This is a milestone in the thrive towards an enlightened and motivated generation of “cyber citizens” in the political frame of “Digital Luxembourg“.
.
Yvonne ZOTZ has a Bachelor’s degree in social and education sciences from University of Luxembourg.
Focus on Migration, interculturality and diversity.
Yvonne ZOTZ is working as coordinator of “Base1 Makerspace” for the National Youth Service (SNJ ) to bring new technologies and media closer to young people.
” Base1 ” offers young people a varied program of workshops and further education in the fields of technology, electronics and computer sciences.
.
Stay tuned for next blog post(s) 😉
Keywords necessary for me to create this blog post: Creativity, Pedagogy, Strategy, social, curiosity of youth, maisons relais, vacances scolaires, wearables, space keeper, Networking for professional exchange between makerspaces, Makerfest December, CHALLENGE, jeunes scientifiques, Mérite Jeunesse, Project SQUAT, project based learning, PBL, open spaces for a.s.b.l.’s, SIR KEN ROBINSON about creativity,
Check my #curation to find best articles, blogs and courses about #education #itsecurity #CyberSecurity #EdCollCoach #GlobalEDU #cyberbullying, #AR #RA #augmentedreality #health #science #QR #qrcodes in EN, FR, DE…
Play the FREE Game and Learn about Cyber Security and Coding
App Advisor
App Advisor helps safe-guard your personal data by telling you exactly which apps you should be cautious of, before they become a threat to your privacy.
Click image to use this free service and find out of your installed Apps are “privacy-friendly” or check new Apps before installing them!


 L’auteur Gust MEES est Formateur andragogique / pédagogique TIC, membre du “Comité Conseil” de “Luxembourg Safer Internet” (LuSI), appelé maintenant BEESECURE, partenaire officiel (consultant) du Ministère de l’éducation au Luxembourg du projet ”MySecureIT“, partenaire officiel du Ministère du Commerce au Luxembourg du projet ”CASES” (Cyberworld Awareness and Security Enhancement Structure)..


 MY experience described in ONLY some phrases: Give the
 Creativity and Maker-Spaces | BEECREATIVE")


 Well, that is VERY interesting as I found out by discussing in the interview with the

 Well, there are some