RSS

Tag Archives: Maker PracTICE

Grove Beginner Kit for Arduino | SEEEDSTUDIO | First Steps with the Arduino-UNO R3 and NANO | Maker, MakerED, Maker Spaces, Coding

Grove Beginner Kit for Arduino | SEEEDSTUDIO | First Steps with the Arduino-UNO R3 and NANO | Maker, MakerED, Maker Spaces, Coding

.

.


Grove Beginner Kit for Arduino | SEEEDSTUDIO |

SEEEDSTUDIO asked me through LinkedIn to make a cooperation with them for reviewing a NEW Arduino, the “Grove Beginner Kit for Arduinoproduct which I accepted. Today I received the stuff which in the next days I will play around a bit and create Blog posts (Tutorials) about it, stay tuned…

FIRST impressions:

I ordered it on 28-07-2020 on the site of SEEDSTUDIO and it arrived on 03-08-2020 @02H58 PM, delivered by DHL. Actually very quick from China to Luxembourg!!

Unpacking my order:

Nice cardboard with lots of TIPS printed on it. The box is sealed with 3 circular glued plastic which I had cut through with scissors, BAD IDEA, as I damaged the cardboard while NOT knowing that the box was meant as a whole playstation as itself (see photos, please)… Here the company could improve please, thanks! My constructive critics! 😉

.


Click image, please, to enlarge.


Click image, please, to enlarge.


..
.
Mausi-idée

.

.

As long as that glued plastic problem ISN’T resolved, use a sharp cutter to cut off the glued circular plastic as I couldn’t remove it by hand!

.


Reading the online Manual

Well, NOTHING to say against it, it is well done!! Please check it here below:

There are professional STEP-BY-STEP instructions so you can’t make mistakes!!

.


Getting started

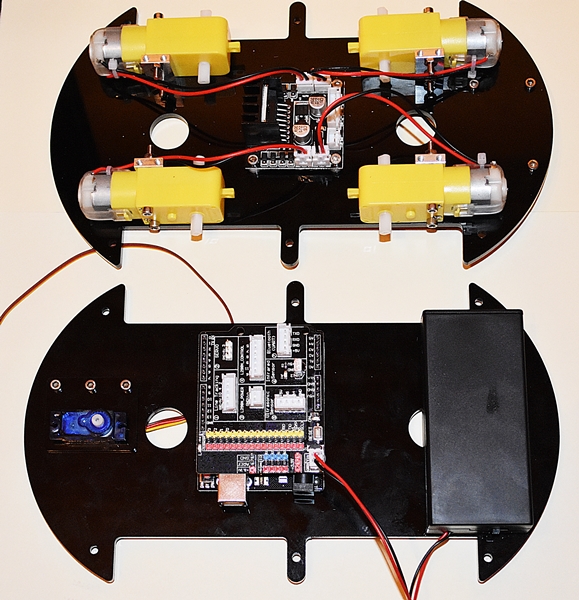
ALL you have to do is to connect the USB-Cable to the PC, Laptop, which is in the right sight of the box (see step 2 in the PIC below please) to start. [Start Text from WiKi] Grove Beginner Kit for Arduino is one of the best Arduino Beginner Kit for beginners. It includes one Arduino compatible Board and 10 additional Arduino sensors and all in one-piece of PCB design. All the modules have been connected to the Seeeduino through the PCB stamp holes so no Grove cables are needed to connect. Of course, you can also take the modules out and use Grove cables to connect the modules. You can build any Arduino project you like with this Grove Beginner Kit For Arduino. [End Text from WiKi]

.

Click image, please, to enlarge.

.


Plug and Play Unboxing Demo

The Grove Beginner Kit has a plug and plays unboxing demo, where you first plug in the power to the board, you get the chance to experience all the sensors in one go! Use the button and rotary potentiometer to experience each sensor demo!

  • Scroll -> Rotating Rotary Potentiometer
  • Select -> Short Press Button
  • Exit Current Demo -> Long Press Button

Buzzer and LED module are used for key prompt.

.


Some examples

Please check the pictures below:

.

Temperature/Humidity GROVE

Click image, please, to enlarge.

3

Air Pressure/GROVE

Click image, please, to enlarge.


Air Pressure/GROVE

Air Pressure/GROVE

Click image, please, to enlarge.


.


My review

Well, I can recommend this product for beginners by 100%!! Up from the beginning beginners can find out HOW things work with just plugging the USB cable to the PC, Laptop, computer. It’s a GREAT way to bring Coding to STEAM students, Maker’s, MakerED and Maker Spaces!

I didn’t yet using the Breakout possibilities, I DON’T overwhelm you with TOO MUCH information, that will GET discussed in next tutorials, BUT looks promising as NO need to plug single cables, ALL done by ONLY one connector!!!

.

Please check the videos below to understand how the GROVE System works.

..


WHERE to order it?

You can GET it here actually (04-08-2020):

..


.

Mausi-idée

.

TIP for Educators, Teachers, Coaches:

Let the learners first trying the working examples in the box to discover the possibilities! Later you can make the Breakout and then they can reproduce the Coding examples such as mentioned in the online manual.


.


L’auteur Gust MEES est Formateur andragogique / pédagogique TIC, membre du “Comité Conseil” de “Luxembourg Safer Internet” (LuSI), appelé maintenant BEESECURE, partenaire officiel (consultant) du Ministère de l’éducation au Luxembourg du projet  ”MySecureIT“, partenaire officiel du Ministère du Commerce au Luxembourg du projet ”CASES” (Cyberworld Awareness and Security Enhancement Structure)..


The author Gust MEES is ICT Course Instructor, ”Member of the Advisory Board” from “Luxembourg Safer Internet” (LuSI), BEESECURE, Official Partner (Consultant) from the Ministry of Education in Luxembourg, project “MySecureIT“, Official Partner from the Ministry of Commerce in Luxembourg, project “CASES” (Cyberworld Awareness and Security Enhancement Structure).

.


.

Stay tuned for next blog post(s) 😉

.

.

.


Tags: , , , , , , , , , , , , , , , , , , , ,

CitiZEN-Science: The PracTICE

CitiZEN-Science: The PracTICE

.

.


CitiZEN-Science: The PracTICE

Through the Maker-Movement and IoT (Internet of Things) there is already a LOT happening and different Networks are collecting Data through Sensors and make them available for everybody to have access and study them! Such sensors are e.g.:

  • Air Quality
  • Meteo
  • Street traffic
  • Radiation
  • People (counter) traffic
  • Water Quality
  • Wind velocity
  • Radar for excess of car speed
  • Inundation prevention
  • Observations on:
    • Nature (birds, etc.)
    • Archaeology discovering

Those, above mentioned  applications can even be assembled together and so being a precious source for communes and Governments! Mostly such projects are done with an ARDUINO and/or Raspberry PI based micro controller and a mini computer: The main difference between them is Arduino is microcontroller board while Raspberry PI is a mini computer.

Thus meaning: that fits perfect for the Maker-Movement and could GET integrated easily into STEM projects! 

Well, after following for a long time different possibilities on the How-To to get globally access to such IMPORTANT Big-Data for everyone, I found out THAT “The Things Network” is a perfect way! Please find below the address and the projects:

It is based on the “LoRaWAN“, check below, please, for more information:

Blog post will GET updated and/or new ones will get posted as it is a very interesting Movement! Stay tuned 😉

Meanwhile check the beginning of this blog post, please:


.

Key words necessary for me to create this blog post: CitiZEN-Science, STEM, MakerED, Maker-Spaces, PracTICE, LEARNing-By-Doing, TTN, The Things Network, Arduino, Raspberry PI, LoraWAN, SigFox (Low Power consumption…)

.

L’auteur Gust MEES est Formateur andragogique / pédagogique TIC, membre du “Comité Conseil” de “Luxembourg Safer Internet” (LuSI), appelé maintenant BEESECURE, partenaire officiel (consultant) du Ministère de l’éducation au Luxembourg du projet  ”MySecureIT“, partenaire officiel du Ministère du Commerce au Luxembourg du projet ”CASES” (Cyberworld Awareness and Security Enhancement Structure).


The author Gust MEES is ICT Course Instructor, ”Member of the Advisory Board” from “Luxembourg Safer Internet” (LuSI), BEESECURE, Official Partner (Consultant) from the Ministry of Education in Luxembourg, project “MySecureIT“, Official Partner from the Ministry of Commerce in Luxembourg, project “CASES” (Cyberworld Awareness and Security Enhancement Structure).

.
.
Stay tuned for next blog post(s) 😉

.

.

.


1 Comment

Posted by on January 13, 2020 in 21st Century Skills, 21st-Century-Teaching-and-Learning, Adaptive Learning, Analyzing, Arduino, BEE CREATIVE, Better Learning, Better Learning about ICT, Better Teaching, Big Data, CitiZEN Science, Coaching, Coding, Collaboration, Collaborative Learning, Collective Intelligence, Competency, Concept, Connected Educators, Creating Mind, Creativity, Critical Thinking, Design Learning, Digital CitizenShip, Digital Footprint, Digital Intelligence, Digital Lëtzebuerg, Digital Luxembourg, Digital4EDUcation, DQ, Education, Education 4.0, eLeadership, eLearning, Electronics, Electronics Tutorials, Engagement, Entrepreneurship, Environment, EQ, eSkills, ESP8266, Ethical Mind, ethics, Europe, For a Better World, Free courses, Future Work Skills, Global, Global Collaboration, growth mindset, Holistic view of EDUcation in the future, Home-Work, HowTo, Innovation, Internet Of Things, IoT, Key Instructors, Leadership, Learning By Doing, Learning to Learn, LoRaWAN, Luxembourg, maker, Maker PracTICE, MakerED, MakerSpace, MakerSpaces, Modern EDU, Motivation, NodeMCU, Not ONLY rights but also responsibilities, Often Asked Questions, Open Mind, Personal profit, PKM, PLN, PracTICE, Proactive Thinking, Professional Development, Professional EDUcators TEACHers, Project Based Learning, Quality Courses, Reality, Reflecting, Respectful Mind, Responsibility, Right use of Technology, Rise Of The Professional Educator, Science, Skills, STEM, Student Centred, Students 21st Century Survival Guide, Sustainability, Synthesizing Mind, Teacherpreneurs, Technology Integration, The Things Network, TTN, understanding, Understanding the internet


Tags: , , , , , , , , , , , , , , ,

First Steps with the Arduino-UNO and NANO | Maker, MakerED, MakerSpaces, Coding | Text on 0.96 inch 128X64 I2C OLED

First Steps with the Arduino-UNO and NANO | Maker, MakerED, MakerSpaces, Coding | Text on 0.96 inch 128X64 I2C OLED

.

.


Text on 0.96 inch 128X64 I2C OLED


WE were playing around already with OLED displays in previous tutorials <===> https://gustmees.wordpress.com/?s=oled <===> where WE created an Analog-Digital Clock and a Temperature/Humidity Monitor with “Heat-Index”. In this tutorial WE will display text on an OLED.

This is actually very easy and WE will learn also (for those who want so…) the different coding for OLEDs here below:


The wiring

Please check below how to connect the OLED SSD1306 with the Arduino NANO.

Click image, please, to access the tutorial


The libraries

You might need to add certain libraries, see below please which ones will GET needed, please.

.


IF a newbie, please check the below tutorial for the How-To:


The Coding

.

Click the image, please, to enlarge.

.

Please check ALSO this GREAT tutorial:


You can download the code here:

It’s an “OpenOffice” document, open it and make a Copy&Paste into the Arduino IDE.

.


Prices and where to order


128 x 64 Pixel 0.96 Inch I2C OLED Display


Click image, please, to enlarge.

Arduino NANO

ARDUINO NANO

Click image, please, to enlarge.


.

L’auteur Gust MEES est Formateur andragogique / pédagogique TIC, membre du “Comité Conseil” de “Luxembourg Safer Internet” (LuSI), appelé maintenant BEESECURE, partenaire officiel (consultant) du Ministère de l’éducation au Luxembourg du projet  ”MySecureIT“, partenaire officiel du Ministère du Commerce au Luxembourg du projet ”CASES” (Cyberworld Awareness and Security Enhancement Structure)..


The author Gust MEES is ICT Course Instructor, ”Member of the Advisory Board” from “Luxembourg Safer Internet” (LuSI), BEESECURE, Official Partner (Consultant) from the Ministry of Education in Luxembourg, project “MySecureIT“, Official Partner from the Ministry of Commerce in Luxembourg, project “CASES” (Cyberworld Awareness and Security Enhancement Structure).


.

Stay tuned for next blog post(s) 😉

.

..


Tags: , , , , , , , , , , , , , , , , , , , ,

First Steps with the Arduino-UNO R3 | Maker, MakerED, Coding | SMART V3.0 ROBOT CAR Kit

First Steps with the Arduino-UNO R3 | Maker, MakerED, Coding | SMART V3.0 ROBOT CAR Kit

.

ELEGOO SMART ROBOT CAR KIT V3.0

.


First impressions

Elegoo Smart Robot Car Kit for Arduino.

.

The Kit is delivered in a well organized plastic box with a poster inside of all the parts with description and a CD with the PDF Manual, Code and Libraries.

The manual in PDF format is actually very well documented an nobody should have problems to follow the instructions.

There are even the necessary tools for assembling provided, such as different screwdrivers.

.


.


Assembling and cabling

Assembling part 1.

.

.

.

First steps, assembling… Actually it isn’t that difficult, only problem encountered are 2mm screws and nuts, I will continue tomorrow with a magnifying glass and more light to handle it (OH my eyes…). There was some fight with screws and nuts ranging from 1.6mm (Ultrasonic Sensor) to 2mm (Servo fixing) where I needed to use special tools, was a bit stressing to work with such tiny things.

.

.

.

.

.

ToolsFor solving the problems encountered with the tiny screws and nuts, I used a “magnetic telescope” for the 1.6 mm nuts and a “spring-loaded tongs” for the 3 mm nuts.

The cabling was very easy and the rest of the assembling as well as it is VERY well described in the Assembling document (in PDF). Next step is to control (End-Control) again the cabling to make sure that everything is correctly connected and THEN the Coding

The documentation is available in different languages…

.

.

.

.


Charger with US plugWhen living in Europe, make sure to make your order on the national platform from Amazon, I made my order in the US and I got the charger delivered with an US plug! Amazon Germany delivers it with an “Euro Plug”! <===>

I made the End Control, checking if the connections were made right, it was.


.

Assembling part 2

.

Assembling the two black plates and the wheels was easy peasy as well…

.

ELEGOO SMART ROBOT CAR KIT V3.0

.


The Coding

Manual on CD

Click the image, please, to enlarge.

Opening the Manual NOW to proceed for the first lesson “Make the car move on [Auto-GO]”. Very easy to follow, it worked in less than 5 minutes. Unplugging the USB cable from the laptop, will it work!?

Taking the car away from the desk and putting it on the floor, switching the Power-supply on and it runs around by avoiding any obstacles while they are detected by the “Ultrasonic Sensor”, it’s FUN watching <===> Success Trying out NEXT lesson now…

The courses are made very easy: plug the USB cable to the computer, open the course in the Arduino IDE, upload it into the IDE, save it in your folder, unplug the USB cable, take the car away from the desk and put it on the floor, switch it on and enjoying…

Well, that’s a Kit which everybody can try and have success, give it a try and enjoy “Coding”, “Maker” activities…


.

GUST-AVRIL2014-800px-2L’auteur Gust MEES est Formateur andragogique / pédagogique TIC, membre du “Comité Conseil” de “Luxembourg Safer Internet” (LuSI), appelé maintenant BEESECURE, partenaire officiel (consultant) du Ministère de l’éducation au Luxembourg du projet  ”MySecureIT“, partenaire officiel du Ministère du Commerce au Luxembourg du projet ”CASES” (Cyberworld Awareness and Security Enhancement Structure). L’auteur était aussi gagnant d’un concours en électronique en 1979 ( Pays germaniques ) et voyait son projet publié dans le magazine électronique “ELO”.


The author Gust MEES is ICT Course Instructor, ”Member of the Advisory Board” from “Luxembourg Safer Internet” (LuSI), BEESECURE, Official Partner (Consultant) from the Ministry of Education in Luxembourg, project “MySecureIT“, Official Partner from the Ministry of Commerce in Luxembourg, project “CASES” (Cyberworld Awareness and Security Enhancement Structure).

The author was also a winner of an electronics contest (Germanic countries) in 1979 and got his project published in the “Electronics Magazine ELO”.

.

Stay tuned for next blog post(s) 😉..
.

.

Keywords necessary for me to create this blog post: Arduino UNO R3, coding, learning to learn, learning by doing, trouble shooting, sensors, assembling, Robot Car Kit,

.


.

.


Tags: , , , , , , , , , , , , , , , , , , , , , ,

Maker-Easy to build mini car with Battery-Holder case and motor, as also a self-made propeller

Maker-Easy to build mini car with Battery-Holder case and motor, as also a self-made propeller

.

Easy to build mini car with Battery-Holder case and motor, as self-made propeller

.


Easy to build mini car with Battery-Holder case and motor, as also self-made propeller

Battery Holder 2 x AAA

Battery Holder 2 x AA

.

.

In our last projects WE were using electronics, which is a bit more for teens up from 10 years. WE will now also create some projects where the younger ones can tinker around as well under the surveillance and guidance of coaches. Boys as well as girls like motors and cars, so WHY NOT trying to tinker a bit around with small motors. WE will use this time a battery-holder for 3 Volts (2 x 1.5 Volts AA batteries, or accumulators [BETTER]) where we fix the motor and the wheels of OUR car on it.

.

.


To make the propeller WE will use the top of a plastic bottle as it is very easy to tinker with plastic, as well as the propeller could get unscrewed and replaced by another one because of the cap. The cap will get mounted on the motor shaft and fixed with hot glue.


Two different propellers made from a plastic bottle (FANTA)

.

Two different propellers made from a plastic bottle (FANTA)

.

Two different propellers made from a plastic bottle (FANTA)

.

Check the video below please, We will use TYPE-3:

.

.

TYP: I used a hair dryer to heat the plastic and whiles heating I pushed down the propeller till it was (nearly) flat-bottomed. WHEN NOT flat-bottomed the propeller will be more as an unbalance as doing its affect as air propulsion! The mini car will jump as crazy then around; believe me I made the experience 😉


Learn more:


The components and how to fix everything

Please find below the components:

.

Components for easy to build mini car

.

First step is to prepare the wheels: the 8 caps on the right-hand side in above photo must get drilled in the middle with the same diameter as the wooden sticks you use; OR as I did by using the solder iron. Next step is to glue together 2 caps with hot glue as shown in photo below.


The wheels are made by 2 caps glued together with hot glue.

.

Cut now the drinking straws and the wooden sticks to the measure as indicated in photo below and fix the drinking straws with hot glue.

.

The measures and How-To

.

Pass the wooden shafts through the drinking straws and the drilled holes in the caps and fix them with hot glue.

.

Fix wooden shafts with hot glue

.

Upper side of the mini car

.

Prepare a piece of drinking straw from 3,5 cm and glue it on the upper side of the battery holder with hot glue, as shown in above photo. Pass through the cables of the battery holder and fix the motor with hot glue, as shown in above photo. Cut the cables to the right length and solder them on the motor.

That’s it, ONLY a bit work and a lot of fun once running; check the video below to see it in action please 😉 AWARENESS: the propeller is turning with high speed and there are sharp ends!!! DON’T touch the propeller whiles in action!!! DON’T let run the mini car WHERE persons, children and pets are around as they could get hurt by the propeller, as you can’t control the direction of the mini car!!!

.


Detailed parts list, supplier and prices

Please find below the detailed parts list as well as the supplier and the prices.

.

Item and quantity

Supplier and order number

Price

1 x drinking straw 0,10€
 1 x Sourcingmap Propeller mit Motor mit hohem Drehmoment

für Modellflugzeug, 1500–10000 RPM, 3–12 V Gleichstrom

 AMAZON 6,28€ 
1 x Bambussplittstäbe FloraSelf® 50 cm, 20 Stk HORNBACH: 7531902 1,79 € 
1 x Battery Holder case with switch (2 x AA) CONRAD:  1318437-62 2,59 €
 2 x Batteries AA à 4,49 / 2 = 2,25 € CONRAD: 658023-62 2,25 € 
  Total: 13,01 €

.

As you can see it is a very cheap project, ONLY 13, 01 € and easy to realize! ALL what YOU need is a bit time, passion and here we GO! 😉 Have FUN!

.


The tools needed

.

Tools needed for easy to build mini car

.

.


The video of our project

.

.


.

GUST-AVRIL2014-800px-2L’auteur Gust MEES est Formateur andragogique / pédagogique TIC, membre du “Comité Conseil” de “Luxembourg Safer Internet” (LuSI), appelé maintenant BEESECURE, partenaire officiel (consultant) du Ministère de l’éducation au Luxembourg du projet  ”MySecureIT“, partenaire officiel du Ministère du Commerce au Luxembourg du projet ”CASES” (Cyberworld Awareness and Security Enhancement Structure). L’auteur était aussi gagnant d’un concours en électronique en 1979 ( Pays germaniques ) et voyait son projet publié dans le magazine électronique “ELO”.


The author Gust MEES is ICT Course Instructor, ”Member of the Advisory Board” from “Luxembourg Safer Internet” (LuSI), BEESECURE, Official Partner (Consultant) from the Ministry of Education in Luxembourg, project “MySecureIT“, Official Partner from the Ministry of Commerce in Luxembourg, project “CASES” (Cyberworld Awareness and Security Enhancement Structure).

The author was also a winner of an electronics contest (Germanic countries) in 1979 and got his project published in the “Electronics Magazine ELO”).

.

Stay tuned for next blog post(s) 😉..

.

Keywords necessary for me to create this blog post: drinking straw, hot glue, motor, battery holder 2 x AA, empty FANTA plastic bottle, screwable caps from plastic bottles (CONTREX),

.

.
.

.


Tags: , , , , , , , , , , , , , , , , , , ,