Blog posts about Education, CyberSecurity, Digital Citizenship, Privacy, InternetSafety, curation, PKM, PLN, blogging, Global Collaboration, Coaching, Collaboration, eSkills, eLeadership, Coding, MakerED, MakerSpace, Social Media, How to learn, learning to learn
In this tutorial WE will use the BREAKOUT of the GROVE Pressure-Module BME280 together with a NORMAL I2C LCD1602 display, ONLY 4 wires to connect. At that moment I didn’t yet receive my ordered GROVE LCD1602 display, so the suspense was great to find out… I was curious to find out if that would ALSO work and it did with a few changes of code.
Check out the wiring below, please:
.
.
I2C LCD1602 SEEEDUINO MAINBOARD
+ 5V <======================> + 5V
GND <======================> GND
SDA <======================> SDA
SCL <======================> SCL
The Code
.
Click image, please, to enlarge.
.
Find here below, please, the Code for download in “.odt Format”:
Have fun learning with PracTICE and stay tuned for next adventures of learning 😉
.
L’auteur Gust MEES est Formateur andragogique / pédagogique TIC, membre du “Comité Conseil” de “Luxembourg Safer Internet” (LuSI), appelé maintenant BEESECURE, partenaire officiel (consultant) du Ministère de l’éducation au Luxembourg du projet ”MySecureIT“, partenaire officiel du Ministère du Commerce au Luxembourg du projet ”CASES” (Cyberworld Awareness andSecurityEnhancementStructure).
The author Gust MEES is ICT Course Instructor, ”Member of the Advisory Board” from “Luxembourg Safer Internet” (LuSI), BEESECURE, Official Partner (Consultant) from the Ministry of Education in Luxembourg, project “MySecureIT“, Official Partner from the Ministry of Commerce in Luxembourg, project “CASES” (Cyberworld Awareness and Security Enhancement Structure).
.
..
Keywords necessary for me to create this blog post: Arduino UNO R3, Arduino NANO, Grove, Grove Beginner Kit for ARDUINO, Coding, Maker, MakerED, Maker Spaces, LCD1602, BME280, Pressure, Altitude Monitor, I2C, SEEEDSTUDIO,
In this tutorial WE will use the BREAKOUT of the GROVE Pressure-Module BME280 together with a GROVE LCD1602 display. As the GROVE LCD1602 display is not included in the Grove Beginner Kit for Arduino, WE will need to buy it! Here below the address:
Connections of the GROVE BME280 and the GROVE LCD1602 on I2C BUS
.
Well, as you can see in above photo there is NO cabling!! You just need to connect the connectors from the BME280 and the LCD1602 to the I2C BUS. Less than a minute work and you are ready to upload the code, which you will find in below link:
Have fun learning with PracTICE and stay tuned for next adventures of learning 😉
.
L’auteur Gust MEES est Formateur andragogique / pédagogique TIC, membre du “Comité Conseil” de “Luxembourg Safer Internet” (LuSI), appelé maintenant BEESECURE, partenaire officiel (consultant) du Ministère de l’éducation au Luxembourg du projet ”MySecureIT“, partenaire officiel du Ministère du Commerce au Luxembourg du projet ”CASES” (Cyberworld Awareness andSecurityEnhancementStructure).
The author Gust MEES is ICT Course Instructor, ”Member of the Advisory Board” from “Luxembourg Safer Internet” (LuSI), BEESECURE, Official Partner (Consultant) from the Ministry of Education in Luxembourg, project “MySecureIT“, Official Partner from the Ministry of Commerce in Luxembourg, project “CASES” (Cyberworld Awareness and Security Enhancement Structure).
.
.
.
Keywords necessary for me to create this blog post: Arduino UNO R3, Arduino NANO, Grove, Grove Beginner Kit for ARDUINO, Coding, Maker, MakerED, Maker Spaces, LCD1602, BME280, Pressure, Altitude Monitor, I2C, SEEDSTUDIO,
As MOST of YOU know, I am an autodidact, a self-directed learner. I learn BETTER by doing it on my own, by searching my own articles, relevant to the topic which needs to get learned. Pursuing ALSO my learning by choosing the books which I decide to buy for my Professional Development! This time YOU will see a lot of “I’s” in my blog post here, different from usual, where I mostly use the WE. WHY!? Because it’s ME who is owning MY learning and I decide WHAT is BEST for me, that is working perfectly, I learn MUCH quicker! 😉
Another reason WHY I learn on my own is the BAD quality of courses around where adults are getting treated as pupils (Pedagogy) and NOT as mature persons (Andragogy)!! Aged 62 years (2017), I DON’T want to get treated as a 12 years old in courses, I won’t feel comfortable at all!! It’s about time that EDUcators, TEACHers, Instructors get training about ANDRAGOGY!
WHAT is Andragogy?
Text from Wikipedia: Andragogy refers to methods and principles used in adult education.[1][2] The word comes from the Greek ἀνδρ- andr-, meaning “man”, and ἀγωγός agogos, meaning “leader of”; it literally means “leader of man”, whereas “pedagogy” literally means “leading children”.[3]
FIRST of all, DON’T fear about learning new stuff, even if it feels strange and NOT understandable up from the beginning!There might be strange words in the learning texts which YOU don’t know YET; but by reading different texts you will understand these words and later understanding ALSO the whole! I learnt that way, it takes time on the beginning, BUT later you will learn very quickly! It’s like an exponential curve…
MUST follow names in EDUcation and also from successful people:
Howard GARDNER
Sir Ken ROBINSON
Jack MA
Daniel GOLEMAN
John HATTIE
Owning the LEARNing
Personally I am convinced and PracTICE with students, learners showed me ALSO, that when owning its learning boosts learning and even accelerates it!! The learners are more motivated to learn as they are engaged in the learning process! I did THIS MOSTLY through Curation! Learn more below please:
L’auteur Gust MEES est Formateur andragogique / pédagogique TIC, membre du “Comité Conseil” de “Luxembourg Safer Internet” (LuSI), appelé maintenant BEESECURE, partenaire officiel (consultant) du Ministère de l’éducation au Luxembourg du projet ”MySecureIT“, partenaire officiel du Ministère du Commerce au Luxembourg du projet ”CASES” (Cyberworld Awareness andSecurityEnhancementStructure)..
The author Gust MEES is ICT Course Instructor, ”Member of the Advisory Board” from “Luxembourg Safer Internet” (LuSI), BEESECURE, Official Partner (Consultant) from the Ministry of Education in Luxembourg, project “MySecureIT“, Official Partner from the Ministry of Commerce in Luxembourg, project “CASES” (Cyberworld Awareness and Security Enhancement Structure).
.
.
.
Keywords necessary for me to create this blog post: Blogging, blogs, Infographics, Text links in my article, I, ME, MY, owning MY learning, making OWN choices for learning, Curation, PKM, Knowledge Management, LEARNing2LEARN, Autodidact, Engagement, Andragogy, Heutagogy…
WHAT gifts to buy for the kids for Xmas and Holidays?
Every year the same question, isn’t it!? WHY not thinking about to buy gifts from where and with that the kids will learn? It might be good to have a look on WHAT are the skills required for the future from youth, students, learners and upon that making your choice! Actually (2020) the trends are in the maker scene and coding scene! Engineers, coding people and ICT specialists are needed, the workforce, industry is searching!!
WHAT is the Coding Scene?
Coding is THE 21st Century skill. Coding enhances creativity, teaches young people to cooperate, to work together across physical and geographical boundaries and to communicate in a universal language. Technology is part of our life, and coding brings it closer to you!
Well, I started myself years ago as a NEWBIE in Coding and so I tried out different stuff, whereby I became a fan of ARDUINO. Here below my gift selection for Christmas (Xmas) which I recommend:
While reading my above tutorials, you will find ALSO more examples in my blog about “Coding with Arduino, etc.); stay tuned for next tutorials with LEARNingByDoing with FUN and PracTICE 😉
.
.
L’auteur Gust MEES est Formateur andragogique / pédagogique TIC, membre du “Comité Conseil” de “Luxembourg Safer Internet” (LuSI), appelé maintenant BEESECURE, partenaire officiel (consultant) du Ministère de l’éducation au Luxembourg du projet ”MySecureIT“, partenaire officiel du Ministère du Commerce au Luxembourg du projet ”CASES” (Cyberworld Awareness andSecurityEnhancementStructure)..
The author Gust MEES is ICT Course Instructor, ”Member of the Advisory Board” from “Luxembourg Safer Internet” (LuSI), BEESECURE, Official Partner (Consultant) from the Ministry of Education in Luxembourg, project “MySecureIT“, Official Partner from the Ministry of Commerce in Luxembourg, project “CASES” (Cyberworld Awareness and Security Enhancement Structure).
.
.
Keywords necessary for me to create this blog post: Arduino UNO R3, Arduino NANO, Grove, Grove Beginner Kit for ARDUINO, Coding, Maker, MakerED, Maker Spaces, OLED, DHT11, Temperature and Humidity Monitor, I2C, SEEDSTUDIO, Robots, Robot car,
Once cut out you have made the BREAKOUT and in this case the two modules “OLED Display 0.96 inch” and “Temperature/Humidity” modules are ready to get connected to the main module. NOW we have to connect them through the delivered connection cables. Here below a picture:
.
.
As you can see, the OLED-Module is connected to the I2C connector, while the “Temperature/Humidity-Module” is connected to the “D3” connector. See PIC below, please:
.
.
SO WHY the “D3” connector for the “Temperature/Humidity-Module”?! Well, let us have a look on the code:
.
.
As you can see in this shown part of the code, there is marked ===> “#define DHTPIN 3“, SO it should GET connected to the “D3-connector” on the main board! If you use “D4” or whatever connector, SO you should change the code from “3” to “4” and so on!!! Give it a try and play around with it for understanding 😉
.
Temperature/Humidity on OLED Display | THE Code
Well, the two connections with the provided cables with connectors took ONLY a few seconds, ISN’T it? 😉 Let’s GO now to upload the code. Open your “Arduino IDE“, click on “NEW“, erase the few lines marked in there, make a “Copy&Paste” from the mentioned Code below and paste it in the “Arduino IDE (NEW)” and upload it, here below the code:
As you can see there is a “special” indication on the display, THE “Heat Index“, WHAT is it?! I encourage you to read my following tutorial which explains:
Have fun learning with PracTICE and stay tuned for next adventures of learning 😉
.
.
L’auteur Gust MEES est Formateur andragogique / pédagogique TIC, membre du “Comité Conseil” de “Luxembourg Safer Internet” (LuSI), appelé maintenant BEESECURE, partenaire officiel (consultant) du Ministère de l’éducation au Luxembourg du projet ”MySecureIT“, partenaire officiel du Ministère du Commerce au Luxembourg du projet ”CASES” (Cyberworld Awareness andSecurityEnhancementStructure)..
The author Gust MEES is ICT Course Instructor, ”Member of the Advisory Board” from “Luxembourg Safer Internet” (LuSI), BEESECURE, Official Partner (Consultant) from the Ministry of Education in Luxembourg, project “MySecureIT“, Official Partner from the Ministry of Commerce in Luxembourg, project “CASES” (Cyberworld Awareness and Security Enhancement Structure).
.
.
.
Keywords necessary for me to create this blog post: Arduino UNO R3, Arduino NANO, Grove, Grove Beginner Kit for ARDUINO, Coding, Maker, MakerED, Maker Spaces, OLED, DHT11, Temperature and Humidity Monitor, I2C, SEEDSTUDIO,
SEEEDSTUDIO asked me through LinkedIn to make a cooperation with them for reviewing a NEW Arduino, the “Grove Beginner Kit for Arduino” product which I accepted. Today I received the stuff which in the next days I will play around a bit and create Blog posts (Tutorials) about it, stay tuned…
FIRST impressions:
I ordered it on 28-07-2020 on the site of SEEDSTUDIO and it arrived on 03-08-2020 @02H58 PM, delivered by DHL. Actually very quick from China to Luxembourg!!
Unpacking my order:
Nice cardboard with lots of TIPS printed on it. The box is sealed with 3 circular glued plastic which I had cut through with scissors, BAD IDEA, as I damaged the cardboard while NOT knowing that the box was meant as a whole playstation as itself (see photos, please)… Here the company could improve please, thanks! My constructive critics! 😉
.
Click image, please, to enlarge.
Click image, please, to enlarge.
..
.
.
.
As long as that glued plastic problem ISN’T resolved, use a sharp cutter to cut off the glued circular plastic as I couldn’t remove it by hand!
.
Reading the online Manual
Well, NOTHING to say against it, it is well done!! Please check it here below:
There are professional STEP-BY-STEP instructions so you can’t make mistakes!!
.
Getting started
ALL you have to do is to connect the USB-Cable to the PC, Laptop, which is in the right sight of the box (see step 2 in the PIC below please) to start. [Start Text from WiKi] Grove Beginner Kit for Arduino is one of the best Arduino Beginner Kit for beginners. It includes one Arduino compatible Board and 10 additional Arduino sensors and all in one-piece of PCB design. All the modules have been connected to the Seeeduino through the PCB stamp holes so no Grove cables are needed to connect. Of course, you can also take the modules out and use Grove cables to connect the modules. You can build any Arduino project you like with this Grove Beginner Kit For Arduino. [End Text from WiKi]
.
Click image, please, to enlarge.
.
Plug and Play Unboxing Demo
The Grove Beginner Kit has a plug and plays unboxing demo, where you first plug in the power to the board, you get the chance to experience all the sensors in one go! Use the button and rotary potentiometer to experience each sensor demo!
Scroll -> Rotating Rotary Potentiometer
Select -> Short Press Button
Exit Current Demo -> Long Press Button
Buzzer and LED module are used for key prompt.
.
Some examples
Please check the pictures below:
.
Temperature/Humidity GROVE
Click image, please, to enlarge.
3
Air Pressure/GROVE
Click image, please, to enlarge.
Air Pressure/GROVE
Click image, please, to enlarge.
.
My review
Well, I can recommend this product for beginners by 100%!! Up from the beginning beginners can find out HOW things work with just plugging the USB cable to the PC, Laptop, computer. It’s a GREAT way to bring Coding to STEAM students, Maker’s, MakerED and Maker Spaces!
I didn’t yet using the Breakout possibilities, I DON’T overwhelm you with TOO MUCH information, that will GET discussed in next tutorials, BUT looks promising as NO need to plug single cables, ALL done by ONLY one connector!!!
.
Please check the videos below to understand how the GROVE System works.
Let the learners first trying the working examples in the box to discover the possibilities! Later you can make the Breakout and then they can reproduce the Coding examples such as mentioned in the online manual.
.
L’auteur Gust MEES est Formateur andragogique / pédagogique TIC, membre du “Comité Conseil” de “Luxembourg Safer Internet” (LuSI), appelé maintenant BEESECURE, partenaire officiel (consultant) du Ministère de l’éducation au Luxembourg du projet ”MySecureIT“, partenaire officiel du Ministère du Commerce au Luxembourg du projet ”CASES” (Cyberworld Awareness andSecurityEnhancementStructure)..
The author Gust MEES is ICT Course Instructor, ”Member of the Advisory Board” from “Luxembourg Safer Internet” (LuSI), BEESECURE, Official Partner (Consultant) from the Ministry of Education in Luxembourg, project “MySecureIT“, Official Partner from the Ministry of Commerce in Luxembourg, project “CASES” (Cyberworld Awareness and Security Enhancement Structure).
Social Distancing Monitor with Alarm, Arduino NANO and I2C LCD2004 Display
In previous tutorial we were using an LCD1602 display, this time we will use an LCD2004 display which gives us the opportunity to display on four (4) lines. That enables us to display more accurate text.
The wiring is exactly the same as already mentioned in previous tutorial, there is ONLY to make a few changes in the code, please check:
L’auteur Gust MEES est Formateur andragogique / pédagogique TIC, membre du “Comité Conseil” de “Luxembourg Safer Internet” (LuSI), appelé maintenant BEESECURE, partenaire officiel (consultant) du Ministère de l’éducation au Luxembourg du projet ”MySecureIT“, partenaire officiel du Ministère du Commerce au Luxembourg du projet ”CASES” (Cyberworld Awareness andSecurityEnhancementStructure). L’auteur était aussi gagnant d’un concours en électronique en 1979 ( Pays germaniques ) et voyait son projet publié dans le magazine électronique “ELO”.
The author Gust MEES is ICT Course Instructor, ”Member of the Advisory Board” from “Luxembourg Safer Internet” (LuSI), BEESECURE, Official Partner (Consultant) from the Ministry of Education in Luxembourg, project “MySecureIT“, Official Partner from the Ministry of Commerce in Luxembourg, project “CASES” (Cyberworld Awareness and Security Enhancement Structure).
The author was also a winner of an electronics contest (Germanic countries) in 1979 and got his project published in the “Electronics Magazine ELO”.
Social Distancing Monitor, Arduino NANO and I2C OLED Display
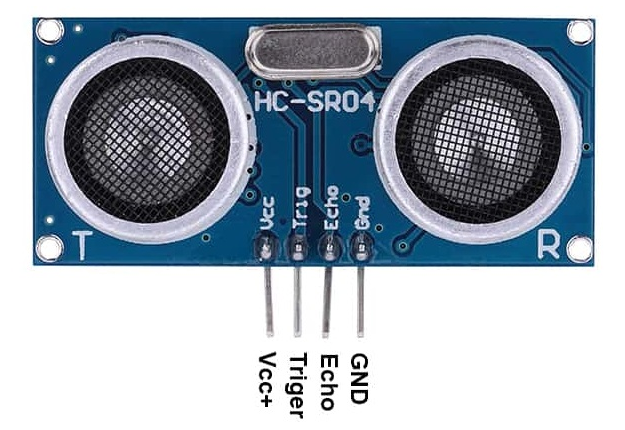
In times of the Coronavirus-Crisis (Covid_19), it might be GOOD to respect the 2 meters distance to avoid getting infected!!! But not everybody can estimate distances, nor are ALL persons respecting the 2 meters rule!!! So came the idea to build an easy to realize gadget, which measures the distance when the 2 meters are not respected.
First of all, like usual, I was searching the internet to find out if there isn’t already such a project around. And YES, there is one; I found a tutorial with an Arduino UNO with provided code as well. Please check below:
In a previous tutorial WE were already using a “Social Distancing Monitor with Alarm, Arduino NANO and I2C LCD1602 Display“, check below please for revision:
L’auteur Gust MEES est Formateur andragogique / pédagogique TIC, membre du “Comité Conseil” de “Luxembourg Safer Internet” (LuSI), appelé maintenant BEESECURE, partenaire officiel (consultant) du Ministère de l’éducation au Luxembourg du projet ”MySecureIT“, partenaire officiel du Ministère du Commerce au Luxembourg du projet ”CASES” (Cyberworld Awareness andSecurityEnhancementStructure)..
The author Gust MEES is ICT Course Instructor, ”Member of the Advisory Board” from “Luxembourg Safer Internet” (LuSI), BEESECURE, Official Partner (Consultant) from the Ministry of Education in Luxembourg, project “MySecureIT“, Official Partner from the Ministry of Commerce in Luxembourg, project “CASES” (Cyberworld Awareness and Security Enhancement Structure).
Social Distancing Monitor with Alarm, Arduino NANO and I2C LCD1602 Display
In times of the Coronavirus-Crisis (Covid_19), it might be GOOD to respect the 2 meters distance to avoid getting infected!!! But not everybody can estimate distances, nor are ALL persons respecting the 2 meters rule!!! So came the idea to build an easy to realize gadget, which measures the distance and gives an alarm when the 2 meters are not respected.
First of all, like usual, I was searching the internet to find out if there isn’t already such a project around. And YES, there is one; I found a tutorial with an Arduino MEGA and a LCD1602 ISP with provided code as well. Please check below:
This tutorial gave me the idea to start. Instead an Arduino MEGA, I used an Arduino NANO; and instead of an LCD1602 ISP, I used an LCD1602 I2C.
Thus meaning: it needs a bit to adjust the code in the sketch in the above mentioned tutorial and it’s LESS cabling, wiring needed to connect the I2C LCD1602 display.
WE played around already with I2C LCD1602 in my tutorial below, please check:
All you need now is to put everything into a case. I was choosing a cardboard (recycling) 😉
.
Social Distancing Monitor
Click image, please, to enlarge.
Social Distancing Monitor
Click image, please, to enlarge.
Social Distancing Monitor
Click image, please, to enlarge.
.
.
Stay tuned for next blog post(s) 😉
.
.
L’auteur Gust MEES est Formateur andragogique / pédagogique TIC, membre du “Comité Conseil” de “Luxembourg Safer Internet” (LuSI), appelé maintenant BEESECURE, partenaire officiel (consultant) du Ministère de l’éducation au Luxembourg du projet ”MySecureIT“, partenaire officiel du Ministère du Commerce au Luxembourg du projet ”CASES” (Cyberworld Awareness andSecurityEnhancementStructure). L’auteur était aussi gagnant d’un concours en électronique en 1979 ( Pays germaniques ) et voyait son projet publié dans le magazine électronique “ELO”.
The author Gust MEES is ICT Course Instructor, ”Member of the Advisory Board” from “Luxembourg Safer Internet” (LuSI), BEESECURE, Official Partner (Consultant) from the Ministry of Education in Luxembourg, project “MySecureIT“, Official Partner from the Ministry of Commerce in Luxembourg, project “CASES” (Cyberworld Awareness and Security Enhancement Structure).
The author was also a winner of an electronics contest (Germanic countries) in 1979 and got his project published in the “Electronics Magazine ELO”.
Valentine’s Day is around: GET creative with an LED Matrix and an Arduino!
[Start Text Wikipedia] Valentine’s Day, also called Saint Valentine’s Day or the Feast of Saint Valentine,[2] is celebrated annually on February 14. Originating as a Western Christian feast day honoring one or two early saints named Valentinus, Valentine’s Day is recognized as a significant cultural, religious, and commercial celebration of romance and romantic love in many regions around the world. [End Text Wikipedia]
A tradition worldwide around is to give flowers to his loved one, so WHY NOT ALSO a small electronic device which shows a heart on a LED Matrix?!! It is NOT expensive and gives a certain “special” feeling to your loved one 😉 And ALSO, I give you the “ready code” to start it straight on. You don’t need to create the “Heart Character” before, BUT I will give you ALSO the link to the tutorial who explains very well the How-To!
Please check below the tutorials with the wiring and the code:
All you need now is to bring it into a box for a nicer presentation and to give it as a gift to your love!
Secret tip: Use as well a LCD with scrolling text, where you can program then a special personal text message for your love. Please check my tutorial below:
Keywords necessary for me to create this blog post: Arduino UNO R3, Arduino NANO, LCD 1602, I2C Bus, coding, learning to learn, learning by doing, LED Matrix, Valentine’s Day, Character Generator for LED Matrix,
.
L’auteur Gust MEES est Formateur andragogique / pédagogique TIC, membre du “Comité Conseil” de “Luxembourg Safer Internet” (LuSI), appelé maintenant BEESECURE, partenaire officiel (consultant) du Ministère de l’éducation au Luxembourg du projet ”MySecureIT“, partenaire officiel du Ministère du Commerce au Luxembourg du projet ”CASES” (Cyberworld Awareness andSecurityEnhancementStructure). L’auteur était aussi gagnant d’un concours en électronique en 1979 ( Pays germaniques ) et voyait son projet publié dans le magazine électronique “ELO”.
The author Gust MEES is ICT Course Instructor, ”Member of the Advisory Board” from “Luxembourg Safer Internet” (LuSI), BEESECURE, Official Partner (Consultant) from the Ministry of Education in Luxembourg, project “MySecureIT“, Official Partner from the Ministry of Commerce in Luxembourg, project “CASES” (Cyberworld Awareness and Security Enhancement Structure).
The author was also a winner of an electronics contest (Germanic countries) in 1979 and got his project published in the “Electronics Magazine ELO”.
Check my #curation to find best articles, blogs and courses about #education #itsecurity #CyberSecurity #EdCollCoach #GlobalEDU #cyberbullying, #AR #RA #augmentedreality #health #science #QR #qrcodes in EN, FR, DE…
Play the FREE Game and Learn about Cyber Security and Coding
App Advisor
App Advisor helps safe-guard your personal data by telling you exactly which apps you should be cautious of, before they become a threat to your privacy.
Click image to use this free service and find out of your installed Apps are “privacy-friendly” or check new Apps before installing them!


 L’auteur Gust MEES est Formateur andragogique / pédagogique TIC, membre du “Comité Conseil” de “Luxembourg Safer Internet” (LuSI), appelé maintenant BEESECURE, partenaire officiel (consultant) du Ministère de l’éducation au Luxembourg du projet ”MySecureIT“, partenaire officiel du Ministère du Commerce au Luxembourg du projet ”CASES” (Cyberworld Awareness and Security Enhancement Structure).