.

.
Two different projects will become ONE project for Xmas
Well, in previous tutorials <===> https://gustmees.wordpress.com/2019/11/03/first-steps-with-the-arduino-uno-maker-makered-makerspaces-coding-make-objects-rotating-with-a-stepper-motor/ <===> and in <===> https://gustmees.wordpress.com/2018/04/08/first-steps-with-the-arduino-uno-r3-maker-makered-coding-scrolling-text-with-8×8-led-matrix/ <===> we learned about the how-to to make objects rotating as well as to display a scrolling text on a LED Matrix. NOW, we will combine those two for a nice Xmas decoration.
When fixing a small object there isn’t any problem, you just drill a hole of the diameter of the axis of the Stepper-Motor and fix it with hot glue or instant glue. BUT, when it comes to make rotating larger objects it will become unstable!! We need then also a larger support plate to fix the object. I used two techniques, one with a copper-plate of 0.8 mm (was still in my cellar for 30 years…) and/or a single-sided copper-Epoxy plate. Copper-plates are expensive and single-sided copper-Epoxy plates are on a less expensive price. They are about 0.65-1€/piece on Amazon.
For our Xmas project we will use a plastic star with LEDs which will get fixed the following way, check below please.
|
Single-sided Copper-Epoxy plate
Single-sided Copper-Epoxy plate Click image, please, to enlarge.
|
Single-sided Copper-Epoxy plate
Single-sided Copper-Epoxy plate Click image, please, to enlarge. |
|
|
Mounting and fixing of the Stepper-Motor
Click image, please, to enlarge. |
Mounting and fixing of an object
Support for Xmas decoration Click image, please, to enlarge. |
|
| Support for Xmas decoration
Support for Xmas decoration Click image, please, to enlarge. |
Support for Xmas decoration
Support for Xmas decoration Click image, please, to enlarge. |


As Xmas star I used one from Amazon, please check below:
Price is 14.99€, you may as well chose another one.
For the code (Sketch) please look at the following tutorial:
.
Two Projects in ONE
Once the Xmas Star fixed together with the Stepper-Motor, cabled and the the Code tested, WE fix our LED matrix with hot-glue, cabling it and running the Code for a last test:
.
|
Finished project front view.
Click image, please, to enlarge.
|
Finished project rear view.
Click image, please, to enlarge. |
|
Arduino NANO Screw Terminal
 arduino-nano-screw-terminal
|
.
 POWER BANK . .
|
|
| .
Prototype Shield for ARDUINO UNO-3 .
|
|


As a reminder, please check below for the instructions for the LED-Matrix.
.
The cabling, wiring…
.

Rotating Xmas Star with Stepper-Motor and Scrolling Text with LED Matrix
.
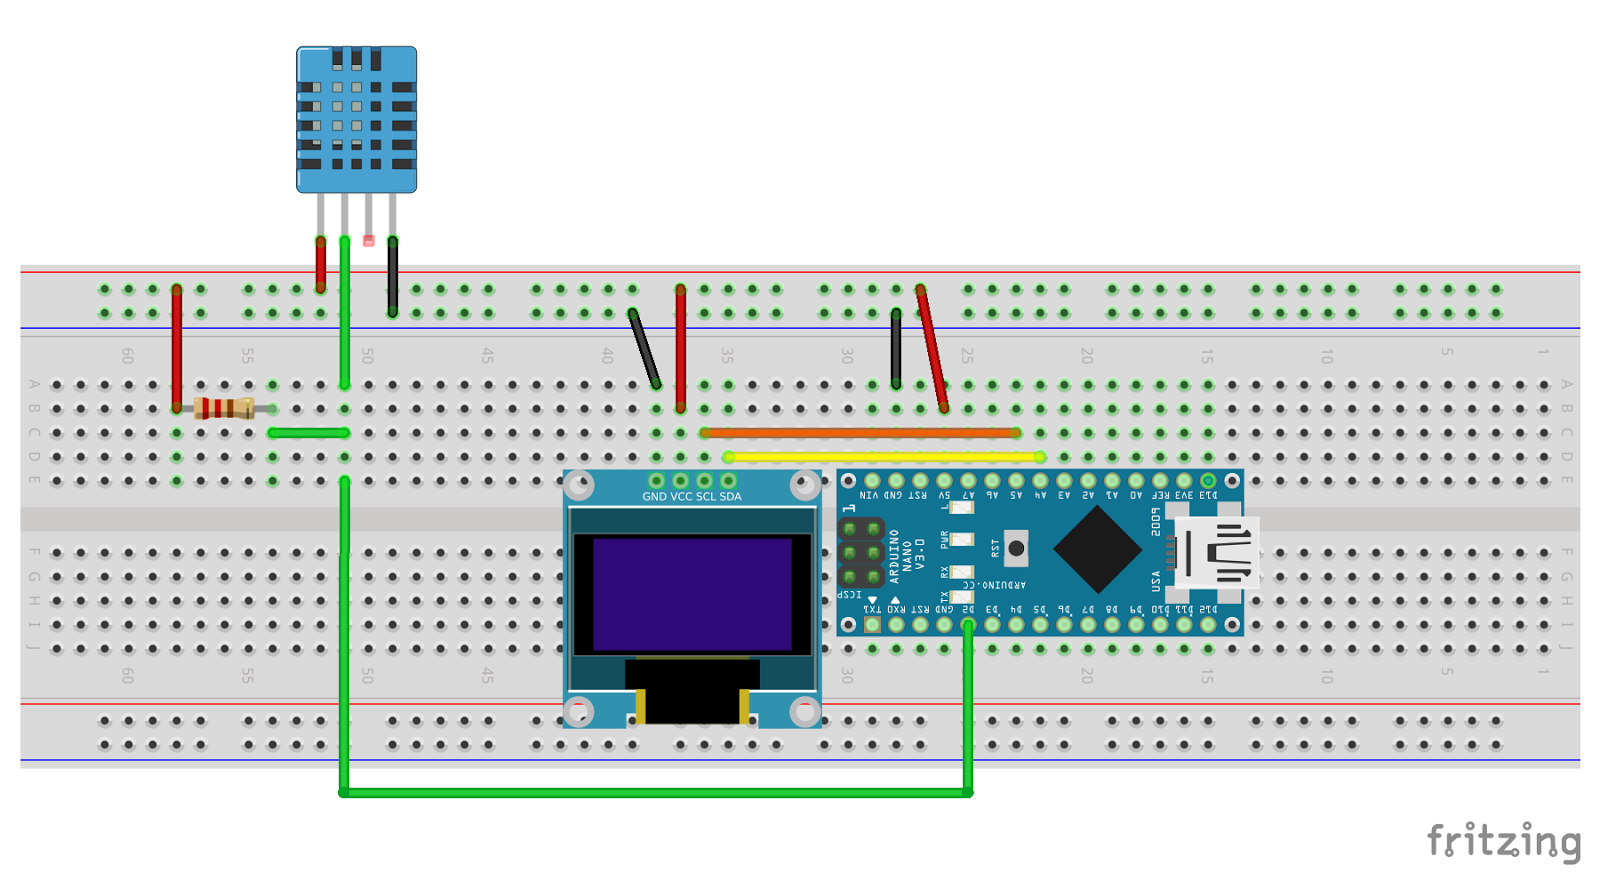
Please, check above image (photo) where you will see the How-To to implement on an easy wiring way the components.
More explanations to come, stay tuned…
..
.
 L’auteur Gust MEES est Formateur andragogique / pédagogique TIC, membre du “Comité Conseil” de “Luxembourg Safer Internet” (LuSI), appelé maintenant BEESECURE, partenaire officiel (consultant) du Ministère de l’éducation au Luxembourg du projet ”MySecureIT“, partenaire officiel du Ministère du Commerce au Luxembourg du projet ”CASES” (Cyberworld Awareness and Security Enhancement Structure).. L’auteur Gust MEES est Formateur andragogique / pédagogique TIC, membre du “Comité Conseil” de “Luxembourg Safer Internet” (LuSI), appelé maintenant BEESECURE, partenaire officiel (consultant) du Ministère de l’éducation au Luxembourg du projet ”MySecureIT“, partenaire officiel du Ministère du Commerce au Luxembourg du projet ”CASES” (Cyberworld Awareness and Security Enhancement Structure)..
The author Gust MEES is ICT Course Instructor, ”Member of the Advisory Board” from “Luxembourg Safer Internet” (LuSI), BEESECURE, Official Partner (Consultant) from the Ministry of Education in Luxembourg, project “MySecureIT“, Official Partner from the Ministry of Commerce in Luxembourg, project “CASES” (Cyberworld Awareness and Security Enhancement Structure). . |
.
Stay tuned for next blog post(s) 😉
.
.
.
.