.

.
.
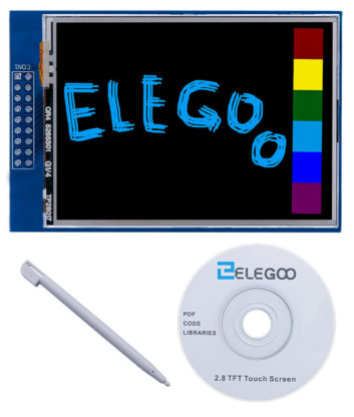 I was very happy when I got delivered that nice looking 2.8 inches TFT with incorporated SDCard. I ordered it on Amazon and it is from ELEGOO. It was delivered with a small CD where a lot of coding examples are integrated and a well done manual. SO, I started as soon as I unpacked it…
First step to do is opening the CD and reading the manual which is in PDF format… After that, chose the examples to see what is possible to do with TFT Display and the Arduino.
ALL the examples worked well…
.
.
.
.
.
.
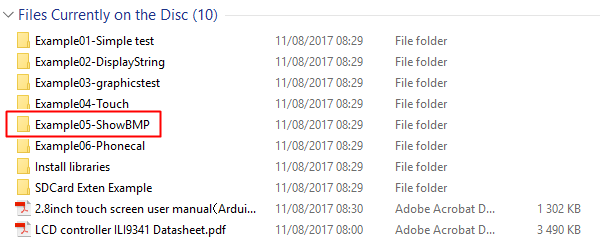
Here, below what is on the CD…
.
.
To use the SDCard to create a Slide-Show, click on “Example05-ShowBMP“, the following window will open, see below…
.
.
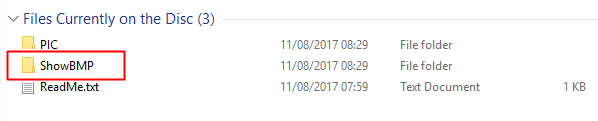
Click the “ShowBMP“, the following window will open, see below…
.

.
The used TFT uses an ILI9341 controller and the code could get downloaded from the website of ELEGOO.
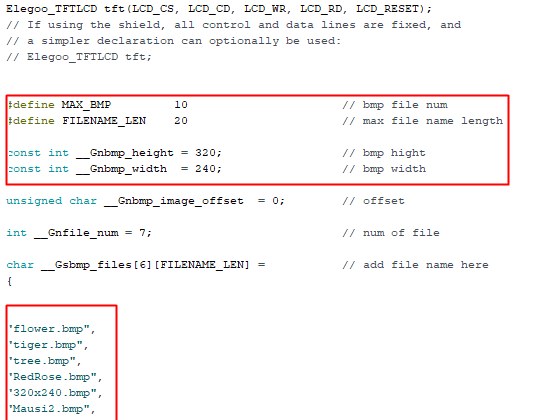
Double-click the “ShowBMP.ino” and the Arduino-IDE will open with the inserted code…
.
As I wanted to use the SDCard to create a Slide-Show, so I remixed a bit the code in the sketch and I uploaded different images to the SDCard. BUT, it didn’t work :(((
I checked the manual which says:
- The SDCard MUST be formatted first (use a NEW one as everything will get erased!!!)
- TIP: DON’T format on quick way, it DIDN’T work for me; use the full format way!!
- Images MUST be in 320 x 240 pix
- Images MUST be in Bitmap format
- Images MUST be saved as 28-bit Bitmaps
- Images name MUST be less than 20 characters
- …
Check the above mentioned in the sketch below also, please.
.
.
SO, I tried out a lot of different online image converters, I was struggling around for nearly a week as I didn’t get it working, frustration… BUT as I NEVER give up before I am on the winning side, so I was looking much more around on the internet to find the perfect solution, and I found it.
And that program is actually present on my PC, it is “Paint“: it converts (nearly) any image to the desired format so also Bitmap and THIS ALSO in 28-bit Bitmaps!! Check he PIC below, please.
.
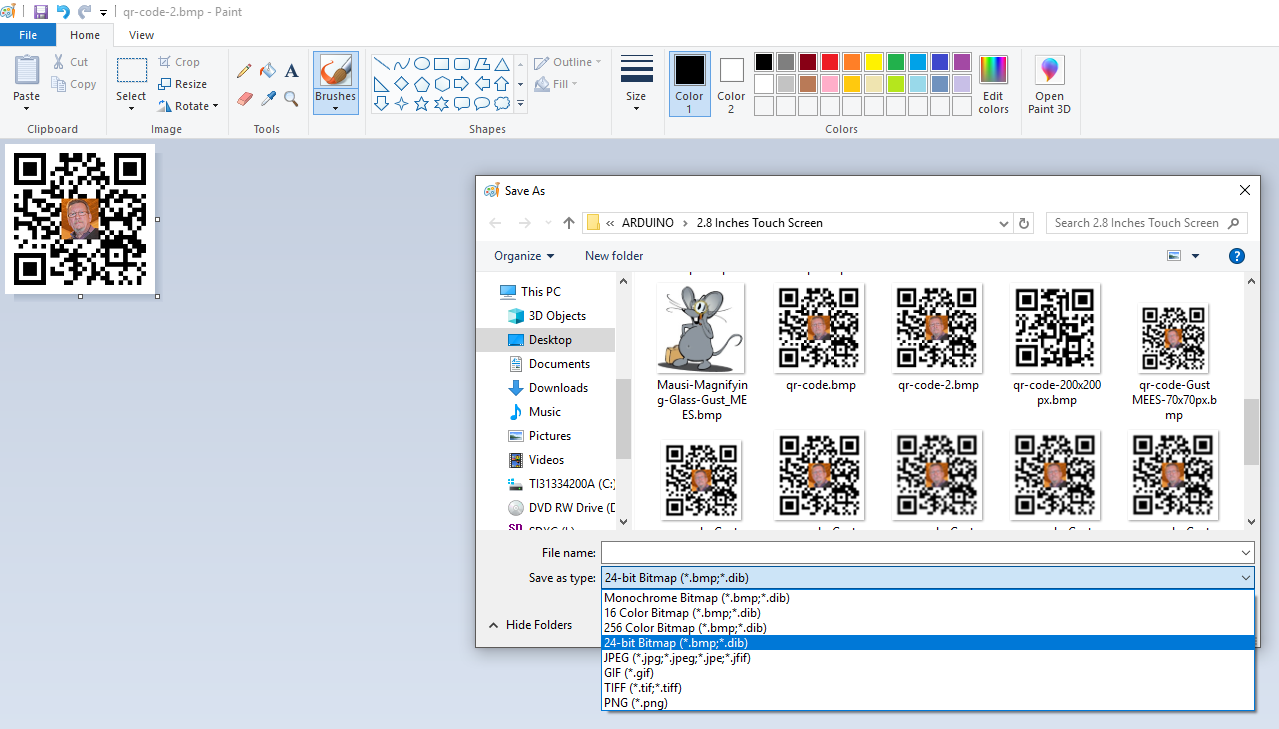
Click image please to enlarge it
.
After saving my images with “Paint” into 28-bit Bitmaps everything worked perfect, actually with unexpected GREAT quality!
SO, for that YOU, dear readers, and Newbies on “Coding“, don’t have to struggle around like me, I created this tutorial.
.
For the assembling, wiring and explication of the code, I suggest to watch this video tutorial, check below, please.
.
.
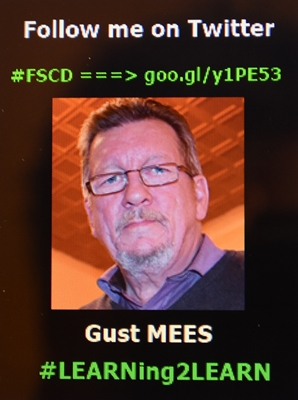 As I wanted to use the TFT display as a digital badge with slide show, I created my own images by:
- Creating a picture with exactly 320 x 240 pix and a black background
- Using PhotoScape (image editor) to insert text and photos
- Opening that created sample in Paint and saving it into 28-bit Bitmap
- Saving that sample to the SDCard and inserting it into the SDCard reader of the TFT
- Uploading the code to Arduino
- …
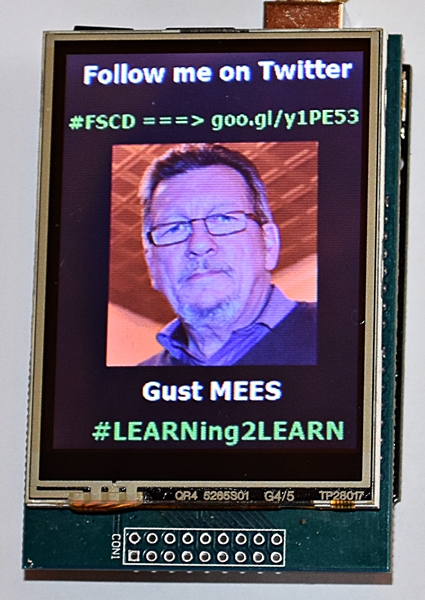
BUT, surprise, it didn’t work!??? The photo was mirrored, funny isn’t it? OK, so back again to the Photo-Editor and “Flip Horizontal“, delete the image on the SDCard and upload the new one…
Now everything is working perfectly 😉 I learned a lot with this project, especially being patient and not giving up, as well as learning more about the “Paint” program!
.
Here below how it looks on the TFT:
.
.
Let us repeat the steps:
- First prepare the images (photos)
- Images MUST be in 320 x 240 pix
- Images MUST be in Bitmap format
- Images MUST be saved as 28-bit Bitmaps
- The SDCard MUST be formatted first (use a NEW one as everything will get erased!!!)
- TIP: DON’T format on quick way, it DIDN’T work for me; use the full format way!!
- Save the images (photos) to the SDCard
- Images name MUST be less than 20 characters
- Double-click the “ShowBMP.ino” from the demo examples and the Arduino-IDE will open with the inserted code…
- Delete the images shown in the code and replace them by your own (must be the exactly name as the saved, check on the SDCard…)
- Insert the SDCard to the TFT and upload the code.
The slideshow will run, have fun 😉
The next step will be to put everything into a housing, I ordered some stuff and after I get it delivered and finished it I will update this blog to show you the result, stay tuned 😉 BTW: I will use the shown example as an electronic BADGE…
.
.
|
The author Gust MEES is ICT Course Instructor, ”Member of the Advisory Board” from “Luxembourg Safer Internet” (LuSI), BEESECURE, Official Partner (Consultant) from the Ministry of Education in Luxembourg, project “MySecureIT“, Official Partner from the Ministry of Commerce in Luxembourg, project “CASES” (Cyberworld Awareness and Security Enhancement Structure). The author was also a winner of an electronics contest (Germanic countries) in 1979 and got his project published in the “Electronics Magazine ELO”. |

.
Stay tuned for next blog post(s) 😉..
.
Keywords necessary for me to create this blog post: TFT Displays, video tutorials, Arduino UNO, Arduino Mega, Bitmaps, TFT size, Bitmaps size, 24-bit Bitmaps, Sketch, Coding, Slide-Show, SDCard, badge, Paint, image editor, photo editor,
.
.